Tuesday 24 January 2023

Spike Brewing - Oxygenation Kit - Hands on Review

In a previous post, we outlined the importance of oxygenating wort prior to pitching yeast. Adequate oxygen levels in the wort are vital to ensure that yeast are able to grow and replicate and subsequently produce the best possible flavour profile into the finished beer.

Failure to supply adequate oxygen to yeast can cause issues such as a stuck or incomplete fermentation, or lead to yeast stress which results in undesirable off flavours being generated and imparted into your beer.

It is generally accepted that the amount of dissolved oxygen required in the wort is in the range of 8-10 parts per million (ppm). It is possible to achieve 8ppm of dissolved oxygen in your wort using aeration, which is essentially forcing atmospheric air into the wort using mostly manual methods - think stirring, splashing, shaking or utilising a pond or other pump.

For most fermentations, 10ppm of dissolved oxygen is considered ideal, and the only way to achieve this level of oxygenation is by utilising pure oxygen (from a pressurised cylinder). This of course requires some specialised equipment - namely an oxygen tank and suitable gas regulator, which are typically geared more towards the welding or medical industries.

Oxygen tanks are easy to come by, however oxygen gas regulators in our experience are a little problematic. The more affordable ones either have no gauge to measure pressure, or have a gauge with a scale far too large for the relatively low volumes and pressures required to introduce oxygen to wort. This makes it difficult to determine with any level of accuracy exactly how much oxygen you're introducing into your wort.

Oxygen gas regulators used in the medical industry are more applicable as they measure and control flow rate as opposed to pressure, however they are often incredibly expensive making them cost prohibitive to homebrewers.

Milwaukee based Spike Brewing have engineered and released an oxygenation kit that gives brewers an easy to use and affordable option for oxygenating their wort to ensure the best possible yeast health and fermentation outcomes.

We got our hands on one for a review and to put through it's paces so let's take a closer look.
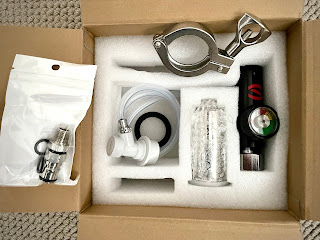
The Spike Oxygenation Kit Box Contents

Opening the box and we've got the following items included inside;

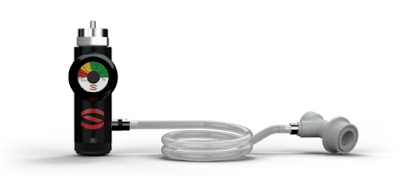
  • Oxygen regulator with attached silicone hose and gas ball lock disconnect
  • Carbonation stone in an integrated 1.5" stainless steel tri clamp housing
  • 1.5" tri clamp and seal
  • Gas ball lock post

As you can see it's an all-inclusive kit and has everything you need to get going, with the exception of an oxygen cylinder (more on that later).

The regulator itself is coloured black with an integrated gauge to show the current pressure in the oxygen tank, as well as an adjustment dial at the top where you can set the flow rate. The body feels sturdy and solid, and the adjustment dial at the top has a tactile feel as each flow rate selection is engaged.

Spike O2 Kit Regulator with pre-attached hose and gas ball lock disconnect

An integrated gauge with a coloured scale ranging from 0-600psi gives a visual indication on how much  gas pressure is left in your oxygen tank when connected to help avoid any surprises with unexpectedly running out. Time for a new tank or a refill when you hit the red zone!
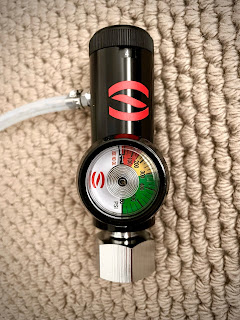
Spike O2 Kit Regulator

The silicone line and gas ball lock disconnect all come attached with stepless clamps which is great to have straight out of the box and saves some mucking around with assembly (and all but eliminates the chance of oxygen leaks from incorrectly installing or not securing clamps fully).

The carbonation stone is an optional extra (you can buy the oxygenation kit with or without the carbonation stone included), and utilises a 1.5" tri clamp connection to attach to your fermenter. This standardised connection means it can be used on any fermenter with a suitable 1.5" tri clamp port. The housing is of course made of stainless steel so is nice and shiny and looks great. The carbonation stone itself is quite long, taking up the majority of the depth of the housing it sits in, which no doubt aids in its effectiveness.
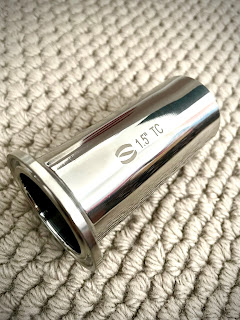
The Spike O2 Kit Carbonation Stone

If you already own a carbonation stone then you can of course attach the Spike Oxygenation Kit O2 regulator to it directly using silicone hose, or using a ball lock disconnect.

All that's left to do for assembly is attach the gas ball lock post to the carbonation stone. Spike recommend a few wraps of teflon tape around the post thread to ensure a leak free seal. Once this is done the carbonation stone is then attached to the fermenter using the previously mentioned 1.5" tri clamp and seal. It's also recommended to submerge or spray the carbonation stone with a phosphoric acid based sanitiser solution (like Star San) prior to installing in order to avoid any risk of infections being introduced by the stone. Easy.
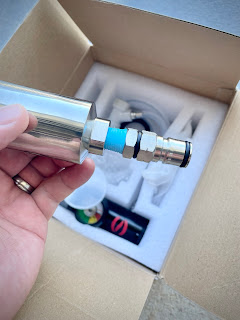
Some teflon tape around the ball lock post thread to ensure a good seal

Next, we ensure the flow rate is set to 0 on the regulator, then attach the oxygen cylinder. We sourced a Bernzomatic branded oxygen cylinder (red is the standard colour for small oxygen tanks like this) which are relatively cheap and available from most hardware stores. The thread used is a CGA600 type and this tank has a capacity of 40 grams. Designing the kit to use these small and relatively inexpensive cylinders was a great idea as it makes them easily accessible to homebrewers.
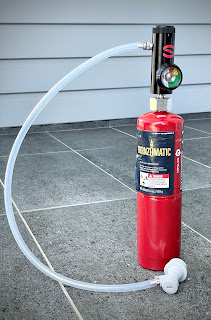
Spike O2 Kit with 40g Bernzomatic oxygen tank attached

The cylinder is screwed onto the regulator using a reverse thread (turning counter-clockwise) - you may hear some hissing from the cylinder as the regulator engages, but if you continue turning it stops quickly so the losses are negligible.

Connect the supplied ball lock disconnect to the gas post of the carbonation stone, and we're ready to go. If you have the carbonation stone installed on the end of a valve then you will need to open this valve to allow the wort to submerge the carbonation stone. Installing it on the other end of a valve in this manner is probably a good idea, as it means that after oxygenating you can shut off the valve then remove the carbonation stone - otherwise you'll have to leave the carbonation stone in place throughout the entire duration of fermentation before it can be removed and cleaned - which may be a little more involved after being covered in wort, yeast and trub for a week or two.

It's worth mentioning the timing of oxygenating your wort as well. It's important that your wort is oxygenated after your wort has been cooled down to yeast pitching temperature, but prior to actually pitching your yeast.

There are a lot of variables that determine how quickly and how much oxygen is absorbed by the wort - like gravity (sugar content) and temperature (low gravity and temperature wort will absorb gases more readily than high gravity and temperature wort), but Spike recommend a flow rate of 1/4 litres per minute (lpm) for a duration of 30 seconds per gallon of wort as a good starting point. If the flow rate is too high the oxygen will simply bubble to the surface and come out of solution rather than remaining absorbed. Too little flow rate and you won't oxygenate your wort sufficiently. If in doubt, err on the side of caution and leave it a little longer - over-oxygenating is generally considered less of an issue compared to under-oxygenating your wort.

Spike O2 Kit Regulator and Carbonation Stone

Based on Spike's recommended flow rate of 1/4 lpm, oxygenating a typical 5 gallon (19 litre) batch would mean running oxygen through the carbonation stone for approximately 2 minutes and 30 seconds - certainly much faster than any aeration method. Compare this to aerating using an aquarium pump which takes anywhere from 20-30 minutes, which at best will get you to 8ppm and you can see how much more efficient using pure oxygen with the Spike Oxygenation Kit is.

Spike estimate up to 200 gallons (757 litres) of wort can be oxygenated using one of these tanks which is further evidence of the efficiency of oxygenating with the Spike kit.

Measuring the amount of oxygen absorbed in a fluid requires the use of a dissolved oxygen meter, something we don't have access to so we're happy to heed the recommended 1/4 lpm flow rate from Spike who have done all the testing and heavy lifting on this for us. However, there are other flow rate options available on the dial too - 1/32, 1/16, 1/8, 1/4, 1/2, 3/4, 1, 1.5, 2, 3 and 4 lpm are available on the adjustment dial if you're feeling adventurous or wish to utilise different flow rate settings.

The video below gives an idea of what the oxygenation process looks like using the carbonation stone submersed in liquid. We did this test in water so it's easier to see. Even at the relatively low rate of 1/4 lpm, you can see there's a lot of bubbling activity as the oxygen passes through the carbonation stone into the water.

The carbonation stone itself isn't just a one-trick pony either. As the name suggests, you can also use the stone for carbonating as well as oxygenating. Carbonating happens after fermentation has been completed and adds the desirable fizziness to your beer. The process for carbonating is basically the same as oxygenating, except you are connecting a carbon dioxide gas source (using a carbon dioxide gas cylinder and regulator) to the carbonation stone instead of an oxygen gas source. Using a carbonation stone is a faster way of achieving the desired level of carbonation in your beer as opposed to the typical method of having to pressurise the headspace of your serving vessel (typically a keg) then waiting for the gas to be absorbed from the headspace into the beer.

Cleaning is a breeze as well. Spike recommend cleaning the carbonation stone by soaking in powdered brewery wash (PBW) or similar, followed by a warm water rinse. You can then purge the stone by connecting your oxygen (or CO2) tank to it on order to remove any residual fluid from the porous stone, followed by a quick spray of sanitiser prior to storing for next use.

Overall we think the Spike Oxygenation Kit is a great product. We like the option of being able to purchase the kit with or without the carbonation stone (in case you already have one) or wish to use a carbonation stone that doesn't feature a 1.5" tri clamp fitting. Spike providing recommended flow rates and durations for oxygenation make it simple to figure out how long you need to oxygenate for to achieve optimal results is also incredibly beneficial. We also appreciated the hose and ball lock disconnected coming attached and clamped together meaning the kit is essentially plug and play - always a bonus and all but eliminates the risk of frustrating leaks from incorrect assembly.

Currently for sale on the Spike website at US$85 for the O2 Kit (regulator and gas ball lock disconnect), and US$165 for the O2 Kit + Carbonation Stone it represents good value in our opinion. All the equipment is of the highest quality and is no doubt built to last, but keep in mind an oxygen tank still needs to be purchased separately as well to get going, plus you can also use the carbonation stone for carbonating as well as oxygenating.

You'll also need a couple of other bits and pieces to get the most out of the kit if you're using the carbonation stone. Some thread tape for attaching the ball lock post to the carbonation stone is strongly recommended, and we also recommend installing the carbonation stone onto a 1.5" valve to allow for faster and easier removal after you're done oxygenating.

There's no doubt that oxygenating your wort is a crucial part of making the best beer possible, and the Spike Oxygenation Kit provides an effective and user friendly way of achieving it, especially at the homebrewing level. In our research we struggled to find other oxygen regulators that connect to the small oxygen tanks and boast the same integrated gauge and ability to dial in the relatively low flow rate like the Spike unit does.

Unfortunately at the moment Spike only ship to the US and Canada, but we'd strongly encourage anyone interested in their products from outside these countries to reach out to them and ask when they'll start shipping to your country, or if they're working on using any local distributors. 


Related Articles


The Importance of Oxygenating Wort when Brewing Beer


Thursday 12 January 2023

Cold IPA Recipe (All Grain)

Following on from our recently published Cold IPA Recipe Creation Guide - here's our Cold IPA recipe.

Notes

As outlined in our Recipe Creation Guide, the grain bill is very simple, with around 74% being pilsner malt, and 23% being malted maize (you can use flaked maize instead). We've also added in a little bit of dextrose to help boost the OG and to promote the low attenuation and dry finish that is required for this style.

Our OG of 1.060 is right in the middle of the recommended range of 1.055 to 1.065 for Cold IPA's.

The hop combination features a new hop we haven't tried before (Mandarina Bavaria), as well as Mosaic and El Dorado. A decent charge of Mosaic at 30 minutes and another dose of El Dorado and Mandarina Bavaria at 10 minutes left in the boil provide the majority of the bitterness. There's a fairly hefty whirlpool hop addition of all 3 hop varieties to make up the remaining IBU requirements and will no doubt impart loads of other fruity, citrus and piney flavours.

Hop added during the boil and whirlpool have been specified by their IBU contribution instead of weight since the AA% of hops will vary between suppliers so this is a more reliable way to get consistent results.

Finally the dry hop comes in at around 10g/L, with an equal mix of the 3 hop varieties.

IBU's are at 55 which is slightly above the minimum 50 IBU's required for the style.

Fermentis W34/70 is the most recommended yeast for Cold IPA, and isn't one we've used before so we're looking forward to trying it - will ferment it at 18°C, slightly above the recommended range of 11-15°C. W34/70 is known to still produce clean results at these slightly higher temperatures, but also helps to reduce diacetyl and promote good attenuation to ensure we get that dry finish.

Some sort of fining agent like Whirlfloc or Irish Moss is recommended to achieve the crystal clear clarity required for the style but I haven't specified it here.

This beer is currently featured on our To Brew List and we'll be sure to update this article with a link to our brew day and tasting results once ready.

Vitals

Batch Volume: 23L 
Boil Time: 30 minutes
Brewhouse Efficiency: 75%

Original Gravity: 1.060
Final Gravity: 1.009
IBU (Tinseth): 55
BU/GU: 0.91
Colour: 7.9 EBC
Expected ABV: 6.7%

Mash

Temperature: 65c - 60 minutes
Mash Out: 75c - 10 minutes

Malts

4.8kg - Gladfield Pilsner Malt
1.5kg - Gladfield Malted Maize
0.2kg - Dextrose

Hops

30 mins - Mosaic - 20 IBU
10 mins - El Dorado - 10 IBU
10 mins - Mandarina Bavaria - 10 IBU

Hopstand 15 mins @ 80°C - Mosaic - 5 IBU
Hopstand 15 mins @ 80°C - El Dorado - 5 IBU
Hopstand 15 mins @ 80°C - Mandarina Bavaria - 5 IBU

Dry Hop - Mosaic - 80g - 3 days
Dry Hop - El Dorado - 80g - 3 days
Dry Hop - Mandarina Bavaria - 80g - 3 days

Yeast

Fermentis Saflager W34/70 (2 packets - dry)

Fermentation

18c for 14 days

Carbonation

2.4 CO2-vol

Water Profile

Brewfather "Hoppy" Water Profile

Ca2+ (Calcium): 110
Mg2+ (Magnesium): 18
Na+ (Sodium): 17
Cl- (Chloride): 51
SO42- (Sulfate): 266
HCO3- (Bicarbonate): 48


Related Articles

All Grain Recipe List

Cold IPA - Recipe Creation Guide


Wednesday 11 January 2023

Beginner FAQ: Cleaning & Sanitising - What's the Difference?

No doubt as you embark and continue on your beer brewing journey, you'll see the terms "clean" and "sanitise" thrown around quite a lot. It's no secret that cleaning and sanitation are the less glamarous but crucially important aspects of making your own beer - and although the two are closely related, it's good to have an understanding of both these key principles, how they relate to each other and what the difference between them is.

Cleaning

As the name suggests, and as most people are probably aware, cleaning involves removing dirt, debris and other foreign matter from objects and surfaces. It's no different when we're talking about brewing. All equipment used in the brewing process - from kettles, spoons, bottles, kegs, bowls, cups, thermometers, fermenters, siphons, hydrometers, and silicone tubes should all be clean - that is, have no visible signs of contaminants on them. In a nutshell, cleaning targets the dirt and foreign matter you can see.

An important consideration when cleaning beer brewing equipment is what cleaning product or chemicals you use. Powdered Brewery Wash (PBW) is a common and popular choice - we use it ourselves as it is (as the name suggests), designed for use in breweries and brewery related cleaning. It's an alkali (ie. non-acidic) cleaner so is generally safe on skin and soft metals like aluminium and stainless steel, as well as plastics and rubbers like the gaskets, seals and other pieces of equipment commonly found in breweries and homebreweries.

The major ingredient in PBW is sodium percarbonate, which can also be purchased and used as a cleaning agent on it's own. It's also a common ingredient in household laundry cleaners like Napisan.

If you want to use another sodium percarbonate based cleaner that isn't pure sodium percarbonate, or PBW, you can certainly do so, but an important thing to keep in mind is to not use any cleaners that are scented. As you could imagine, if you clean using a scented detergent some of the scented perfume used will likely remain on the surface of the object you've cleaned afterwards and then potentially leach into future brews. Lavender scented beer anyone? No, thank you.

Cleaning with PBW or sodium percarbonate products works best in warm or hot water. Be careful when cleaning delicate plastic parts like PET plastic based fermenters to not exceed the recommended temperature for fluids stored inside them - usually around 50°C. These products do work in cold water but a little more scrubbing is required compared to using warmer water. 

Speaking of scrubbing, it's also a good idea to use non-abrasive sponges when cleaning to minimise scratching, particularly when dealing with plastic parts like plastic based fermenters. Scratches, whilst being unsightly can also allow a build up of dirt and other microbes within them and can be difficult to clean (and sanitise) next time around.

Sanitising

Sanitising is the next step that needs to be done after cleaning has been completed and all the visible dirt and contaminants have been removed. Sanitising is the process of removing the contaminants that you can't see as they're at a microbial level.

If a surface looks clean, then it's ready to be sanitised, and sanitising is as simple as spraying or submerging the surface in a solution that will kill any germs or bacteria that are present. It's important that the surface is clean first, as you can't sanitise dirt.

This of course requires some special chemicals to do so, with the most popular being phosphoric acid based sanitisers like Star San. Other chemicals like iodine or bleach can also be used, but remember to avoid scented products (especially when dealing with bleach) to avoid the previously mentioned risk of scents and fragrances remaining on sanitised surfaces and leaching into your future beers.

When using bleach it's also important to remember to rinse thoroughly afterwards as even unscented bleach can leave a residual coating.

What we use, and our recommendation for other homebrewers is to use phosphoric acid based sanitisers. There are a couple of things worth mentioning and pointing out though with regards to these products.

Firstly, they are generally safe to use if you follow some simple safety precautions when using them. Gloves are a good idea as it will burn a little if you get undiluted phosphoric acid on your hands.

Also be careful not to spill or place the bottle containing the undiluted phosphoric acid on any finished hard surfaces - like benchtops as it will eat into them and leave a permanent mark/stain. Countless brewers have been caught out by this one and marked their nice stone bench tops with phosphoric acid.

When diluted though, these products are safe on surfaces and won't do any harm if coming in contact with skin. Mix up a batch in a spray bottle as a handy, ready to go option for quickly sanitising objects and surfaces on the go.

Most phosphoric acid based sanitisers are considered "no rinse" so don't need to be rinsed off with water after being used, making them fast and easy to use. Foaming sanitisers like Star San can leave quite a lot of residual bubbles and foam after being used, but there's a common saying "don't fear the foam" - it's fine to leave it there and won't lead to any problems or off flavours being imparted.

Always follow the recommended dilution rates as per the instructions on the packaging, as mixing it up too strong may lead to residual acidic smells and flavours, and mixing it up too weak may render it ineffective at sanitising.

As well as a spray bottle, you can also mix up any amount you desire in a bucket or other vessel and simply submerge whatever you need to sanitise in the solution.

Phosphoric acid based sanitisers work in as little as 30 seconds so don't need long exposure times to be effective.

Conclusion

As you can see, cleaning and sanitising are indeed very different from one another, but both are critically important to ensure you're getting the best results possible from your brewing.

Inadequate cleaning and sanitising practices can lead to an infection occurring - a concept that strikes fear into the heart of just about all brewers. This can be daunting and intimidating, particularly for new brewers, so it's important to get into the habit of cleaning and sanitising everything. 

Thankfully, the products you need to do this are affordable and readily available, so with a little care you can pretty well eliminate your risk of contamination occurring.

Remember, if it looks clean, it probably is, but it isn't sanitary until you've sanitised it. Give it a quick spray with some diluted phosphoric acid sanitiser and you're set!


Saturday 7 January 2023

Spike Brewing - All-In-One PRV - Hands on Review

Pressure fermenting has really taken off in recent years within the homebrewing community. With the abundance of affordable and quality pressure capable fermenters, it's a technique that many a brewer is adopting or considering using, particularly given the well known benefits such as the ability to ferment at warmer temperatures, and the suppression of esters and off flavours that are usually generated by yeast when fermenting at these warmer temperatures.

Working with pressure comes with some inherent risk and danger though, which is easy enough to mitigate as long as you're using equipment that is fit for purpose and setup correctly.

Two key pieces of equipment for pressure fermenting are a spunding valve and a pressure relief valve (PRV). The two are essentially safety devices and are typically used in conjunction with one another, with the spunding valve being responsible for regulating the pressure of the carbon dioxide gas created by fermenting yeast that is captured within the headspace of the fermenting vessel. The PRV is then used as a "safety net", to ensure the maximum working pressure of the fermenter is not exceeded in the event of the spunding valve failing or becoming clogged/blocked.

There are some problems and limitations with the array of spunding valves and PRV's available currently on the market though, which lead to Milwaukee based Spike Brewing coming up with a solution to address these shortcomings.

The All-in-One PRV is Spike Brewing's combined spunding valve and PRV - and with a couple of other neat features included as well, it is as the name suggests, an all in one solution for spunding and pressure relief, negating the need for separate components for each of these jobs as described previously.

We were fortunate enough to get our hands on one of the Spike All-in-One PRV's to review, so let's take a closer look at what it's all about.

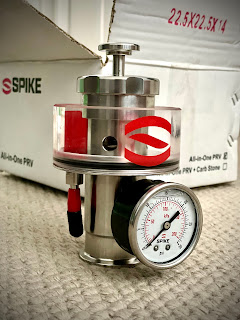
Opening the box and we've got the PRV body, with the gauge and ball lock gas packed separately and needing to be attached. The ball lock post comes with some spare seals which is a nice inclusion, but the 1.5" tri clamp and gasket/seal required to attach it to your fermenter are not included so need to be purchased separately.

Spike All-in-One PRV box contents

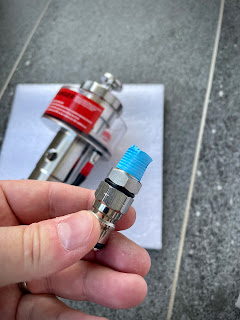
For assembly, Spike recommend wrapping the 1/4" NPT threads of both the gauge and the ball lock gas post with some pipe/teflon tape and tightening with a wrench or spanner to ensure a good seal and leak free operation. We used some blue tape as you can see below and after attaching both components we had zero leaks.

Thread tape around the gas ball lock post prior to installing

Thread tape around the gauge thread prior to installing

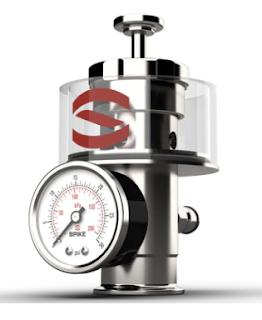
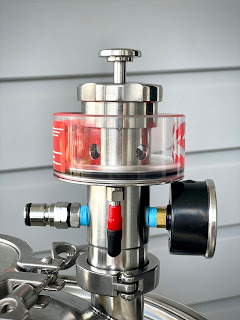
You can see straight away the design is made almost entirely of stainless steel, giving it a sturdy look and feel and a nice weight to it. It's compact, looks great, and boasts plenty of well thought out features. 

At the base of the All-in-One PRV we have a standard 1.5" tri-clamp connection meaning it's compatible with any 1.5" tri-clamp ferrule - a common feature on almost all pressure capable fermenter lids, so you can use it on any fermenter lid with a 1.5" opening, not just those made by Spike.

On the front we have a pressure gauge, with a ball lock gas post on the opposing side of the main body with both being connected using a 1/4" NPT thread.

There's an integrated cup for filling with sanitising solution and a drain port for easy drainage/removal of said sanitising solution.

Finally at the top there's an adjustment knob as well as a quick release plunger for quick and easy venting of pressure.

That's a lot to pack into a single unit, and there isn't another PRV or spunding valve currently on the market that boasts all these features. Let's go through them all now in a little more detail.

The Spike All-in-One PRV fully assembled

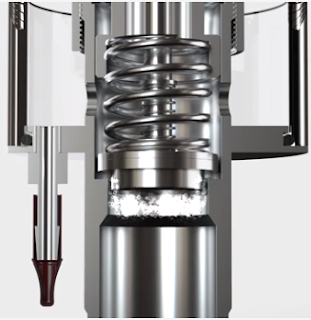
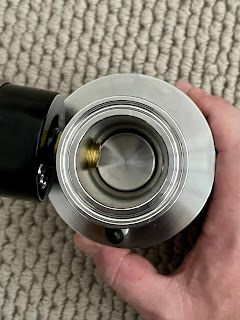
First we have the large 1.5" opening that is used for coupling the PRV to the fermenter lid. Although 1.5" tri-clamp PRV's are not new, there aren't any that feature the same large diameter port opening where the diaphragm resides as the Spike All-in-One. Spike intentionally made this port and diaphragm as large as possible to all but eliminate the possibility of the port becoming blocked or clogged, or the diaphragm/spring becoming stuck by krausen or hop debris making it's way in there.

Cross section of the Spike All-in-One PRV showing the large opening and diaphragm style design

Clogging is a major risk when looking at some of the spunding valves and PRV's available that feature smaller port openings, but especially on those that utilise spring and poppet designs or connect to the fermenter using ball lock disconnects which also leverage a spring and poppet design.

Under side shot showing the large diameter diaphragm

The nature of spring and poppet designs is that the surface area of the poppet is quite small, meaning they can be easily blocked which is particularly problematic if you have a spring and poppet based spunding valve working in combination with a spring and poppet based PRV. Since both your spunding valve and PRV are typically situated on the lid of the fermenter, if a large krausen were to occur that reaches that high up, then there's a good chance that both could become blocked and result in no way for gas to escape and lead to an excessive and unregulated build up of pressure in the fermenter. Such an event would inevitably be catastrophic for the fermenter.

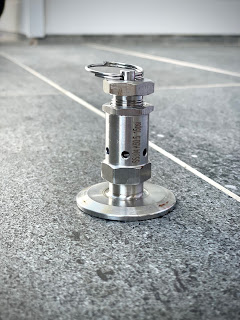
An example of a 1.5" PRV

1.5" PRV with small opening that can be easily clogged/blocked

The small surface area of poppets results in them having quite a large hysteresis too - meaning the difference in the amount of pressure required to open and then subsequently close the poppet are quite far apart. This in turn results in less accurate regulation of pressure when compared to diaphragm style designs like the Spike All-in-One PRV has.

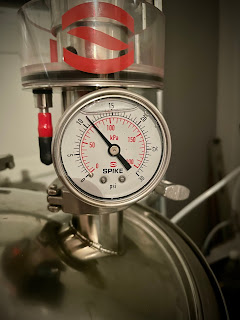
The large format pressure gauge reading from 0-30psi is also a great inclusion. The large face and crystal clear increments and numbers allow you to accurately determine and set the amount of pressure being controlled by the All-in-One. Many spunding valves have small format gauges built-in which are good for giving an indication that pressure exists but are not known for being easy to read or particularly accurate at measuring exactly how much pressure there is. 

The included pressure gauge is a great size, liquid filled and crystal clear

The Spike gauge is liquid filled too, meaning it's more robust and better able to deal with pressure spikes, humidity and moisture without wearing out the delicate gauge components.

All the other 1.5" PRV's we've seen available don't have an integrated gauge either, meaning a separate gauge needs to be purchased and attached to the fermenter by using an additional 1.5" port on the fermenter or by connecting "T" or "Y" style adapters to allow multiple items to be connected to a single 1.5" opening - adding complexity and cost.

Complexity by adding multiple attachments off single ports is rarely a good idea, especially when you start adding shut off valves into the mix. Inadvertently putting your PRV on the wrong side of a closed valve renders it useless and is a sure way to over pressurise your fermenter.

The integrated ball lock post is a great inclusion

An integrated ball lock gas post is another key feature that allows a gas source to be connected directly to the All-in-One so that pressure can be added back into the fermenter. This is useful if you like to add positive pressure to the fermenter head space at the beginning of fermentation after pitching your yeast, or for performing pressure transfers from your fermenter. Where you would otherwise have to remove your spunding valve if attached to the gas ball lock post before you could connect your gas source, having the gas ball lock post integrated on the PRV negates this and is a simple yet clever idea to make the brewers life that little bit easier and simpler.

Next up we have a reservoir designed for filling with sanitising solution (such as Star San) which means the All-in-One essentially acts like an old-school air lock. As pressure within the fermenter causes the diaphragm to move, gas will escape out through the vent holes and then pass through the sanitising solution to the atmosphere. This creates a bubbling effect giving a crystal clear visual indicator of yeast activity within the fermenter, but also prevents any airborne microbes or other contaminants from entering the fermenter through the vent holes whilst they're open.

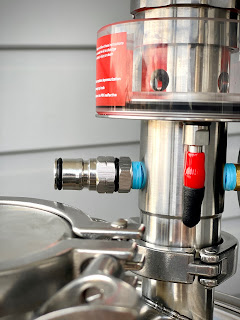
There's also a drain hole with a red and black silicone cap over it that can be removed to quickly and easily drain the solution cup without having to disconnect and remove the All-in-One from the fermenter. The diameter of this drain port has been intentionally made quite small so a length of silicone tubing (1/4" or 6mm internal diameter) can be quickly attached to make draining as mess-free as possible. Alternatively you could just stick a glass directly underneath to drain into, but you'd need to be quick and the space between the drain port and the PRV is a little tight. 

The black part of the silicone cap is textured as well, allowing it to be more easily gripped for quick removal without slipping through your finger tips. Little details like this really highlight the level of thought and attention to detail that has gone into engineering this design.

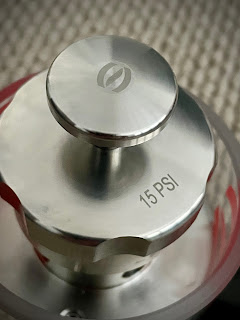
The adjustment knob on the top of the main body is used to adjust the set pressure for the All-in-One. Turning it clockwise will increase the set pressure, and counter-clockwise will reduce the pressure. When fully tightened in the clockwise position, the PRV will vent at 15psi which is the maximum rated working pressure for Spike pressure capable fermenters, as well as many other brand stainless pressure fermenters. 

This maximum pressure setting of 15psi is another reason why this unit is a true "All In One" as it negates the need for a secondary "safety net" PRV like what is required with other spunding valves that can be tightened or fully closed off, which if left unchecked could allow the maximum rated working pressure for any pressure fermenter to be exceeded.

There aren't any graduation markings when adjusting the pressure either to give you an indication of what pressure the All-in-One PRV is currently set at. This is because Spike recommend to using the integrated gauge when calibrating/setting the pressure as it will provide more accurate results.

Spike All-in-One PRV - adjustment knob and quick release plunger

At the very top of the All-in-One we have the quick release plunger which allows for some or all of the pressure within the fermenter to be rapidly purged. This is a great way to quickly ensure your fermenter is safe to open and avoid lids, caps and clamps flying off and causing injury or damage - simply press the plunger prior to undoing anything to be certain the vessel isn't currently pressurised. Depressing the quick release plunger requires minimal force to operate which is great, especially compared to other PRV's that utilise a pull type mechanism where you have to pull against the full force of the spring to open the valve for quickly venting pressure. A word of warning though - make sure the sanitising solution has been removed from the cup prior to depressing the plunger or you'll end up with sanitising solution everywhere, as the plunger opens the same venting ports used during normal operation. As you could imagine, any amount of pressure being rapidly vented through whatever liquid is in the sanitiser cup will result in a lot of spray and mess.

Cleaning is simple too, with only the gauge needing to be removed before the entire PRV unit can be submerged in your cleaner of choice like powdered brewery wash (PBW) and/or sanitising solution. Another huge benefit of the stainless steel construction compared to plastic is it's resilience to withstanding the harsh chemicals sometimes used in breweries, which can often cause discoloration or brittleness in plastic components like with other PRV's or spunding valves.

At approximately 16cm in height, the All-in-One PRV does add a bit of height to the fermenter when attached, so it's worth double checking you've got the vertical clearance if you're using a fermentation chamber or fridge that is tight on space

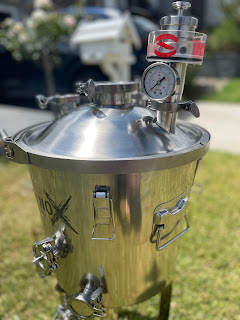
The Spike All-in-One fitted to our Nano-X Fermenter

Currently retailing on the Spike Website for US$150, it's certainly more expensive than many of the other PRV and spunding valves available on the market. We feel this can be easily justified though, given the premium stainless steel build quality and rich feature list. By the time you bought a standard 1.5" PRV, tee piece(s), gas ball lock post and large faced gauge and put them together with clamps and seals, you'd be unlikely to do it for less than the cost of the Spike All-in-One, and it certainly wouldn't look as nice, or be as compact.

Let's also not forget that you're using your PRV and potentially spunding valve to not only pressure ferment your beer, but also protect the significant financial outlay you've made for a quality pressure capable fermenter to ensure you don't damage it by over-pressurising it.

Unfortunately at the moment Spike only ship to the US and Canada, but we'd strongly encourage anyone interested in their products to reach out to them anyway - we've found them great to deal with and would strongly recommend the All-in-One product to any homebrewer in the market for such a device.


Related Articles


What Pressure Should I Pressure Fermenent At?