Friday 25 February 2022

KegLand Digital Illuminated Mini Gauge - Review

We recently purchased this Digital Illuminated Mini Gauge (KL18388) to replace the analog mini gauge that came in our blowtie spunding valve.

The old style analogue gauges are known to be somewhat inaccurate, and KegLand themselves state that they are accurate to 10% of the entire pressure range. So for our factory fitted 0-15psi it would be accurate to within +\- 1.5psi.

Digital Illuminated Mini Gauge fitted to our Kegland Blowtie Spunding Valve

The new digital mini gauge has a working range of 0-90psi and boasts some other cool features such as;

  • Battery powered with expected battery life of more than 2 years (if gauge is used/powered on once per day)
  • Auto power off for battery saving (turns off after 15 seconds)
  • Back lit display for easy reading in poor light environments
  • Ability to change display units between psi, kpa and bar
  • Can be used in the blowtie spunding valve, mini inline regulator or core 360 mini regulator products
  • Measuring gas pressure only, not suitable for liquids

Fitting the gauge was simple enough - though we did have some difficulties getting the old analog gauge out of the blowtie spunding valve housing. Gently trying to lever it out with a screw driver led to something being damaged within the analog gauge so it now reads at around 5psi when there is no pressure applied to it - we're not too concerned though since we don't plan on using it again. If you're trying this yourself, we suggest removing the yellow adjustment handle from the blowtie then tapping the spunding valve upside down on a hard surface to get the old gauge out.

Our KegLand Blowtie Spunding Valve with the old analog gauge fitted

The new gauge fits into the blowtie really snugly and is secured in place with 2 screws on opposing corners of the gauge (which were provided with the gauge). A fair amount of torque was required to get the screws threaded and tightened but once done up it sits nice and neatly in the housing.

There are two buttons on the face of the gauge. A red button to power the gauge on and off, and a yellow button that with a single press, toggles between psi, kpa and bar scales for readings - and if held for a couple of seconds, triggers the green back light. The gauge automatically powers off after 15 seconds to help preserve battery life.

A quick test by connecting the gauge to one of our pressurised kegs gave what appears to be a highly accurate reading of just over 10psi, which matches pretty closely what our gas regulator was reading for the same keg.

Testing the accuracy of the digital gauge by connecting to one of our pressurised corny kegs

CO2 regulator pressure reading for the same keg also indicates a similar reading of just over 10psi

Early indications are very promising with the accuracy shown with this simple test. Given how largely inaccurate we've found our factory fitted analog spunding valve gauge to be, we certainly consider this to be a worthwhile upgrade.

One potential improvement could be a single button press to power on and light up the display at the same time. At the moment the gauge must be powered on by pressing and holding red button for a second or two. In low light situations, you then need to press the yellow button for several seconds to activate the backlight. From the off/sleep mode, perhaps a single press of the yellow button could power on the gauge and activate the back light at the same time?

This digital gauge can also be used in other applications such as the KegLand mini inline regulator or the Core 360 mini regulator. There is also a similar looking gauge available that is Duotight compatible that can be fitted into a gas line T-piece or similar to achieve the same results - eg. for those with previous model spunding valves that don't have the integrated gauge.

The digital illuminated mini gauge we purchased for fitting into our blowtie spunding valve is available from the Kegland Website. We're already looking forward to using our blowtie spunding valve on our next brew to see how it performs and reads during a pressure fermentation.


Related Articles


Monday 21 February 2022

How to Dry Hop in a FermZilla All Rounder

The FermZilla All Rounder is a relatively simple, yet versatile pressure capable plastic fermenter. It's popularity is largely due to it's simple design, especially in comparison to it's more complicated brother, the FermZilla Conical.

This means that when it comes to dry hopping your beer your options are somewhat limited. This isn't necessarily a bad thing though - sometimes the simplest way is the best way.

We've tried doing dry hopping by removing one of the carbonation caps on the lid of the FermZilla, but found the hole just isn't big enough for the hop pellets to fall through easily, causing them to clog the hole that then needs to be cleared by either poking them through the hole, or gently shaking the fermenter. Neither option is particularly ideal. KegLand even have a ball valve attachment that can connect to one of these PCO1881 threads on the lid of the FermZilla. The theory behind this contraption is great, but the general consensus among veteran All Rounder users is the same. It just doesn't work and it clogs as the hole just isn't big enough.

When it comes to dry hopping in your FermZilla All Rounder, we'd recommend using one of the following two methods;

1. Unscrew the lid and add the dry hops via the main opening at the top of the fermenter.

As mentioned above, sometimes the easiest way really is the best way. Brewers in general have two major fears - oxidation and infection. We get it - opening the lid of your fermenter can be scary and nerve racking - it opens you up to both of these potential issues that can quickly ruin your batch of beer. In our experience though, it just doesn't happen. Especially if you're careful.

If you're fermenting your beer under pressure, bleed all the pressure by pulling the pressure release valve (PRV), or alternatively open your spunding valve for a more gentle method of slowly releasing the pressure. Note that pulling the PRV and causing a rapid drop in pressure can cause a krausen 'volcano' that causes the krausen to rise suddenly and aggresively, sometimes all the way to the lid opening. So if you're dry hopping during active fermentation we'd recommend gently bleeding the pressure using your spunding valve to try and avoid this. Once you've bled all the pressure, (or if you're not fermenting under pressure), remove the lid and sit it to the side of the opening (see the video below for an example). We can reduce the risk of any contamination by not removing the lid and dip tube completely.

Remember, carbon dioxide (CO2) which is produced during active fermentation is more dense than regular air/oxygen, so it will naturally settle to the bottom as a 'blanket' of CO2 sitting on top of your fermenting beer acting as a layer of protection. If you don't move your fermenter there is no reason why this air would be disturbed.

Dry Hopping in the FermZilla All Rounder

Pour your hops in via the top and re fit the lid. As another layer of protection we can then apply some CO2 pressure back into the fermenter then 'burp' it a few times by quickly pulling the PRV. Remember, CO2 is more dense than oxygen so carbon dioxide will settle to the bottom and any trace amounts of oxygen will be at the top and will be vented via the PRV when you pull it. Repeat this 2-3 times and you're set.

This is the method we've used many times for dry hopping our beers, and we have never had any issues with oxidation or infection.


2. Attach a hop sock (or similar) to the inside of the fermenter (above the fermenting beer) and secure with magnets

This isn't a method we've used ourselves, however if you insist on not wanting to open your fermenter to dry hop then this option is for you.

Before filling your fermenter with wort, or immediately after filling (and before fitting the lid), place your dry hops into a hop sock along with a magnet (make sure you sanitise the magnet and use a food safe option to avoid any contamination/off flavours from being introduced).

Place the hop sock on the inside wall of the fermenter as high towards the opening as possible and secure with another magnet on the outside of the fermenter (to hold it in place).

When you're ready to dry hop, simply remove the magnet from the outside of the fermenter which will cause the hop sock to drop into your fermenting beer. 


Have you dry hopped in your All Rounder using one of these methods, or is there another method you prefer to use? Let us know in the comments below.

Update - 14/3/22 

KegLand have developed and will soon be releasing a "Hop Bong" that can be used for oxygen free dry hopping in your FermZilla All Rounder. Check out our blog post on the Hop Bong - what it is, how it works and what else you'll need to go with it for dry hopping in your FermZilla All Rounder


Related Articles


Tuesday 15 February 2022

Bentspoke Brewing Co - Crankshaft IPA - Beer Review

Review Date: 14/2/2022
Brewery Name: Bentspoke Brewing Co (Braddon, ACT, Australia)
Beer Name: Crankshaft IPA

"Similar to a West Coast IPA. Floral nose with notes of citrus and pine. Medium bodied with a nice punch of hops and a solid malt finish. Crankshaft won a silver medal at the 2017 International Brewing Awards. A great beer for lovers of big full flavoured brews - it cranks! Crankshaft was the highest ranked IPA in the GABS Hottest 100 Aussie Craft Beers Poll for 2018, for the second year in a row."

Bentspoke Brewing Co - Crankshaft IPA Can

General

Alcohol By Volume (ABV): 5.8% (Standard)


Label/Design: 8/10

Serving Style: Can

Region of Origin: Pacific (Australia, New Zealand)

Style Family: IPA

Malts/Adjuncts: Unknown

Hops: Ekuanot, Simcoe, Citra, Centennial

IBU's: 35

Appearance

Colour: Deep Gold


Clarity

Brilliant Clear Slight Haze Hazy

Collar of Foam & Head Retention

None 

Poor
(Up to 15 secs)

Moderate
(15 - 60 secs) 

Good
(more than 60 secs)


Foam Texture

N/A Thin Fluffy Mousse-Like

Carbonation (Visible)

None Slow Medium Fast-Rising Bubbles

Alcohol Aroma

Not Detectable Mild Noticeable Strong Harsh

Aroma & Flavour

Esters Aroma: None
Phenols: None


Alcohol Taste:

Not Detectable Mild Noticeable Strong Harsh

Hop Pungency:

Mild Moderate Strong Extreme

Hop Bitterness:

Restrained Moderate Aggressive Harsh

Malt Sweetness:

Low Medium High Cloying
(Excessive)

Astringency: 

Low Medium High

Palate/Mouthfeel: 

Light Bodied
(Thin/Watery)
Medium Bodied
(Light + Full)
Full Bodied
(Round, Rich & Creamy)

Palate Carbonation: 

Low Medium High

Length/Finish:

Short
(Up to 15 seconds)
Medium
(15 to 60 seconds)
Long
(More than 60 seconds)


Oxidative/Aged Qualities: None

Bentspoke Brewing Co - Crankshaft IPA in the Craftd Alpha glass

Overall

Drinkability: 9/10

Overall Impression: 9/10

Notes

It's easy to see why this is Gabs #1 rated beer for 2021 and has won countless other awards in the past. It's just so likeable and easy to drink. Loads of hop presence, with a moderate bitterness but it doesn't linger too long or leave a lasting bitterness on the palate like a lot of other IPA's do. Medium/light mouthfeel and a decent dose of alcohol makes it a well balanced package. Fruit notes across the spectrum from citrus to tropical fruit with a really nice neutral finish. If you haven't tried this one yet then do yourself a favour and do so - you won't be disappointed.


Sunday 13 February 2022

Nomad Brewing Co - Rollin Haze - Hazy Pale Ale - Beer Review

Review Date: 12/2/2022
Brewery Name: Nomad Brewing Co (Brookvale, NSW, Australia)
Beer Name: Rollin Haze - Hazy Pale Ale

"Get rollin' with this hazy pale ale from award-winning Nomad Brewery. Loaded with oats for the haze and left unfiltered for extra flavour and a soft creamy mouthfeel. Southern Hemisphere hops are featured in this pale with the use of Galaxy, Nelson Sauvin and a new experimental hop to give a combination of citrus, gooseberry and tropical fruit aromas."

Nomad Rollin Haze Hazy Pale Ale can

General

Alcohol By Volume (ABV): 4.6% (Standard)


Label/Design: 9/10 - very cool 

Serving Style: Can

Region of Origin: Pacific (Australia, New Zealand)

Style Family: Pale Ale

Malts/Adjuncts: Oats

Hops: Galaxy, Nelson Sauvin, New "experimental" hop

IBU's: Unknown

Nomad Brewing - Rollin Haze Hazy Pale Ale Can Notes

Appearance

Colour: Pale Straw


Clarity

Brilliant Clear Slight Haze Hazy

Collar of Foam & Head Retention

None 

Poor
(Up to 15 secs)

Moderate
(15 - 60 secs) 

Good
(more than 60 secs)


Foam Texture

N/A Thin Fluffy Mousse-Like

Carbonation (Visible)

None Slow Medium Fast-Rising Bubbles

Alcohol Aroma

Not Detectable Mild Noticeable Strong Harsh

Aroma & Flavour

Esters Aroma: None
Phenols: None


Alcohol Taste:

Not Detectable Mild Noticeable Strong Harsh

Hop Pungency:

Mild Moderate Strong Extreme

Hop Bitterness:

Restrained Moderate Aggressive Harsh

Malt Sweetness:

Low Medium High Cloying
(Excessive)

Astringency: 

Low Medium High

Palate/Mouthfeel: 

Light Bodied
(Thin/Watery)
Medium Bodied
(Light + Full)
Full Bodied
(Round, Rich & Creamy)

Palate Carbonation: 

Low Medium High

Length/Finish:

Short
(Up to 15 seconds)
Medium
(15 to 60 seconds)
Long
(More than 60 seconds)


Oxidative/Aged Qualities: None


Nomad Rollin Haze Hazy Pale Ale in the Craftd Alpha glass

Overall

Drinkability: 7/10

Overall Impression: 7/10

Notes

Not as hazy as the name would have you believe. The can label is very cool and demands to be seen. It practically jumps off the shelf and into your hands. Nelson Sauvin hops give such a unique flavour and mix well with Galaxy and whatever this 'experimental' hop they used as well. The body is light in colour and mouthfeel with medium fizz. A nice and welcome change from the typical tropical fruit pale ales with some unique hop flavours combining for a fairly short, yet refreshing finish. ABV is relatively low at 4.6% meaning you can put a few of these bad boys away without feeling too woozy.


Wednesday 9 February 2022

KegLand Duotight Push In Fittings - Review

Duotight is a range of push in fittings for gas and liquid connections often used in home brewing keg/draught system setups (kegerators) for connecting beer and CO2 gas lines to and from regulators, kegs, taps and other bits of equipment. The range was first released by KegLand in 2018, with a design update/revision in 2020.

They are made using an engineering grade of plastic called polyoxymethylene (also known as POM or Acetal) and allow hoses for gas and liquid (usually beer) to be quickly and easily disconnected which is often a requirement in home brew setups - as systems are disassembled for cleaning, new components are added, rearranged, or other problems are troubleshooted. The fittings all include a small 'collar' that when pressed allows the beer/gas line connected into the fitting to be removed. They aim to be a much more convenient, faster, and reliable method of making connections when compared to the previous standard of hoses being fitted over barbs and then clamped with stepless clamps or other varieties of hose clamps. All the fittings are rated to 100psi of pressure, and use a special dual O-ring design to ensure a leak free seal.

There are a large variety of fittings and applications, such as connecting gas and liquid lines to quick disconnects, but there are also options for one way 'check' valves, in-line ball valves that can be turned on/off, T-pieces for splitting one connection into two, 90 degree elbows and double ended female connectors to combine/join two beer/gas lines together.

We've been using KegLand Duotight push in fittings for our home made kegerator setup for some time now and wanted to share and outline are experiences. The Duotight range has mixed opinions on homebrew discussion groups as to their reliability and susceptibility to leaks with some swearing by them, and others vowing never to use them again after poor experiences.

In our setup we use the following Duotight connections;

  • KL06880 - 8mm x FFL (to fit MFL disconnects) - screw on thread to fit gas and liquid disconnects as well as the gas outlet hose on our gas bottle regulator

    KL06880 - 8mm x FFL (to fit MFL disconnects) 

  • KL07481 - 6.5mm x 8mm reducer - used to connect liquid line to our Pluto Dispensing Gun

    KL07481 - 6.5mm x 8mm reducer on pluto gun

  • KL02387 - 8mm female x 8mm female double tee piece - used to "T" our gas line to connect multiple kegs

    KL02387 T Piece for splitting gas line

  • KL06903 - 8mm female x 5/8" female thread - screw on thread to fit liquid line to tap shanks
KL06903 - 8mm female x 5/8" female thread - screw on thread to fit liquid line to tap shanks

When we were initially setting up and installing our Duotight fittings, we did experience some issues with leaking, however we soon discovered the cause of the leaks was due to us not installing them correctly. The leaks solely occurred on our push in fittings connected to MFL threads (ie. our liquid and gas disconnects) and turned out to be caused by the Duotight fittings not being tightened enough on the threads.

Thankfully, KegLand have a document available with clear instructions on how the Duotight fittings should be fitted and tightened on MFL threads. The nature of the Duotight design means a small amount of compression is required for the fitting to seal properly. Tightening by hand is not sufficient as we discovered, and explains why the threaded side of the fitting has the hexagonal shape to allow a spanner/shifter to tighten it. In short, after hand tightening, a further turn of 180 degrees is required to reach the required amount of compression in the fitting.

After adjusting all of our threaded fittings accordingly, we've had no more leaks.

Another common complaint amongst customers is fittings becoming brittle, cracking, and developing a chalky surface. These issues are almost exclusively caused by the use of harsh cleaning chemicals on them such as phosphoric acid based cleaners like Starsan or Stellarsan, or other harsh acidic baced cleaners like bleach. Although at the recommended dilution of these products, such problems should not occur but if they are left to dry after being sprayed the water evaporates and as it does, the concentration of the residual phosphoric acid (or other active cleaning agent) increases which causes a rapid deterioration in the plastic. 

Such problems have never occurred with any of our Duotight fittings, but nor have we ever sprayed the outside of our fittings with any cleaning/sanitising products. This just isn't necessary. We've always connected our hoses and fittings together, and then ran a cleaning/sanitising solution through the lines and fittings to clean/sanitize them.

As it turns out, the problem was prevalent enough to prompt KegLand to release a design revision for the Duotight fittings in September 2020. This design revision essentially changed the material the collar of the fittings to be of a stronger plastic compound called POK (polyketone).

Duotight connectors are design to be compatible with KegLand's EvaBarrier range of beer/gas lines. Just make sure that you get the correct Duotight fitting width/diameter to match the Outer Diameter (OD) of your EvaBarrier line. The most common appears to be 8mm and is what we use exclusively for all our fittings.

Our experience and research has come across a few other tips and suggestions to ensure your seals are good and connections stay leak free;

  1. Make sure the beer/gas line is pushed in all the way. Duotights use a double O-ring design so you need to make sure your line is pushed in all the way to ensure both O-rings seal correctly. 

  2. Ensure the end of your line is cut perfectly straight/square. Angled cuts will prevent the line from inserting all the way to the end of the fitting, so it won't sit flush and won't seal correctly within the fitting.

  3. Ensure there are no burrs or surface imperfections (from cutting or a previous connection) on the outside of the line before you push it into the fitting. Trim the line to remove any bits that aren't perfectly smooth.

  4. After pushing the hose into the fitting, give it a firm pull to try and pull the hose out - there should be next to no movement/give in the line when it is sealed/seated correctly.

As another level of protection, there are also 'locking clips' available that slide in between the collar and the fitting. These prevent the collar from being pressed in which is required to release the tube/line from within the fitting. Although we've never had a fitting come loose, we figured it's some cheap insurance and another layer of protection since a 10 pack of clips only costs AU$1.

Duotight connector on liquid disconnect (MFL thread) with blue locking clip in place

Are Duotight push in fittings any good?

In a word, yes. There are a few tricks and things to be wary of if you're going to use Duotight fittings, but if you follow the instructions (or check out KegLand's YouTube videos) for details on how to setup and install the fittings correctly, you're almost guaranteed a trouble free experience. For extra peace of mind we'd recommend using the locking clips as well, especially considering how inexpensive they are to buy.

The convenience of push in fittings like Duotight makes them a really worthwhile investment. Sure, others swear by the tried and true method of hoses and clamps, though they can inevitably leak or cause lines to split if done up too tight. Being able to quickly disconnect hoses and fittings without the need for any tools at all is something we find very beneficial. We'll definitely be continuing to use Duotight fittings for all our hoses and connections on our kegerator setups.


Related Articles


Tuesday 8 February 2022

BrewZilla Brew Day - Best American Pale Ale

Here's a rundown on our latest BrewZilla brew day, using our 35L BrewZilla 3.1.1 and Digiboil 35L sparge water heater.

This brew day was bringing to life our Best American Pale Ale Recipe.

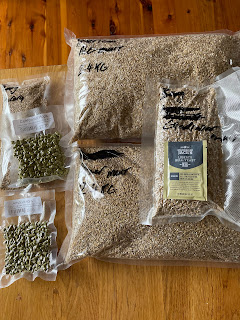
All our ingredients ready for brew day

Without going into the full recipe (check out the link above), we've got a mixture of pale, pilsner, carapils and melanoidin malt. We ended up going with the Gladfield equivalent of the last two malts (Gladiator for carapils and Aurora for melanoidin), as that's what our local home brew supply store had available. For the hops we're going with Centennial and Amarillo as they're a well known and timeless/classic combination for an American Pale Ale.

For the yeast we're using Mangrove Jacks M36 Liberty Bell dry yeast - this is our first batch using any variety of Mangrove Jacks yeast so we're excited to see how it goes.

Mashing in and the mash itself went to plan and was largely uneventful. After adding the grain, we gave it a thorough stir, then left the grain bed to settle for 10 minutes before turning on the pump to recirculate the wort. Once we switched on the pump we started our 60 minute timer for the mash.

The mash itself was quite thick, so we didn't get a particularly good flow when recirculating and had to restrict the pump flow quite a lot. It never really 'backed up' or got stuck though which is good. We also stopped the pump and stirred the grain bed 3 times during the mash (every 15-20 minutes).

We always use the BrewFather app to calculate our water chemistry and strike/sparge water volumes and it's never failed us. The built in profile for the 35L BrewZilla is great and really accurate in our experience.

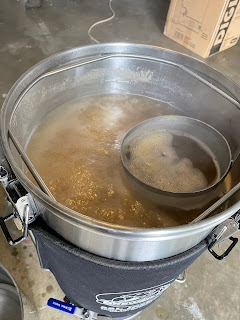
At the end of our 60 minute mash we raised the temperature to 75c for the mash out step. Ramp up time was pretty decent at around 5 minutes or so (using both heating elements). We calculate grain bed temperatures using a long probe thermometer in the top of the grain bed for more accurate temperature measurement rather than relying on the temperature reading on the display of the BrewZilla.

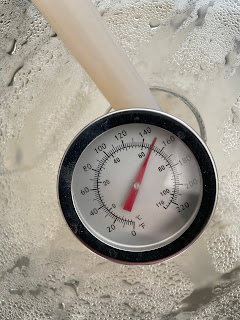
Our long probe thermometer fits well through the lid to measure the grain bed temperature from the top

We've found after a bit more practice we're getting better at dialling in and maintaining our mash temperature. Setting the BrewZilla to around 5c above the target temperature seems to be the sweet spot, which seems like a lot but it works well for us.

Sparging also went without a hitch - we suspect that the combination of a proper mash out to raise the temperature to 75c and sparging with water heated to the same temperature really helps the sparge water flow back through the grain bed. Sparging took next to no time at all and the water was flowing through faster than we could pour it in using a 1L jug.

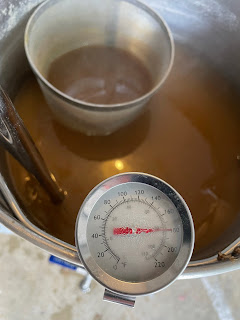
Pre-boil gravity sample taken and it was surprisingly higher than expected at 1.052 (recipe expected 1.046)

Pre-Boil Gravity Reading - 1.052 - several points higher than expected

We went with a classic 60 minute boil as that's what the original recipe (sourced from David Heath's YouTube channel) calls for. There are quite a few hop additions so we measured all these out whilst waiting for boil temperature to be reached. Planning and organisation is key on brew day!
 

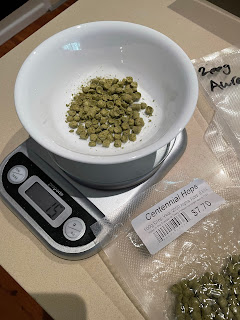
Measuring out hop additions whilst waiting for the boil

Boil was promptly reached and hop additions added at 60, 10, 5 and then again at flameout as per the recipe.

The Boil

At the end of the boil, we had a reasonable hop addition/hop stand to be added when the wort temperature is dropped to 80c then held for 15 minutes - also known as a whirlpool addition.

This was only our second attempt at a hop stand so we adjusted our method slightly based on the lessons learnt last time we attempted. After starting the initial cooling process with the immersion chiller, we waited for the temperature to drop to around 85c before stopping the water flow through the chiller. The drop from boil to 85c was very quick, probably less than 90 seconds. During which time we adjusted the set temperature of the BrewZilla to 85c and left both heating elements on.

We had the whirlpool arm installed as well so switched the pump on to begin recirculating the wort through the whirlpool arm. The end result of all this was a rock solid 80-82c temperature throughout the entire hopstand which we were very happy with.

Whirlpool/hop stand temperature at ~80c

After our 15 minute hop stand, we began flowing water through the immersion chiller again to finalise the chilling down to around 24c then transferred to our FermZilla fermenter using the pump and recirculation arm.

After transporting the wort home and into our fermenting fridge, we pitched the yeast and set the target temp to 20c.

Our Original Gravity was also higher than expected at 1.055-1.056 (recipe expected 1.051) which is great and means that our efficiency is improving. These numbers give us a brewhouse efficiency of 82% which is awesome.

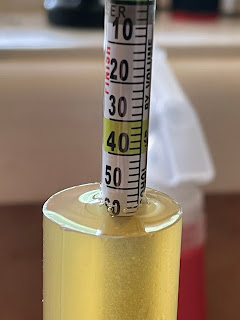
OG Gravity Reading 1.055 but a more realistic 1.056 with temperature correction

Pleasingly, fermentation was underway the next morning and is tracking well. This is also our first fermenting using our new Rapt Pill hydrometer/thermometer so it's been great having a more accurate insight into the fermentation that we didn't previously have.

Surprisingly, the fermentation seemed really fast for this beer. After pitching yeast on Saturday afternoon, by Sunday mid-morning, fermentation was underway (we started to see gravity movements from our RAPT Pill), and final gravity of 1.010 was reached 72 hours later on Tuesday morning at around the same time. This was our first fermentation with this kind of visibility, but it does seem pretty fast!

We'll definitely be leaving it for at least another week before transferring to our keg in order to give the yeast ample time to clean up any by products like diacetyl and let the flavours mellow/settle. 

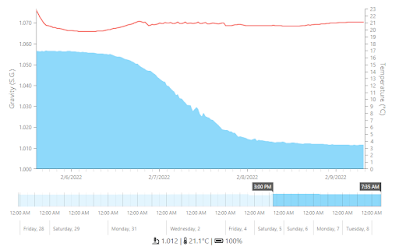
Fermentation graph from the Rapt Pill

After 7 days in the fermenter we took a "regular" hydrometer reading and found the result pretty consistent with what our Rapt Pill was saying (1.010)


Initial tasting was very promising, still a little astringent or 'green' with alot of  grainy flavours but this will no doubt start to clear up over the next week

Check out the Tasting & Review of our Best American Pale Ale

Monday 7 February 2022

Best American Pale Ale (All Grain) Recipe

After much research and putting together our American Pale Ale Recipe Creation Guide, we have settled on the below recipe for our Best American Pale Ale.

Vitals

Batch Volume: 23L
Boil Time: 60 minutes
Original Gravity: 1.051
Final Gravity: 1.012
IBU (Tinseth): 50
BU/GU: 0.97
Colour: 9.7 EBC

Mash

Temperature: 65c - 60 minutes
Mash Out: 75c - 10 minutes

Malts

2.4kg Gladfield American Ale Malt (46%)
2.4kg Gladfield Pilsner Malt (46%)
260g Gladfield Gladiator Malt (Carapils) (5%)
160g Gladfield Aurora Malt (Melanoidin) (3%)

Hops

15g (16 IBU) - Centennial (9.8%) - Boil - 60 minutes
24g (8 IBU) - Amarillo (7.1%) - Boil - 10 minutes
17g (8 IBU) - Centennial (9.8%) - Boil - 10 minutes
27g (6 IBU) - Amarillo (7.1%) - Boil - 5 minutes
16g (5 IBU) - Centennial (9.8%) - Boil - 5 minutes

34g (3 IBU) - Amarillo (7.1%) - Whirlpool/Hopstand - 80c for 15 minutes
25g (3 IBU) - Centennial (9.8%) - Whirpool/Hopstand - 80c for 15 minutes

Yeast

Mangrove Jack's M36 Liberty Bell (Dry) - 1 packet

Fermentation

20C for 14 days

Carbonation

2.4 CO2-vol

Water Profile

Ca2+ (Calcium): 110
Mg2+ (Magnesium): 18
Na+ (Sodium): 19
Cl- (Chloride): 50
SO42- (Sulfate): 267
HCO3- (Bicarbonate): 43

Want to see how it went? Check out our Best American Pale Ale Brew Day post to find out.

You can also check out the Tasting & Review of our Best American Pale Ale for our final thoughts and the outcome of this brew and recipe.

We have taken this recipe from David Heath's YouTube video (recipe is in the video description) and have updated the values to match the grain and hop AA%'s we had available. We're big fans of David's YouTube video's so check him out!


Related Articles

All Grain Recipe List

Best American Pale Ale - Tasting & Review

BrewZilla Brew Day - Best American Pale Ale