Thursday 28 July 2022

Beginner FAQ: How To Tell If My Beer Is Infected?

Fermentation is such a strange and marvellous thing - the magical process undertaken by yeast to transform our carefully curated wort into beer. This process can lead to some interesting sights and smells being created though which often leads brewers to wonder, "is this beer infected"? Here are a few signs (and false alarms) to help determine if what you're seeing/smelling is normal, or if you are in fact dealing with some kind of infection in your beer.

Look At It

A pellicle will generally form on the surface of your fermenting beer when it has some kind of bacterial infection. It can sometimes be difficult to distinguish between what is a pellicle, and what is normal - krausen, bubbles, or yeast rafts are often sitting on top of your fermenting beer and can be mistaken for signs of infection.

It can be difficult to specify in general terms exactly what to look for, but here are some guidelines;

  • If you're seeing lots of small bubbles on the surface, this is normal and a sign of fermentation being underway, or beginning to ramp up (ie. not an infection).
  • If you see a consistent bubbly, foam like substance on the surface, this is krausen and is definitely normal (ie. not an infection).
  • If you're seeing chunks of matter clumped together and floating on the surface, this is likely "yeast rafts" and is normal (ie. not an infection).
  • If you're seeing large chunks of matter floating around within the wort and not the surface, this is likely cold break, and is simply proteins within the beer clumping together and is normal (ie. not an infection).
  • If you're seeing larger bubbles on the surface, potentially with 'stringy bits' joining them together, this is likely a pellicle and is a good sign of an infection.

An example of a krausen sitting on top of fermenting beer

A google image search for the terms "pellicle", "krausen", "yeast rafts" or "beer infection" will help give some indication on what to look for. It's definitely worth researching other peoples posts and photos on homebrewing forums and Facebook groups, as chances are someone has already asked the question with a beer that looks exactly like yours does right now.

Smell It

If you're still not sure from the visual signs outlined above, the next step would be to open your fermenter and have a smell of what is inside. If it smells like beer, or hops, or some kind of combination of both, you're good.

If you're getting a sulphur or rotten egg type of smell, that is a warning that something might be wrong here, but keep in mind this particular type of smell can be generated by some yeast strains (such as lager yeast) so may well be normal.

Descriptors for the smell of infected beer are "sour", "skunky" or "musty", or even like vomit.

Taste It

The last step if from looking and smelling you are still not sure or convinced whether or not you're dealing with an infection is to have a taste. Rest assured, even if you take a sip of infected beer, it's not going to harm you or make you sick, so give it a try.

You'll know fairly quickly from tasting whether or not you're dealing with an infection. It will taste acidic, rancid or rotten. If you'd describe it in any way other way, then there's a good chance it's fermenting away just fine and as expected. Fermenting beer will perhaps have some funny or strange flavours but it won't taste foul. For example, if you're noticing a "buttery" type of taste (or smell), this is often caused by diacetyl which is produced (and then cleaned up/removed) by yeast as part of the fermentation process.

What Next?

Even if you think you have an infected beer, it can sometimes be worthwhile letting it ride out to see how it turns out after a couple of weeks. Bacterial infections will likely lead to a sour beer, but these styles of beers can sometimes turn out pretty good. Don't be too quick to dump a beer until you've given it a chance to fully ferment and see how it turns out.

If you're unsure, then chances are your beer is fine and you should definitely wait it out. You can also try posting a photo of the current state in a homebrewing forum or Facebook group to gauge the opinion of others.

Remember, sanitation is key when it comes to brewing. If you've been diligent with cleaning and sanitising your brewing equipment then your chances of ever dealing with an infection are very low.


Tuesday 26 July 2022

What Pressure Should I Pressure Ferment At?

If you're looking into pressure fermentation, one of the first questions you'll be asking is what pressure you should set on your spunding valve for pressure fermenting.

Any amount of pressure from 1 up to 18 psi will give you the benefits of pressure fermenting - in particular the ability to ferment with your wort at a warmer temperature, which results in a faster fermentation as well as a reduction in esters and off flavours being created by the yeast.

There are some other things to consider though before making your decision.

Firstly, certain types of beer yeast are sometimes chosen because of the desirable esters and phenols that are imparted into the beer by them - like Saisons, Belgian yeast strains, and other ale yeasts like Verdant IPA. Fermenting these yeast strains under pressure will likely suppress or totally prevent these flavours which may not be desirable in your particular beer.

A popular way around this is to not ferment under pressure for the first 3-4 days which is when these yeast specific flavours are generally created. For the first 3-4 days, the spunding valve can be left wide open, preventing the build up of pressure in the fermenter (or simply fit an airlock), then either remove the air lock and fit a spunding valve, or adjust the spunding valve to your desired pressure after the first 3-4 days of fermentation have passed.

If your beer style calls for a relatively clean/neutral yeast profile - such as lagers, or if using a clean fermenting yeast strain like US-05, then it's fine to pressure ferment from the very beginning of fermentation.

Another consideration is whether you will be dry hopping your beer. If you are dry hopping then you will more than likely need to depressurise your fermenter in order to open it to add the hops. This rapid depressurisation can lead to a sudden expansion of the krausen in the fermenter sometimes resulting in a "volcano" like effect with the krausen rapidly rising to the top of the fermenter - caused by the dissolved CO2 rapidly coming out of solution as the fermenters atmospheric pressure is released.

We manage this by setting a low pressure (~5psi) until the dry hops are added which minimises the impact of depressurising as outlined above. After the dry hops are added, if fermentation is still active the pressure can then be increased by adjusting the spunding valve accordingly and allowing the CO2 created by the remaining fermentation to build up. You can alternatively add pressure manually from a CO2 tank to increase the pressure and help with carbonating.

There's no conclusive evidence suggesting that higher levels of pressure give any additional benefits other than increasing carbonation levels of beer in the fermenter. If anything, higher amounts of pressure will put increased strain on yeast which is more likely to cause other problems affecting yeast health and viability. The generally accepted range is up to 18 psi, but as little as a couple of psi will work just as well. Sure you could go higher but likely won't reap any additional benefits from doing so.


Related Articles

Other Brewing How-To Guides, Tips & Tricks

Friday 22 July 2022

Beginner FAQ: What Is Cold Crashing?

Cold Crashing is a really common term and process used by home brewers. No doubt if you're a new brewer you've probably come across the term in homebrew user groups and other articles and are wondering what it means.

The term "Cold Crashing" refers to the process of rapidly dropping the temperature of your recently fermented wort - which is now beer whilst it is still in the fermenter. The desired temperature is typically as cold or as close to 0 as possible - usually around 3 degrees Celsius. This is typically done by having the fermenter situated in a refrigerator, but can also be accomplished by having a glycol chilling system connected.

What are the benefits of cold crashing?

  1. It helps some of the remaining yeast in the beer flocculate or clump together and then drop to the bottom of the fermenter into the trub pile which can help to improve beer clarity and reduce the chances of particulates clogging lines, disconnects, bottling wands etc during the packaging process.
  2. Less yeast in the remaining beer can lead to improved flavour in some cases.
  3. If you have added dry hops to your fermenter, it also helps any remaining hop matter floating on the top of your beer to drop to the trub pile at the bottom of the fermenter.
  4. If you have some stubborn krausen that is still remaining on top of the beer, a cold crash will help it break down and settle to the trub pile as well.
  5. If cold crashing in a pressure capable fermenter,  you can apply CO2 gas pressure to the headspace of the fermenter which will be absorbed into the beer more rapidly as the temperature drops which can give you a head start on carbonation, or even give you a fully carbonated beer by the time the cold crash is finished.
  6. If you are bottle conditioning, you will notice less sediment in the bottom of each bottle after conditioning.

Are there any disadvantages or risks with cold crashing?

  1. The rapid drop in temperature will cause a vacuum or "suck back" effect that can have several impacts. If you are using an air lock with sanitiser in it on your fermenter, the sanitising solution can be sucked into the fermenter/beer. If the fermenter is airtight, this can potentially cause the fermenter to collapse in on itself due to the negative pressure that is created by the temperature drop. If the fermenter is not airtight, then some oxygen/air may be sucked into the fermenter and potentially absorbed into the beer (though the impact of this last point is still widely debated).
  2. You need a fridge or other specialised equipment to perform this, which is not accessible to every homebrewer. Or an incredibly cold climate.

Can you still bottle condition after cold crashing?

We pondered this one ourselves when we first started cold crashing - as to whether there would be enough yeast left in suspension for bottle conditioning after cold crashing? The answer is definitely "yes". We've bottle conditioned multiple beers after a cold crash and had no issues with the remaining yeast providing adequate carbonation by consuming whatever additional fermentable sugar is added at bottling time.

Does cold crashing stop fermentation?

Performing a cold crash will essentially put a "pause" on fermentation if fermentation is still active when you begin a cold crash. If the yeast that are fermenting get too cold and the temperature of the wort they're fermenting in drops below their operating range, they don't die, but rather become dormant or inactive. This will lead to fermentation slowing to a stop, but should not be used to a method to finalise or finish fermentation early. Doing this will leave fermentable sugars in the wort, and the remaining yeast will continue with fermentation when the temperature of the beer/wort is raised again which can be dangerous, especially if you are planning on bottle conditioning.

Always wait until fermentation has completely finished before initiating a cold crash.

Is it worthwhile doing a cold crash?

In our opinion if you have the ability to perform a cold crash then it is definitely beneficial to do so. Yes, there is a risk of oxidation however this is quite possible an old wives tale. Brulosophy ran an exBeeriment testing this very thing which essentially debunked it.


Related Articles

Tuesday 19 July 2022

The To-Brew List

For no real reason other than the fact that we keep thinking of and coming across different beer styles that we'd like to make, we thought we'd document them in a list with our thoughts, findings and research for our upcoming brews.


1. American Amber Ale

Number one on our hit list and the next brew we're going to be attempting is an American Amber Ale. We've already started preparing for this one with our American Amber Ale Recipe Creation Guide and American Amber Ale Recipe.

Check out our American Amber Ale - Review & Tasting Notes article to see how this one turned out.

2. Hard Seltzer

Deviating from our typical path of brewing beers, we're keen to try our hand at a hard seltzer. We're planning on brewing one of these in the upcoming spring/summer of 2022 when the weather is a little warmer and more conducive to this particular style of drink.

For those unfamiliar with Hard Seltzers - it's essentially alcohol sparkling water, that can then be enhanced with flavour extracts - usually some type of fruit/berry flavour. Brewed with usually distilled water, some form of simple sugar (eg. dextrose), yeast and some nutrients.

Clawhammer Supply did an excellent YouTube video that really put the idea in our head - and we also liked the choice of yeast - Omega Lutra Kveik Yeast which is available in dry format, with a special Propper Seltzer Nutrient to help it along.

Omega Yeast actually have an official 4 day Lutra Hard Seltzer Recipe which we'll likely be using as well.

CH from Homebrew4Life on YouTube also did a hard selzter brew that got excellent results with Lutra Kveik yeast which further confirmed our decision to use this yeast.

Once brewed, we might look at trying some of KegLand's concentrated natural flavours range - "PUNCHY" for flavour enhancement and back sweetening.

Check out our Hard Seltzer - Tasting Results & Review post to see how this one turned out!

 3. Fruited Sour

We recently documented our findings and research on Lallemand's Philly Sour Yeast which has us really keen to try our hand at a sour beer - now that we know how simple it can be by using this particular yeast. We'll likely go with a raspberry sour and will adopt the base recipe that Lallemand/University of the Sciences (who discovered Philly Sour) used during their testing and trials of the yeast.

We don't like super mouth-puckeringly sour beers so we're hoping we can create one that is approachable and drinkable with a nice refreshing and balanced fruit tartness to it. Time will tell.

4. Cold IPA

In a previous post, we discussed the difference between a Cold IPA and an India Pale Lager (IPL). This research really peaked our interest in the Cold IPA style so it's on the hit list of styles to brew. We haven't got a recipe decided on yet, but we'll likely go for the popular option of  Fermentis SafLager W-34/70 dry yeast fermented a little warm.

We've only tried one Cold IPA before, Sunday Road Brewing Co's Yule Fuel Cold IPA - and we loved it. If we can somehow brew something half as good as this one we'd be pretty happy!

Check out our Cold IPA Recipe Creation Guide as well as our Cold IPA All Grain Recipe articles.

5. NZ Pilsner

Being from Australia, NZ based hops are readily available and easy to come by, yet it isn't something we've used in any of our current brews to date. Another couple of BrewTubers - The Apartment Brewer, and The Homebrew Challenge have both done their own takes on a NZ Pilsner with unsurprisingly positive results, so we'd certainly like to try out hand at making one as well. We feel it would be a nice change up from the typically hop forward more American style beers we've been making. Who doesn't love a nice clean Pilsner?

6. Stone & Wood Pacific Ale Clone

Everytime I have this beer I'm reminded of just how damn good it is and always think to myself I should try and make something like it. I know it uses exclusively Galaxy hops and is incredibly fruity and refreshing. I know there's a bit of info and some clone recipes floating around homebrewing forums and such. Some quick research suggests a 60/40 split of pale and wheat malt respectively, US-05 yeast, approx 22 IBU's, lots of late/dry hopping. Will likely do a head to head comparison against the real thing as well once brewed.

Check out our Stone & Wood Pacific Ale All Grain Clone Recipe, Brew Day and Tasting Results posts for more detail on this one.

7. Munich Helles

Sticking with the trend of cleaner styles like a pilsner, we're also keen to try our hand at a Munich Helles. Another clean style means they can be a little more challenging to brew, with little to hide off flavours behind - unlike heavily hopped beers like IPA's etc. Helles are easy and clean drinking with simple recipes and minimal hops required. It's all about processes and we're hopefully ready for the test by the time we get to brewing this one.

8. Sierra Nevada Pale Ale Clone

One of the most well known American Pale ales available on the market - it's popular, available worldwide, and is a true classic. We personally love it, especially the (arguably overdone these days) use of caramel/crystal malts for that sweet, caramelly undertone. Sierra Nevada actually have the recipe up on their website which we're going to have a crack it, with a head to head comparison like we're planning on doing with our Stone & Wood Pacific Ale clone.

9. Pale Ale/IPA with Kveik Yeast

Relatively new to the market is Kveik yeast - known for it's ability to tolerate warmer fermentation termperatures (up to 37C), we're keen to try this one for ourselves to see what it's about. Hard to fathom having a beer fermented and ready to drink within a week without any off flavours being produced, which is why we want to experience this for ourselves. We'll go with a relatively simple pale ale recipe for this one, or perhaps some other type of IPA.

10. West Coast IPA

We've had a couple of these in recent times and it's not something we've ever attempted to make ourselves. Some assertive bitterness, loads of new world American hops and a decent and slightly sweet malt backbone make for an excellent combination.

Check out our West Coast IPA Recipe, Brew Day and Tasting Results to see how it turned out.

11. Low Alcohol IPA

We stumbled across this video from David Heath where he made a low alcohol version of an IPA. It looked pretty simple, and the results also seemed quite promising and positive, so we'd like to try it and see for ourselves.

Monday 18 July 2022

Lallemand Philly Sour - Yeast Overview

Philly Sour from Lallemand is a relatively new yeast strain that is rapidly gaining popularity due to the also increasingly popularity of sour beer styles. This particular yeast strain has some interesting characteristics that makes it unique and sets it apart from other yeast strains and methods used for creating sour beers.

History and Discovery

Philly Sour was discovered by an undergraduate student, Stiven Mita working at the University of the Sciences in Philadelphia, Pennsylvania in the lab of the Assistant Professor of Biology and Directory of Brewing Science - Matthew Farber.

Matthew mentions that the yeast was actually discovered in a graveyard neighboring the University of Sciences grounds in Philadephia. A quick search on Google Maps indicates it was likely the "Center Circle" graveyard or perhaps neighboring "The Woodlands Community Garden" where this particular yeast strain was found. Pretty cool and obviously explains how the yeast got it's name.


Further research suggests that the yeast came from the bark of a dogwood tree located in this parkland/cemetery area.

Philly Sour Yeast Properties

Launched in 2020, Philly Sour is a unique strain of Lachancea species and is a lactic-acid producing yeast. It is unique as it creates lactic acid and ethanol during primary fermentation. This allows the creation of sour beer styles to be somewhat simplified compared to traditional methods of souring.

The lactic acid generated by the yeast helps to lower the pH of the beer, making it more acidic which helps to draw out the natural flavours and characters from fruit making it an excellent choice for fruited sour beers.

Typically sour beers have been created by using multiple yeast strains and/or bateria. Brettanomyces (aka Brett) is a common yeast variety used for souring, and Lactobacillus and Pediococcus are common bateria's also used for the purpose of souring a beer.

Lactic Acid Management

The level of lactic acid obtained is controlled by the amount of glucose that is present in the wort during fermentation. This can be controlled in several ways such as adjusting mash temperature (a higher mash temperature will result in less glucose and less lactic acid), the use of glucose based adjuncts such as dextrose, and adjusting the amount of specialty/highly modified base malts. The use of more specialty malts will result in less lactic acid production, and the use of more highly modified base malts will increase lactic acid production.

Flavour & Aroma

Image Copyright of Lallemand Inc

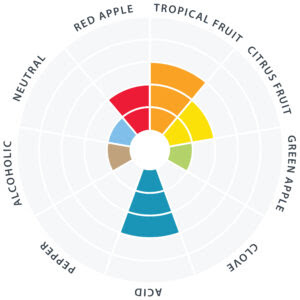
Aroma and flavour is described as sour, with notes of red apple and stone fruit, most notable peach. Red apple flavours are very prevalent early on, but these tend to fade and mellow into stonefruit flavours.

Fermentation Properties

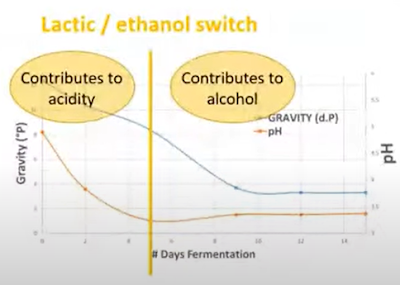
During the fermentation process, Philly Sour initially creates lactic acid during the first 4-5 days, followed by ethanol production towards the tail end of fermentation. "Terminal acidity" is reached around days 2-4, with terminal gravity typically being reached in around 10-12 days. For this reason, it does ferment a little slower than other ale yeast strains. It is considered a high attenuating and high flocculating yeast.

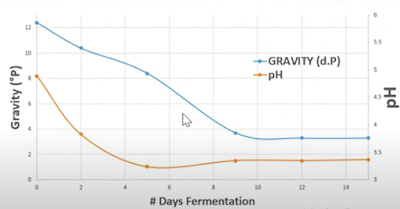
The below chart gives a good visualisation of how fermentation works - in this particular example, terminal acidity or the lowest level of pH is reached at day 5 of fermentation (orange line), after which point the gravity (blue line) continues to fall as fermentation continues and ethanol is produced.

Image Copyright of Lallemand Inc

Throughout all testing and trails, the yeast never failed to produce lactic acid on it's first pitch.

Fermentation Temperature

The optimal fermentation temperature for Philly Sour yeast is 22C - 27C (71F - 80F). A popular temperature range used during trials was 22C - 24C. 

Allowing the temperature to "free rise" during the fermentation works well, along with pitching warm - as warm as 30C has been tested followed by letting the temperature drop back down to fermentation temperature thereafter.

Even when fermenting above the recommended temperature range, no off flavours have been reported. One trial had a fermentation temperature of 33C with no off flavours or defects being noticed.

Fermenting below the recommended temperature range is not recommended as this can lead to under attenuation. As expected a lower fermenting temperature will also result in a slower/longer total fermentation time.

Fermentation pH

The "potential hydrogen" or pH of a fluid  refers to  how acidic or basic a water solution is. The generally desired starting pH (ie. before fermentation) for most ales is around 5.2 and 5.6, and when using Philly Sour, the desired starting pH is much the same, with a desirable starting pH of 5.2 - 5.4. This is great news for brewers since they don't need to make any further adjustments/changes to their mash or water profiles when using Philly Sour yeast which greatly simplifies the process.

The expected final pH for most beers is around 3.2-3.5. Lactic acid production can be further increased by adding glucose during the early stages of fermentation. Titratable acidity is typically 3-8g/L.

Attenuation Rate

The expected attenuation rate for Philly Sour yeast is 70-85%.
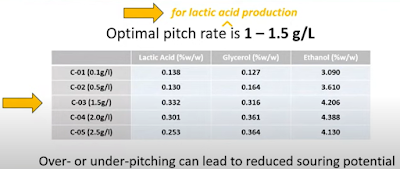
Pitching Rate

Pitching rate is very important when using Philly Sour yeast. Under pitching or over pitching the yeast can lead to reduced souring during fermentation. The chart below outlines the effects pitching rate had on lactic acid as well as ethanol/alcohol production.

Image Copyright of Lallemand Inc

As you can see, the sweet spot is around 1.5g/L. Pitching at a rate less than this lead to reduced lactic acid production and reduced ethanol production.

Pitching at a rate higher than 1.5g/L also gave slightly lower lactic acid numbers, but ethanol content remains around the same.

In saying that, under or over pitching won't create a poor beer - it will just mean reduced souring due to the reduced amount of lactic acid created - particularly when under pitching.

If you do pitch at a lower rate, then a higher fermentation temperature is recommended. Similarly, if fermenting at a lower temperature, then a higher pitching rate of Philly Sour yeast is recommended.

Adding Fruit

As previously mentioned, acidic beers complement the use of fruit, meaning that fruited sours are a popular style to create using Philly Sour yeast.

The timing of fruit additions during fermentation is important. Fruit being added in the first 5 days of fermentation will help to drive the increase of lactic acid production, and fruit being added later in fermentation (ie. after day 5 of fermentation) will contribute to alcohol/ethanol production.

Image Copyright of Lallemand Inc

This of course ties back into what was previously mentioned about lactic acid being produced by the yeast during the first 5 days of fermentation, followed by ethanol/alcohol being produced after day 5.

Some popular fruits that were used during trials are; mango puree, fruit concentrate, aronia berry juice, pineapple and pineapple puree.

Adding fruit during the early to mid stages of fermentation can help to rouse the yeast and drive fermentation along.

Fruit that is added after primary fermentation has completed is not recommended as the yeast is highly flocculant and may not efficient metabolize/consume late sugar additions such as those by introducing fruit this late.

Impact of Lactose

Philly Sour does not ferment lactose, so any lactose present in the wort will remain so after fermentation has completed. This can help to contribute to residual sweetness and may be desirable in certain beer styles. The use of lactose had no other perceivable impact on fermentation character/results so is considered fine/safe to use in recipes fermented with Philly Sour yeast.

Co-Pitching Yeast

Co-pitching another yeast variety at the beginning of fermentation along with Philly Sour is not recommended as Philly Sour tends to be outcompeted - meaning souring/lactic acid production won't occur. After day 4-5 of fermentation when terminal acidity is reached, another type of yeast can be pitched to help complete fermentation and/or introduce other unique flavours and esters by using specialty yeast types such as a saison.
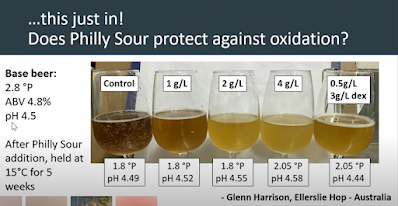
Reduced Oxidation?

A really interesting finding is perhaps the possibility that Philly Sour can help to protect packaged beer against the effects of oxidation. In an experiment run by Glenn Harrison from Ellerslie Hop, a number of beers were bottled with differing amounts of Philly Sour yeast being added to the bottle during packaging. The results are pictured below;

Image Copyright of Lallemand Inc

As you can see clearly just by looking at the colour of the samples above, the control sample appeared heavily oxidised, with all the other samples with differing levels of Philly Sour yeast being added showing reduced amounts of oxidation. Even with as little as 0.5g/L added, there was a noticeable difference in the end colour of the beer.

It's also worth pointing out that the pH for all these samples also remained unchanged - further demonstrating that lactic acid production only occurs during the first few days of primary fermentation and not after primary fermentation has completed and there is alcohol present in the wort/beer. There also wasn't increased attenuation in the samples as a result of adding the Philly Sour yeast to the bottles.

This is only a single test/experiement but sure provided some interesting results - there's obviously much more to be discovered with this special strain of yeast.

Interestingly though, Lallemand state that bottle conditioning is not recommended since the primary sugar will be converted into both lactic acid, ethanol and CO2 and may give inconsistent results. They recommend using Lalbrew CBC-1 yeast to bottle condition fermentations done with Philly Sour yeast.

Cleaning and Sanitation

Since Philly Sour is a yeast strain and not a type of bacteria, standard brewery cleaning processes and chemicals have proven to be sufficient to control and sanitise equipment like fermenters that have been in contact with the yeast. This is a big benefit of using this particular method for creating sour beers, as cross contamination using other methods is a real concern which no doubt deters many brewers from attempting to create sour beer styles.

Pressure Fermenting

Initial testing and trials of the yeast did not use pressure fermentation, so it is not recommended that pressure fermentation be used - at least in the first 5 days during the lactic acid production phase. You can of course do your own testing on this one to see for yourself.

Repitching or Harvesting

Repitching or harvesting Philly Sour yeast for re-use is generally not recommended. It can potentially be propogated when pitched for the first time to help increase use and cell count, especially in large scale breweries, but at a homebrew level it is definitely not recommended or necessary. Re-using Philly Sour yeast would likely lead to inconsistent results/outcomes, with reduced lactic acid production. The yeast has never failed to produce lactic acid when pitched for the first time so it's recommended as a "single use" yeast variety.

Rehydrate or Direct Pitch

Philly Sour yeast can be rehydrated before use, or directly pitched/sprinkled into the wort. Testing has been done using both methods with positive results. Do whatever you're comfortable/familiar with.

Sample Recipe

University of the Sciences in Philadelphia were kind enough to share their pilot brew recipe that was used during trials and testing of the Philly Sour yeast;

85% Pilsner
10% Flaked Wheat
5% Flaked Oats
Recirculation mash @ 65.5C for 1 hour.

This would make a great base recipe for a low IBU fruited sour, and will likely be the recipe we use for our upcoming attempt at making one.

Suitable Beer Styles

Philly Sour is a good choice for classic sour styles such as saisons, fruited sours, gose, berliner weisse, sour IPA's and American Wilds It's also encouraged for use with experimental styles, such as fermenting juice instead of wort, or performing mixed yeast fermentations (so long as the secondary yeast is pitched after lactic acid production has occurred as covered previously).

Summary/Conclusion

Using Philly Sour really simplifies the process of making sour beers. Typically sour beers have required multiple fermentations, at varying temperatures, with the use or addition of multiple yeast strains and/or bacteria to get the job done. Typically with a classic brewers yeast to perform the fermentation and create the alcohol, and then a secondary bacteria or yeast strain to produce the acidity or sourness.

Having both steps done by a single product, during a single fermentation is a real game changer and makes the creation of sour beers accessible to any homebrewer with basic equipment.

The lack of risk of cross contamination is also a major benefit since brewers no longer need to use dedicated equipment for souring processes due to fear of unwanted souring in future batches by chemically resistant bacteria strains that remain even after rigorous cleaning and sanitation practices.

The ability to ferment at warmer temperatures without any noticeable downsides is another major benefit meaning temperature control is less of a factor and consideration, especially for homebrewers who don't always have the equipment necessary to do this.

We're very much looking forward to trying our hand at a fruited sour beer using Philly Sour very soon, perhaps when the weather where we are starts getting a little warmer!

Source

We found the majority of this information from Lallemand Brewing's YouTube video on Philly Sour


Related Articles


Saturday 16 July 2022

Will My Beer Be Carbonated After Pressure Fermenting?

This is a question posed by many brewers who are new to pressure fermentation. The answer is "yes", but exactly how much carbonation is in your beer at the end of fermentation will depend on a couple of things though - namely what temperature you fermented at and how much pressure was applied/captured during fermentation.

The amount of carbon dioxide (CO2) that is absorbed into your beer is measured in volumes of CO2. The number of volumes of CO2 that can be absorbed into your beer is dependent on what temperature your beer is at. The colder the beer, the more easily CO2 is absorbed for the purpose of carbonation.

You can use a carbonation chart like the one below to calculate how much pressure is required to reach your desired carbonation level (click the image to make it bigger and easier to read).

Keg King Carbonation Chart

As an example, if you fermented a pale ale at 20 degrees Celsius and wanted to achieve 2.4 volumes of CO2 for carbonation, you would need around 28.4psi of pressure in the fermenter to achieve this. This is a reasonable amount of pressure and towards the upper end (though still within the limits) of what some pressure capable fermenters are able to safely hold which is around 35psi.

20 degrees Celsius and 2.4 volumes requires 28.4psi

This is certainly achievable using the CO2 that is generated by fermentation by setting the spunding valve on your pressure fermenter accordingly.

Keep in mind though that pressure fermenting is believed to cause additional stress on yeast. The generally recommended limit for pressure fermenting is 15psi however there's still plenty of study and research being undertaken to fully understand the impacts of pressure fermentation. Pressure will affect different yeast strains differently too. Also remember that CO2 gas is not absorbed into beer instantly - it takes time, and will be absorbed faster at colder temperatures.

An alternative option, which is the method we use, is to ferment at 10-15psi which will achieve partial carbonation in the beer. Once fermentation is finished top the fermenter up to around 20psi of pressure, disconnect the gas source and then initiate a cold crash. During the rapid temperature drop of the beer during a cold crash, some of the 20psi of pressure in the headspace is absorbed into the beer - as CO2 is more easily absorbed at colder temperatures. Using this method we get pretty close to full carbonation by the time our cold crash is completed.


Related Articles


Friday 15 July 2022

What pressure do I set on my kegerator for serving beer?

If you're new to kegging your beer, this will no doubt be one of the first questions you'll ask. There's a short answer and a long answer to this question.

The short answer is around 10-12 psi - this will generally be a safe level to use for most beer styles and will be a good starting point for most kegerator systems.

The long answer is "it depends". Here's why. 

You need to "balance" your kegerator system and there are a number of variables that need to be worked out in order to accomplish this. The serving pressure you set and use will be the same as the carbonation pressure required to achieve the level of carbonation or fizziness you want in your beer.

Don't stress though, it doesn't matter if you get this wrong at first - you won't ruin anything - an overcarbonated beer/keg can be corrected, just like an undercarbonated one can as well - you will need to make adjustments along the way, and understanding what you need to adjust and how will make this process much easier.

Firstly, the amount of carbonation (ie. carbon dioxide - CO2) that is dissolved into your beer (or other beverage) to make it fizzy is referred to as volumes of CO2. A popular carbonation level for most ales and lagers is around 2.4 volumes of CO2 so this is a good starting point for many popular homebrew beers. A quick google search for your desired beer style will give plenty of results on what the recommended carbonation levels are. 

It's also important to understand that the amount of carbon dioxide that can be absorbed into your beer is dependent on what temperature the beer is at. CO2 is more easily/readily absorbed at colder temperatures. So you will need to know what temperature the beer is sitting at in your kegerator.

This is all perhaps confusing and a little daunting, but thankfully there's wonderful things called carbonation charts that give you a table to map out your beer temperature, desired volumes of CO2 and will then give you a target pressure to set your gas regulator to. As previously mentioned, the pressure you use to carbonate your beer will be the same pressure you use to serve.

Here's a carbonation chart from Keg King. You can click the image below to make it larger and easier to read.

Keg King Carbonation Chart

As an example of how this works - let's say we want our beer carbonated to 2.4 volumes of CO2. And the beer in our kegerator is sitting at 3 degrees Celsius. If we match up the column for 2.4 volumes of CO2 with the row of 3 degrees celsius, we are presented with a value of 10.2 (psi). So this is the pressure we would set on our gas regulator.

There is one final piece to the puzzle though - and that is the length of your beer line - ie. what connects your beer keg to your beer tap. Even if you set your gas pressure correctly as per a carbonation chart, you may still pour beers that are too foamy or overcarbonated if your beer line length isn't long enough. This is because your beer line needs to provide some flow resistance to stop the CO2 from rapidly coming out solution whilst travelling down the line. Too much CO2 coming out of solution too rapidly is what causes foaming and is caused by the beer line not being long enough (assuming that the carbonation/keg pressure has been set correctly).

So how much beer line do you need? Once again, it depends, this time on the internal diameter (ID) of the beer line you are using. We use 4mm ID beer line and use just over 2m. For 5mm ID beer line you'll need around 4m. Start with a longer length and trim small parts off till you find the right length.

Lastly, there is the option of flow control beer taps and beer disconnects that can help provide this resistance in your beer line instead of, or in conjunction with your beer line length. They aren't something we've used ourselves but they're definitely worth mentioning.

Confused? Hopefully not, but here's a step by step guide on how we'd recommend you setup and balance your kegerator system.

  1. Look up the carbonation level measured in volumes of CO2 for the type of beer you are serving. If you're not sure, start with 2.4.

  2. Measure the temperature of the beer stored in your kegerator - you can set the temperature on the display of many modern kegerators, or otherwise leave a thermometer in the fridge for an hour and see what it reads.

  3. Lookup the pressure you need to set based on these two values - use the carbonation chart featured in this article above.

  4. Set the pressure on your regulator accordingly and connect to your keg(s). If your keg has more pressure than this value - shutoff the gas outlet from your CO2 bottle, and pull the PRV on your regulator or keg to purge the excess gas, then re-open the outlet on your bottle so the correct amount of pressure is applied to the keg(s).

  5. If your beer is not already carbonated, then you'll need to leave it connected to your gas source for several days in order for carbonation to occur. Make sure your beer is fully carbonated before proceeding.

  6. Connect your beer tap to your keg using a length of beer line. If you're using 4mm ID beer line, start with 2.5m. If you're using 5mm ID beer line, start with 4.5m.

  7. Now the fun part. Pour yourself a couple of beers. The first may be a little more foamy because of the temperature differential between your beer and the tap as it passes through so do a couple to get a true/accurate idea.

    If it's too foamy, double check your temperature and pressures. If they're all good, you will need to increase your beer line length.

    If it's too flat or undercarbonated, trim 10cm off the beer line and try again. Repeat until you pour beers with the right amount of head/carbonation.

Related Articles

Thursday 14 July 2022

American Amber Ale Recipe (All Grain)

Following on from our recently published American Amber Ale - Recipe Creation Guide, here is our go-to American Amber Ale recipe.

Vitals

Batch Volume: 23L 
Boil Time: 30 minutes
Brewhouse Efficiency: 75%

Original Gravity: 1.052
Final Gravity: 1.011
IBU (Tinseth): 37
BU/GU: 0.72
Colour: 31.5 EBC

Mash

Temperature: 67c - 60 minutes
Mash Out: 75c - 10 minutes

Malts

4.2kg - Gladfield American Ale Malt (80%) OR 4.2kg Maris Otter Malt
0.4kg - Gladfield Munich Malt (7.5%)
0.4kg - Gladfield Medium Crystal Malt (7.5%)
0.2kg - Gladfield Shepherds Delight Malt (4%)
0.05kg - Gladfield Light Chocolate Malt (1%)

Hops

30 mins - Columbus (15 IBU)
10 mins - Columbus (7 IBU)
10 mins - Chinook (7 IBU)

Hopstand 10 mins @ 85c - Columbus (3 IBU)
Hopstand 10 mins @ 85c - Chinook (3 IBU)
Hopstand 10 mins @ 85c - Centennial (2 IBU)

Yeast

Ferments US-05 (1 pkg) or Lallemand BRY-97

Fermentation

20c for 14 days

Carbonation

2.4 CO2-vol

Water Profile (Brewfather's American Amber Ale Profile)

Ca2+ (Calcium): 100
Mg2+ (Magnesium): 15
Na+ (Sodium): 19
Cl- (Chloride): 75
SO42- (Sulfate): 199
HCO3- (Bicarbonate): 43

Notes

We have taken inspiration for this recipe from David Heath's YouTube video (recipe is in the video description). We've made a couple of minor adjustments but wanted to credit David's work as we're big fans of his YouTube video's so check him out!

Our local homebrew store stocks mostly Gladfield malts so we've used the Gladfield equivalents. Check out this substitute chart/table for more info.

Yeast is the stock standard go-to yeast of US-05 but this can of course be substituted out for any number of alternatives. We really wanted a simple neutral flavoured yeast to really let the malt and hops do their thing.

All the other vitals are within the recommended ranges of the BJCP guidelines as outlined in our recipe creation guide.

Want to see how it turned out? Check out our American Amber Ale Brew Day post and our Tasting Results and Review post.


Related Articles

All Grain Recipe List

American Amber Ale - Tasting Results & Review

American Amber Ale - BrewZilla Brew Day

American Amber Ale - Recipe Creation Guide

Wednesday 13 July 2022

Beginner FAQ: How to tell if my beer has finished fermenting?


This is a common question for beginner homebrewers and it's a very important one to understand. As we well know, fermentation is the process undertaken by yeast that consumes sugars in our wort - and as a byproduct of this consumption, carbon dioxide (CO2), alcohol and heat are generated - along with other flavours and compounds that are imparted into the beer to give it it's unique flavours.

It's important that brewers understand when the fermentation period is completed so they know when they can proceed with the next step of the brewing process - usually packaging. For homebrewers, packaging will often be into bottles.

Packaging before fermentation is completed can be dangerous - especially when glass bottles are involved. If the beer is packaged into a bottle before fermentation is fully completed, the remaining sugar in the wort will be consumed by the yeast, along with the priming sugar that would have also been added to the bottles. As a result of this, the CO2 that is produced from the "mini fermentation" that occurs in the bottle will create an excessive build up of pressure which can lead to exploding bottles - aka. "bottle bombs". Definitely not something you want to happen.

So, how to know if fermentation is fully completed? The only way to know for sure is to take hydrometer readings to measure the specific gravity of the wort. If there are no changes to the specific gravity reading for 3 consecutive days, then fermentation is complete.

Relying on air lock bubbling/activity (or lack thereof) is not a reliable method for determining the completion of fermentation. As fermentation slows down towards the end, air lock activity will dramatically drop but fermentation can still be slowly occurring with no visible signs in the air lock.

Relying on reaching your recipes expected final gravity is also not a reliable method. Yeast are living organisms and as a result are somewhat unpredictable and don't always behave the same. For any given batch, the yeast may consume more or less sugar than expected which is known as over attenuation or under attentuation respectively.

We get it though - taking a couple hundred mL for a floating hydrometer sample every day for 3 days adds up - and who likes wasting beer, right? There are other alternatives though such as the Rapt Pill floating hydrometer which can give real time readings on the specific gravity of the wort and send them to an internet dashboard (ie. web page) or mobile app where you can view them which saves on the wastage of taking small samples for floating hydrometer readings.

Gravity readings are an important part of brewing - they also allow you to calculate how much alcohol has been generated by the fermentation and imparted into your beer!


Related Articles

Tuesday 12 July 2022

Cheeky Peak Nano-X Fermenter - Impressions after First Brew

We finally got our first brew (fermentation) done with our Cheeky Peak Nano-X Fermenter and wanted to share our thoughts so far.

This first fermentation was the Alfajor Biscuit Ale fresh wort kit from All Inn Brewing Co - we love fresh wort kits and find them a really quick way to get a keg full of freshly brewed beer without the fuss of a full brew day which we don't always have time for.

Most of our previous fermentations have been done in our FermZilla All Rounder from KegLand. We love our All Rounder and have made some great beers in it, but there are a few pro's and con's we've noticed even after just a single brew with our stainless steel Nano-X fermenter that we felt were worth highlighting.

Firstly, with our Rapt Pill in the stainless fermenter situated inside our brewing fridge - we essentially had it in a type of faraday cage that prevented the Pill from reliably connecting to our WiFi network and was very intermittently able to transmit data - sometimes going for several days without being able to connect which was disappointing. One possible solution to this problem would be to replace our InkBird temp controller with the KegLand RAPT Temperature Controller which can connect to the Pill via Bluetooth, then update the telemetry to the cloud from it's own WiFi connection. This feature was only recently enabled after a firmware update for the Pill. Alternatively we could use a WiFi range extender in our garage to help boost the WiFi signal, so long as it works for the older 2.4GHz network which is what the Pill uses.

We also missed the ability to watch the action inside the fermenter like we can with the clear plastic All Rounder. We installed our sight glass ball valve on the Nano-X fermenter so that the wort is visible in the sight glass, which gave us some insight into what was happening, but by the end of fermentation it had mostly filled with trub as you can see in the photo below.

Nano X Fermenter sight glass full of trub

Stainless steel is better at transferring heat than plastic, so we noticed our Nano X was a little more susceptible to temperature changes compared to our FermZilla. Not a particularly big deal as we had a heating option sorted for our fermenter fridge which worked well in conjunction with borrowing our insulation jacket from our FermZilla and loosely wrapping it around the Nano-X. A little crude, but it worked! The Nano-X neoprene jacket is definitely on the hit list for a future upgrade.

Our Nano-X Fermenter with heat pad and FermZilla insulating jacket

The Nano-X with the pressure rated lid has a significantly higher profile than the FermZilla so we had to remove an extra shelf in our fermenter fridge to allow it to fit.

We were also pleased with not having any issues with pressure leakage from any of the Nano-X ports or the lid itself. Not surprising with tri-clover fittings as they're relatively small, have new seals and are fairly easy to deal with and fit correctly. The large pressure lid though has a large surface area which means more area to seal and potentially leak from. The trick is definitely to use some food grade lubricant on the seal/gasket which gave us a leak free seal.

The conical shape of the Nano-X was also a big benefit. Our fresh wort kit was a total of 20L and we managed to fill our 19L keg and still had some beer left over in the end which was really surprising. There's definitely more beer lost in the trub in the non-conical All Rounder. It was great having the trub settled nicely into the cone at the bottom of the Nano-X, which separated it nicely and left more of the fresh beer on top.

Trub settled into the bottom of the Nano-X cone

Cleaning was also quite easy with the Nano-X - being made from stainless steel it's a bit more durable and the risk/worry of scratching the fermenter surface is much lower than when you're dealing with plastic fermenters. It was a little more time consuming compared to the All Rounder though since did a full tear down and removed all tri-clover fittings for cleaning as well. Ultimately not a big deal, but certainly not as quick/easy to clean as the All Rounder.

Our Alfajor Biscuit Ale didn't call for any dry hopping, but expect that this will be a piece of cake as well by using either the 3" or 1.5" openings on the lid of the Nano-X. We may even look at fitting a Hop Bong in the future to allow for completely oxygen free dry hopping, though dumping hops through the lid without any of this fancy stuff has never posed a problem for us previously.

Pressure transfer from our Nano-X to our fermenter

Transferring under pressure was also much the same, however it was nice not having to worry about tilting the fermenter on an angle like we do with the All Rounder to orient the floating dip tube to maximise how much beer we're able to extract out as it nears the trub cake at the bottom. We did however miss the visibility of seeing how much was left in the fermenter during transfer, but much of the guess work was taken out by viewing the weight of our keg being filled in real time using our Plaato Keg.


Related Posts


Saturday 9 July 2022

Keg King - Quickie - Cornelius Post Dispenser Nib - Hands on Review

Sometimes you just need to need to get in and get it done with minimal fuss. Perhaps you've only got limited time in the morning before the kids wake up, or only a small window of opportunity later at night before going to sleep - and that's where the Quickie comes in.

Keg King's Quickie Box

Of course we're referring to the Quickie - a corny keg poppet depressing attachment from Keg King. Aptly named, it's a simple yet clever device made for quickly and easily moving liquid through a cornelius keg liquid post, with no additional hardware required.

The Quickie is made from two pieces of stainless steel - and it simply slips over the liquid post of any cornelius keg. Press the Quickie down which in turn depresses the poppet on the post, and the liquid flows out through the little nib attached to the side. Simple and effective.

Keg King's Quickie - Cornelius Post Dispenser Nib

We tried ours for the first time by attaching it to one of our serving kegs and dispensed some beer into a glass. With the serving pressure on the keg set at around 12psi, the beer came out with quite a bit of force and a little more foam, but this can be reduced by modulating the flow by not depressing the Quickie down all the way to fully open it up, or by reducing the serving pressure in the keg. There's also the option to attach some silicone tubing to the nib of the Quickie to provide some additional control and flow resistance. Attaching it to a mini keg and taking to parties would be an excellent use case and saves the need for disconnects, long lengths of beer line and picnic taps or pluto guns for dispensing.

Keg King's Quickie - Fitted to Cornelius Keg Ball Lock Post

Dispensing finished beer is only one possible use though. Another use for the Quickie would be to extract small amounts of beer/wort from your fermenter for the purpose of taking a gravity reading using a floating hydrometer. This has certainly been a pet peeve of ours over the years - connecting a separate liquid disconnect, beer line and pluto gun to our pressure fermenter in order to extract a couple hundred millilitre sample to use for a gravity reading - only to then have to disassemble the pieces again for cleaning and sanitizing. And we all know if you leave the cleaning part as a job for tomorrow, it will get forgotten and the next time you go to use said pluto gun it will have all sorts of build up in it from being stored warm with beer left in it. Obviously we're not the only ones who felt this way - as thankfully now there's a simple and easy alternative.

A final example use would be when cleaning or sanitizing your cornelius keg and needing to run cleaning or sanitizing solution through the liquid tube and liquid post of the keg. Put some solution into the keg, apply some pressure and pop the Quickie on the post and the job is done - no more messing around with disconnects, beer line and pluto guns/picnic taps as previously mentioned.

Keg King's Quckie - with Silicone Tubing Fitted

Cleaning is an absolute breeze with the Quickie unscrewing from the top into two separate pieces. If you rinse/wash it immediately after use then the chances of any build up occurring are almost nil, and when it's this easy why wouldn't you? 

Keg King’s Quickie - Disassembled

Being made from stainless steel it's incredibly hard wearing and durable. It also means that the harsh cleaning chemicals and sanitisers often used in homebrewing will pose no problem to it's strength and reliability.

Retailing for under AU$15, the Quickie is one of those handy tools to have in your arsenal of brewing equipment. We'll definitely be using ours regularly for cleaning and taking samples and won't be missing the dreaded cleaning of the equipment it replaces.


Related Articles

Other Homebrewing Equipment Review Articles