Review Date: 26/11/2021
Brewery Name: Sydney Brewery
Beer Name: Pyrmont Rye IPA (definitely a missed opportunity - why is it not called a "Rye-PA"!?)
"Crafted with three varities of U.S hops, a bitter spiciness of pine & savoury malt, our Pyrmont Rye IPA presents itself as a beautiful dark amber, perfectly balanced with a sweet, fruitful aroma. Pyrmont Rye IPA really is a ripper!"
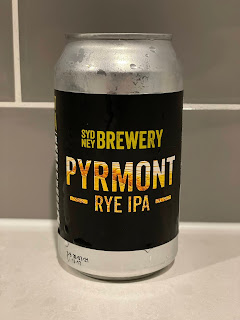 |
| Sydney Brewery - Pyrmont Rye IPA |
General
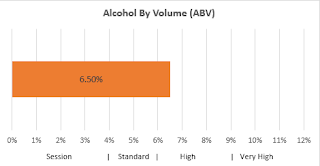
Alcohol By Volume (ABV): 6.5% (High Strength)
Label/Design: 3/10 - plain & simple design
Serving Style: Can - 355ml
Region of Origin: Pacific (Australia, New Zealand)
Style Family: IPA
Malts/Adjuncts: Rye, Unknown
Hops: 3 US Varieties (Unspecified)
IBU's: Unknown
Appearance
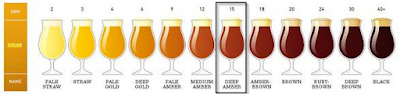
Colour: Deep Amber
Collar of Foam & Head Retention: Good (more than 60 seconds)
Foam Texture: Fluffy
Alcohol Aroma: Mild
Aroma
Esters Aroma: None
Phenols: None


Flavour & Aftertaste
Alcohol Taste: Noticeable
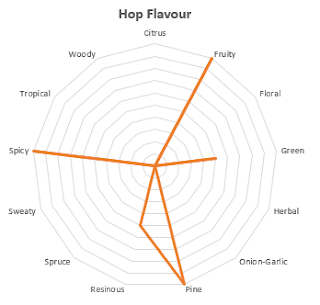
Hop Bitterness: Aggressive
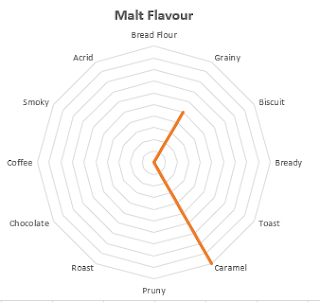
Malt Sweetness: Medium
Astringency: Low
Palate/Mouthfeel: Full Bodied (Round, Rich & Creamy)
Palate Carbonation: Medium
Length/Finish: Medium (15 to 60 seconds)

Overall
 |
| Sydney Brewery Pyrmont Rye IPA in the Craftd Alpha glass |
Drinkability: 7/10
Overall Impression: 7/10
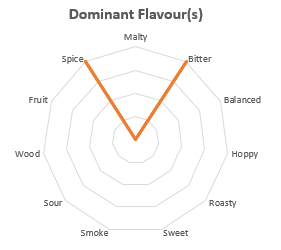
Notes: Overall an enjoyable beer and a good example of an American IPA. It has strong flavours - the unmissable classic American hop flavours always pair well with the caramel notes, presumably from crystal malts being used. Enjoyable but not sessionable with plenty of flavour and alcohol content.