.png)
At various points of the brewing process there is a requirement to move liquid from one vessel to another. Whether you're brewing with a single vessel all-in-one unit, or have a fully fledged three vessel system in your brew space - you'll inevitably need to move your water, wort or cleaning solution at some point. Sure, you can use gravity but this of course requires lifting large volumes of water so that they're high enough in relation to other vessels to allow gravity to do it's thing, so undoubtedly the most efficient way to do this is to use a motorized pump to do the hard work and heavy lifting for you.
Not all pumps are created equal, however - with base model units having limited flow rate, non-standard fittings and connections, increased risk of clogging, limited serviceability options and are simply more likely to just break down and leave you high and dry (literally and figuratively).
 |
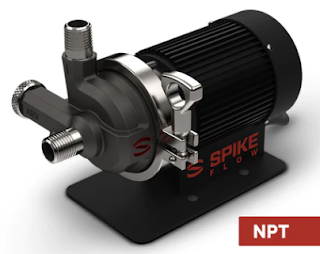
Spike Flow Brewery Pump - side shot
|
Spike Brewing have previously incorporated the March branded pump in their brewing systems, but for several reasons decided it was time to engineer and manufacture their own in order to address a number of shortcomings with the March and other similar brew pumps available on the market.
The end result is the Spike Flow Brew, and with thanks to Cheeky Peak Brewery, we're one of the first to get our hands on one for a hands-on, in depth review so let's jump in.
Packaging
The Flow comes packaged in a bright white box emblazoned with the red Spike logo. As we've come to expect with Spike products, there's plenty of padding to ensure no damage can occur to the pump during transit as well as protective covers over the inlet and outlet to prevent any dust or other material making its way in there.
 |
| Spike Flow packaging |
First Impressions Last
Taking the Flow out of it's box - and it just looks cool. The black anodized casing for the motor is the perfect back drop for the red Spike logo and chrome clamps to really pop out against. It comes fully assembled and ready to go - though you will need some additional attachments that aren't included to get it hooked into your brewing system. After lifting the Flow out of it's box for the first time we're impressed by the weight - there's no doubt this thing is built to last - Spike do claim after all that your liver will fail before their equipment does.
Accounting for this weight, at least in part, is the solid steel base with mounting holes/pattern consistent with other pumps on the market. This allows the Flow to be fixed to just about anything you can put a screw or bolt into, giving you flexibility and options with how you implement it in your brewery. It's sturdy enough on the ground, but mounting it to a piece of timber might be a good idea to help prevent it being accidentally knocked or kicked over - because you wouldn't want to damage that pretty paint job, right?
Spike Flow Model Options
There are two different models available for the Flow, with the only difference between them being the type of connections used for the inlet and outlet. Ours features a 1.5" tri clamp connection at the inlet and outlet points, with the alternative model featuring NPT threads in place of the tri clamps. It's certainly a personal decision as to which option will work best for you, and may depend on what hose connection types you already have but it's nice that two standardized fitting options have been used so no specialist or proprietary adapters are needed to get things going.
Depending on what model you go for will determine what extra parts you need - for the tri clamp version you'll need two 1.5" tri clamps, gaskets and suitable 1.5" fittings with some sort of barb or quick disconnect mechanism for attaching a hose to (one for the inlet and one for the outlet). We fitted some 1.5" tri clamp to quick disconnect attachments to make attaching and detaching hoses super quick and easy - just how you like things to be on brew day.
For the NPT version of the Flow, you will need two female NPT fittings with a barb or quick disconnect attachment that you can connect your hoses to (one for the inlet and one for the outlet).
 |
| Spike Flow with tri-clamp connection |
 |
| Spike Flow with NPT thread connection |
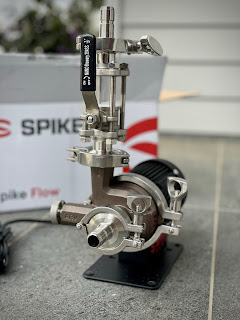
Here's a markup highlighting all the key parts of the Flow. This is of course for the tri clamp version, the NPT version will be the same with the exception of the inlet and outlet connection types;
 |
| Spike Flow Pump with TC connections |
Air Relief Valve (ARV)
The image above is fairly self explanatory, but it's worth pointing out the incorporated Air Relief Valve (ARV). This feature makes the process of priming the pump as simple as possible. The knurled ARV adjustment knob you can see protruding from the side is what is used to open or close the valve which when opened lets any air pockets (and some fluid) out through the 1/2" barbed ARV drain port, located on the front face. This is a neat inclusion and what's also great is that this valve is on the inlet side of the pump, so there is no pressure applied to this port which allows it to be opened whilst the pump is running without fear of whatever you're pumping being sprayed everywhere. Place a small container or hose under the port if you wish to capture and reuse whatever is drained out as part of the bleed process, then add it back into your source vessel if you wish to minimize wastage.
Some brewing pumps don't feature any sort of bleed or priming valve mechanism at all, and other pumps like the Blichmann Riptide have it on the high pressure side of the pump and facing upwards, meaning purging can result in hot sticky wort (or whatever it is you're pumping) spraying everywhere, including your pump housing. Having this built in with such a simple to use and non-pressurised valve is a great inclusion on the Flow, and means opening it gives a nice manageable stream that can be easily and safely contained.
 |
| Spike Flow ARV |
How does the Flow, flow?
Spike boasts a best-in-class flow rate of 9 gallons (34 litres) per minute (with the pump running fully opened), and a maximum pressure of 9.5 PSI (with the pump fully closed). Pretty impressive numbers and Spike are claiming 25% more flow than other comparable pumps on the market, but why is this important?
Flow rate is key when it comes to pump specifications, and higher is generally better. This means you can move more fluid through the pump more quickly. This is beneficial for almost every use case in a brewery - like faster movement of wort when transferring between vessels, a more effective trub cone when whirlpooling, faster wort cooling after boiling to help promote cold break, or more cutting power when cleaning your gear using a clean in place (CIP) spray ball. You can throttle back the flow if you need to by implementing a ball valve on the outlet side of the pump which allows you to dial it back for other use cases where flow rate doesn't need to be so high - like recirculating wort when mashing to match your recirculation rate to the flow through the grain bed.
The omission of a flow control mechanism was a deliberate design decision by the Spike engineering team as an integrated valve like what is featured on other pumps will ultimately limit and restrict the maximum potential flow rate of the pump. Plenty of man hours were invested in making the Flow work the way it does, with over a year spent on the pump head design and geometry alone. With this level of planning, design and engineering, it's no wonder they were able to achieve the numbers and specs they did.
The forward facing inlet and vertical facing outlet are oriented for maximum flow and efficiency - as opposed to other pumps which feature an "east-west" style flow path for inlet and outlet that inevitably lead to sharp bends that impede and hinder flow rate and efficiency.
Breaking It Down
The large 3" tri clamp that joins the motor housing to the cast-steel pump head is another great inclusion and means taking the Flow apart for whatever reason is quick and much easier than other pumps that feature multiple screws to hold the pump head in place. Undoing the 3" clamp and removing the pump head exposes the clever 6-impeller system used by the Flow.
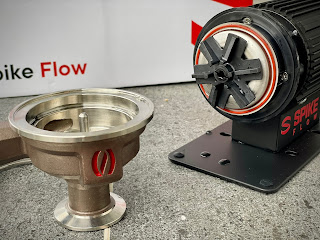 |
Spike Flow with pump head removed
|
No doubt one of the greatest inconveniences during a brew day is a clogged pump - an annoying and all too common occurrence when dealing with pumping fluids containing relatively large amounts of solids and particulate - like grain, hop debris and other proteins commonly found on the hot and cold side of brew days. Spike have tried to alleviate this problem by including chopping tines in the Flow's impeller system to cut up and break down any large enough particles to all but eliminate the chance of a clog occurring. It's a great idea that would no doubt be well received by any brewer who has suffered through the frustration of a clogged pump half way through a brew day. It will work well with things like T90 hop pellets, but isn't going to be capable of chopping up whole hop cones, so best proceed with caution if using these to ensure they remain contained in your brewing vessel and don't make their way into the pump.
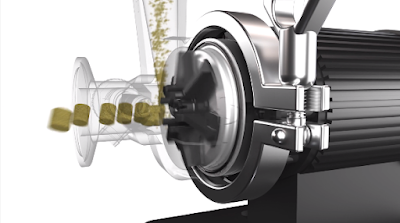 |
| Still shot from an animation of the chopping tines in action (from Spike website) |
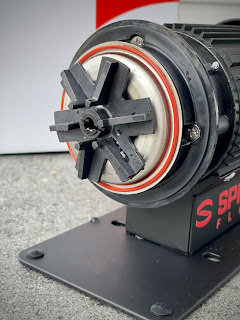 |
| Spile Flow pump with housing removed |
Removing this 3" tri clamp is all that is needed to clean out the pump, making it really fast and simple to maintain without fear of being unable to put everything back together again, or losing small parts required for reassembly. Some basic cleaning is all that's required to keep your Flow in good working order with no other regular maintenance being needed.
In saying that though, long-term serviceability was obviously a factor when designing the Flow, with the thrust washer and impeller shaft being integrated into a single stainless steel piece. This was another design consideration and point of difference between the Flow and other pumps which have the shaft fixed or integrated into the pump head with a removal thrust washer that can be very easily lost during disassembly. What this means is that after thousands of hours of running time, if the shaft becomes overly worn and needs to be replaced it can be done cheaply and easily without needing to replace the entire pump head like you would have to with a pump head with a fixed shaft attached.
The red on/off switch is located on the side underneath the motor, and features a plastic cover to prevent any fluids from getting in and damaging the circuitry inside. The power cord is permanently affixed, but is 6 feet (~1.82m) in length giving plenty of reach as well.
The motor casing itself is almost completely sealed off too, making it splash resistant with the only ventilation holes being on the rear of the housing. Other brewing pumps we've seen feature ventilation holes all over the motor casing to help keep the motor cool, but also allow water or wort to get inside the housing which is definitely not ideal - we all know that electronics and water don't mix well. It's great that Spike were able to engineer the Flow for continuous use without fear of the motor overheating, and without needing loads of ventilation holes in the casing to do so.
 |
| Spike Flow pump side angle with on/off switch |
The Flow Test
We've broken down all the key parts and features of the Flow, but how does it actually perform? We setup a simple recirculation system to our Cheeky Peak Nano-X Fermenter to give it a test run to see for ourselves.
 |
| Spike Flow pump assembled for testing |
Here's our Flow fully assembled for testing and as you can see in the image above, we've got our 1.5" to quick disconnect on the inlet of the pump. We then put a ball valve sight glass on the outlet of the pump with another 1.5" to quick disconnect on top of the sight glass for our outlet hose connection.
A ball valve on the outlet side is the best way to control the flow rate, and a sight glass is a nice addition in order to be able to see what's going on (and coming out) of the pump. Keep in mind though that this ball valve doesn't have to be attached to the Flow itself, you could mount it on the inlet port of your kettle for example to make it easier to access and monitor to make fine adjustments - all that matters is that the flow is controlled somewhere on the outlet side of the Flow and not on the inlet side.
We then hooked up the inlet side of the Flow to the bottom of our fermenter, and put the 13.5mm (ID) outlet hose from the pump back into the top
 |
| Spike Flow pump test rig with Cheeky Peak Nano-X Fermenter |
A very simple setup, but you get the idea and it's certainly enough to give us an understanding of how the Flow performs. After hooking this up we bled the air bubbles in the inlet hose out via the ARV, then powered on the Flow with a 'click' of the on/off switch - and we were surprised at what happened next.
Spike boast about the motor being "ultra-quiet" and they certainly weren't kidding. The Flow seemed to be moving the water through these hoses with much more force and pressure than you'd expect from the gentle hum coming from the motor. Check out the video below to see for yourself.
We left this setup running for a period of time and unsurprisingly the Flow didn't miss a beat. It's certainly got more than enough working pressure to run a spray ball attachment so this is something we're going to look at investing in soon - but there's no doubt that whatever fluid pumping job you need to do in your brewery, the Flow is up to the task.
The Verdict - Go With the Flow
The Flow has certainly established itself as a premium product, and with that comes a price tag to suit, putting it typically within a few bucks of what we'd consider it's closest competitor - the Blichmann Riptide. It's apparent that plenty of thought has gone into the engineering of the Flow, since it addresses almost all the shortcomings of other pumps on the market - with the only real drawback being the lack of included mechanism to control the output flow. We're OK with this though - including such a mechanism would have ultimately reduced the performance of the Flow, and if you do need to control the output, ball valves are cheap and readily available and most brewers probably already have one in their equipment inventory anyway.
The included ARV is a feature highlight, with a non-pressurised and simple to use drain port for bleeding air out of the inlet line for easy, mess free and safe pump priming.
The Flow looks great, goes like hell and with standardized fitting options, mounting holes and exceptional build quality would without a doubt make a great addition to any brewing system.
The Technical Stuff
Here are the technical specs, taken directly from the Spike website;
• Best-in-class 9 gallons (34 litres) per minute flow rate
• Best-in-class 9.5 PSI of pressure
• Air Relief Valve (ARV) makes priming easy and convenient
• Built in 1/2" drain barb
• 6-vane impeller design optimized for performance and durability
• 304 stainless steel precision machined casting with maximized inlet and outlet ports
• Integrated chopping tines to prevent clogging
• Black anodized motor shell and shot-blasted housing
• 3" Tri-Clamp housing connection for easy disassembly, cleaning and reassembly
• Ultra-quiet, fan enclosed motor: 120v, 60 Hz
• 6 foot power cord
• 9" length x 5" width x 7" height
• Continuous use rated
Where to Buy
If you're located in Australia (like we are), the only place to get your Spike Flow Brew Pump is from Cheeky Peak Brewery with a current price of AU$385.
Outside of Australia you can get the Spike Flow directly from the Spike Website (US$229 for the NPT model or US$249 for the tri clamp version) or from other good brewing equipment retailers.


.png)