Wednesday 28 September 2022

BrewZilla - Boiler & Malt Pipe Extensions to Increase Capacity

For those who are using the Generation 3 BrewZilla's - the maximum volume of malt that can be held in the factory malt pipe is somewhat limited - particularly for the 35L versions.

For the Generation 3 65L unit, the maximum malt load is 15.5kg (34.17lbs) with a maximum efficient load of 12kg (26.45lbs)

For the Generation 3 35L unit, the maximum malt load is 9kg (19.84lbs) with a maximum efficient load of 7kg (15.43lbs)

Some may not be aware that a boil extender unit is available for both units to help increase the volume/capacity of the BrewZilla's. These boil extenders simply clamp onto the top of the BrewZilla using the factory clamps and come with a rubber gasket/seal to help prevent any leaks from occurring between the extender and the BrewZilla.

Since they attach using the factory clamps, they are easily removed meaning you can opt to use it or not use it for each particular batch, and are easy to disassemble and clean.

For the 35L BrewZilla, a boil extender will give an additional 12L of usable space taking the total usable volume to 47L (12.4 US Liquid Gallons).

BrewZilla Gen 3 35L Boil Extender
Image Copyright of KegLand

You could even stack two of them together for a total volume of 59L (15.5 US Liquid Gallons).

For the 65L BrewZilla, a single boil extender will add 24L and take the total usable volume to 89L (23.5 US Liquid Gallons) or by stacking two of them together you can reach a total of 113L (29.8 US Liquid Gallons).

BrewZilla Gen 3 65L Boil Extender
Image Copyright of KegLand

KegLand have stated that the heating elements are powerful enough to reach a boil with two extensions fitted - though it would probably depend on the ambient temperature as well. We expect temperature ramp up times would also be fairly long.

If you want to fit a boil extender to your BrewZilla, you can also opt for a large malt pipe to suit which is 195mm taller than the standard malt pipe allowing you to fit more grain along with the additional increased liquid capacity.

Fitting the larger malt pipe with a boil extender on the 35L BrewZilla will raise the efficient maximum from 7kg (15.43lbs) to 10.5kg (23.14lbs) with a total capacity raised from 9kg (19.84lbs) to 13.5kg (29.76lbs)

BrewZilla Gen 3 35L Extended Malt Pipe
Image Copyright of KegLand

For the 65L BrewZilla, the larger malt pipe will raise the efficient maximum from 12kg (26.45lbs) to 18.5kg (40.78lbs) with total capacity raised from 15.5kg (34.17lbs) to 24kg (52.91lbs)

BrewZilla Gen 3 65L Extended Malt Pipe
Image Copyright of KegLand

Here's a table summary outlining the above information;

BrewZilla Gen 3 - 35L BrewZilla Gen 3 - 65L
Standard Malt Pipe - Max Grain 9kg (19.84lbs) 15.5kg (34.17lbs)
Standard Malt Pipe - Efficient Max Grain 7kg (15.43lbs) 12kg (26.45lbs)
Boil Extender + Extended Malt Pipe - Max Grain 13.5kg (29.76lbs) 24kg (52.91lbs)
Boil Extender + Extended Malt Pipe - Efficient Max Grain 10.5kg (23.14lbs) 18.5kg (40.78lbs)

As you can see, by fitting a boil extender and larger malt pipe, you're able to achieve an approximate 50% increase in capacity (maximum and efficient maximums).

If you do decide to go for the boil extender and larger malt pipe, you may also wish to purchase the Halo Support Ring - the wire ring located around the top of the BrewZilla units that the malt pipe rests on when in the raised position. Alternatively, you can remove the factory fitted halo support ring and install it onto the boil extender.

You can of course opt for the boil extender on it's own (without the larger malt pipe) - to give a little extra headspace and insurance against boilovers if you're running the BrewZilla to it's capacity.

We think these are some really great optional extras that allow BrewZilla users to scale up their batch sizes without having to purchase an entirely new system. The fact that they're modular and easily removed means brewers have increased flexibility on whether or not they use it for every single batch. Removing them will also aid in cleaning and maneuverability of the BrewZilla when not in use.

We're planning on upgrading our 3.1.1 35L unit with a single boil extender and larger malt pipe in the near future so we can increase our batch sizes, but also so we can brew higher gravity beers with more malt for a regular/single batch size.

Check out the links below to KegLand's website for pricing and other information on the boil extenders, extended malt pipes and malt pipe support rings.

BrewZilla 35L Boil Extender

BrewZilla 65L Boil Extender

BrewZilla 35L Extended Malt Pipe

BrewZilla 65L Extended Malt Pipe

BrewZilla 35L Malt Pipe Support Ring

BrewZilla 65L Malt Pipe Support Ring

We'd also recommend checking out David Heath's YouTube video where he covers these boil extenders in more detail.


Related Articles

Stone & Wood Pacific Ale - All Grain Clone Recipe

Tuesday 27 September 2022

How to connect RAPT Pill to Brewfather

If you're using the RAPT Pill or RAPT Temperature Controller, you are able to seamlessly integrate the readings from either or both of these devices directly into Brewfather. This allows for fermentation graphs to be tied/linked directly to a batch within Brewfather which is a neat way to allow fermentation graphs to appear within the batch.

The process for integrating them is really simple and is outlined below;

  1. Login to Brewfather (https://web.brewfather.app) then select Settings from the left menu.
    Under the Power-ups section, enable the slider for RAPT and copy the ID value that appears underneath.


  2. Login to the RAPT Portal (https://app.rapt.io)

  3. Click your name in the top right corner to open the drop down menu, then select Web Hooks


  4. Select Create new Web Hook > Brewfather Power-up


  5. On the Details tab, enter a name for the Webhook (the name is not important - you can call it whatever you like), then paste the ID value you copied from Brewfather in Step 1 into the Integration Id field.


  6. Select the Devices tab, then enable whatever devices you have available that you wish to integrate into Brewfather. Enabled devices have a tick next to them.
    In the example below we've enabled both our RAPT Temperature Controller and our RAPT Pill.


  7. Click the Save button at the bottom of the screen to save the settings.

  8. It may take a little time for the sync from RAPT to Brewfather to occur (ours happened within an hour), but once it does Brewfather will notify you (if you have email notifications enabled), and the RAPT devices will appear within the Devices list in Brewfather.


    Note that your RAPT device(s) need to be powered on, connected to the Internet and actively submitting telemetry to the RAPT Portal for the sync process to work.

  9. If you have an active batch within Brewfather, you can then link whatever RAPT devices you wish by clicking the Devices button after selecting the Batch within Brewfather


  10. You can then attach whatever devices you wish to the batch by clicking the Attach button.

  11. After attaching devices, there is a settings cog and a bar graph icon available for each device.


    You can use the settings cog to configure gravity or temperature offsets for the corresponding device. Note the instructions about using whole numbers and not decimals for gravity offset. For our RAPT Pill, we used -4 as our Pill was reading 0.004 higher at the beginning of our fermentation than our known Original Gravity.


  12. Use the bar graph icon to enable/disable fields from being displayed/imported into Brewfather. For both devices you can enable/disable readings for Gravity, Temperature & Battery. On our Pill we opted to not show the temperature or battery values in Brewfather.


  13. Once this has been setup, you will have a nice graph appear in the batch in Brewfather logging whatever fields you have enabled.


  14. Note that you need an active Premium Brewfather subscription to utilise these features. At around AU$30 per year it's fairly easy to justify given the additional benefits you get.

Related Articles


Monday 26 September 2022

Keg King - UltraFill - Counter Pressure Bottle Filler - Review

Most homebrewers begin their brewing journey with starter kits that come with a bunch of bottles for packaging their beer after being fermented. Bottles are cheap, simple, and can be packaged into with minimal additional equipment required, making them an ideal storage solution for those starting out in the hobby of homebrewing.

For those that stick with it, bottling can soon become tedious though - mainly because of the labour and effort required to clean and sanitize dozens of bottles for every batch. This inevitably leads many homebrewers (like us) down the rabbit hole of kegging their beer - which gives plenty of additional benefits over bottling, but perhaps most significantly reduces the cleaning and preparation time involved for packaging. Cleaning a single keg is inevitably faster and easier than cleaning 20+ bottles for every batch of beer that is brewed.

Ironically, once homebrewers have their kegging operation underway, it's soon realised that there isn't a particularly easy way to efficiently get their precious beer from the keg into a bottle - which can be handy for sharing with family and friends, entering into competitions or taking to parties etc.

Sure, you can fill a bottle or growler directly from a tap, but this will often lead to a fair amount of foaming which reduces the level of carbonation, and with no way to reduce oxygen being introduced into the beer during this process, the beer will likely suffer the effects of oxidation and spoil within a matter of days in the bottle.

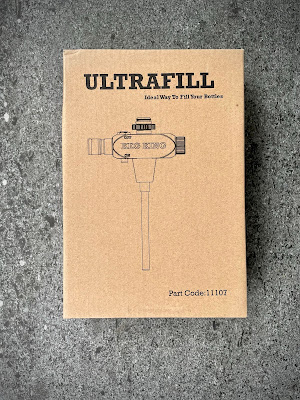
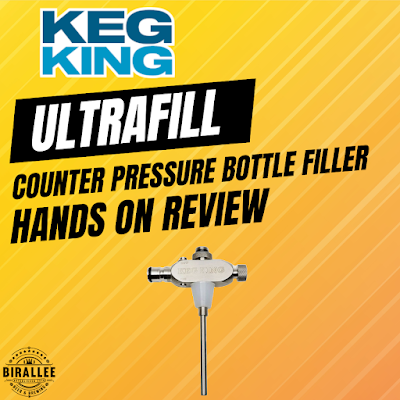
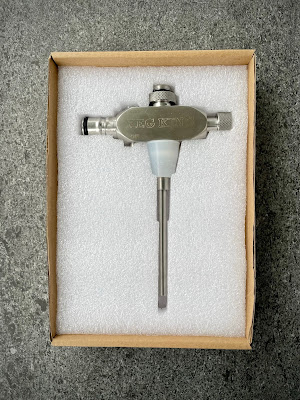
Keg King's UltraFill Counter Pressure Bottle Filler Box

That's where counter pressure bottle fillers come in. They provide a reliable way for brewers to get their beer packaged from a keg into bottles/growlers by significantly reducing the effects of foaming and oxygen ingress during the bottling process.

The term counter pressure bottle filling can sound a little daunting though. The theory (and process) behind it is relatively simple, and similar to that of general pressure transfers from (pressurised) fermenters to kegs. The bottle is pressurised to be the same or similar pressure to the source keg. Then once the beer transfer line is opened on the bottle filler, a vacuum effect is created by reducing the pressure in the bottle that draws the beer from the keg into the bottle.

Since the beer remains under pressure during the transfer process, the amount of absorbed carbon dioxide (CO2) that comes out of solution is limited which in turn reduces foaming and helps maintain the right level of carbonation within the beer after being bottled. And since the bottle is pressurised with CO2, this also greatly reduces the level of oxygen present in the bottle which helps reduce the risk of oxidation.

Keg King have designed their own counter pressure bottle filler, named the UltraFill which is a versatile little unit to help brewers leverage the benefits of counter pressure filling.

The UltraFill comes assembled as a single unit, constructed almost entirely of stainless steel. Straight out of the box it has a threaded connection to enable it to be screwed directly onto the nozzle of Keg King's range of UltraTap's. Some other counter pressure bottle fillers use a push-in style adapter to insert into the tap nozzle which are more prone to leaks, or simply popping out during use. Having a screw in thread like this means leaks and accidental disconnections are much less likely to occur.

Keg King's UltraFill Counter Pressure Bottle Filler

There are a few other connection options available for the UltraFill, such as UltraTap or InterTap extension kits which allow beer extension lines to be fitted to the respective taps (instead of connecting the UltraFill directly to the tap nozzle), or a Keg Connector kit - all of which allow bottle filling to be accomplished on a table top, or the ground. In this review we'll be using the Keg Connector kit.

The image below illustrates the key components of the UltraFill;

1. Gas ball lock connection
2. Gas On/Off toggle
3. Liquid/beer input - pictured is the thread to connect to UltraTap's.
4. Screw collar
5. Pressure release adjustment
6. Plastic/silicone bung
7. Telescopic filling arm

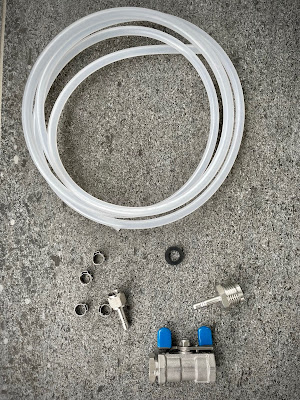
UltraFill Keg Connector Kit Parts

The Keg Connector kit that we're using has a ball lock housing that attaches to the liquid input (3) of the UltraFill. There's also  a length of beer line, a washer and some stepless clamps to attach the beer line to the ball lock housing and the other end to a liquid disconnect (liquid disconnect is not included). It's relatively straight forward to assemble, though we got caught out after failing to install the included washer when first assembling which resulted in leaking during initial testing. A single page instruction sheet or diagram on the Keg King website wouldn't go astray to help young players piece it together. 

UltraFill Keg Connector Kit Assembly

The inclusion of a gas ball lock connection on the UltraFill housing is a great idea, helping to make the unit as "plug and play" as possible.

The on/off toggle for the gas is well positioned near the gas ball lock post and allows for easy single handed operation of the gas input.

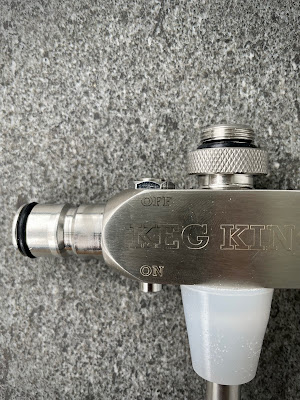
Closeup of the UltraFill gas on/off toggle

An additional screw collar (4) means that the UltraFill can be adjusted and oriented correctly after having whatever is to be attached to main liquid input thread (3) screwed into place. This is a really nice and well thought out feature as it would be extremely difficult to operate if not facing the correct way after being screwed into place.

The pressure release control (5) is tactile and has a nice feel to it, giving precise control over the pressure being released from the bottle. There are also some markings as you unwind it giving an indication of what pressure is currently set which is a nice touch.

Just about any size bottle can be filled using the UltraFill. Since the filling arm is telescopic, it can be extended to reach the bottom of even the largest of bottles, and the tapered shape of the silicone bung (6) means any size bottle opening can be used and sealed for pressurising and filling.

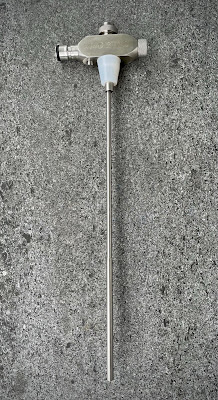
UltraFill Telescopic arm fully extended

After connecting everything together, we were ready to go with filling our first bottles. Here's the step by step process we followed;

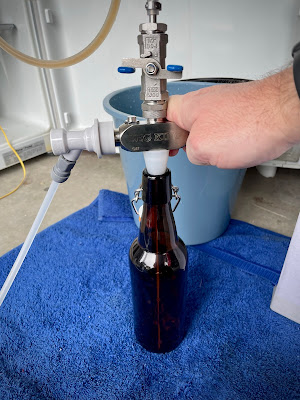
Keg King UltraFill Counter Pressure Bottle Filler in action

1. Ensure the ball valve control is in the off/horizontal position and the pressure release control on the UltraFill is fully tightened (turned clockwise).

2. Extend the telescopic arm so it's as long as possible (only required for the first bottle if subsequent bottles to be filled are the same size/length).

3. Insert the telescopic arm into the bottle and lower the UltraFill so the plastic bung is seated securely in the bottle opening. The telescopic arm automatically retracts whilst doing this so it's as close to the bottom of the bottle as possible.

4. Set the gas toggle to the "On" position which will begin building pressure within the bottle. A little bit of downward pressure to keep the UltraFill seated on the bottle is required to ensure pressure is built/maintained. We briefly release the pressure by lifting the UltraFill slightly to "burp" it and help release some of the oxygen from the bottle. This can be done a couple of times, though we only did it once per bottle.

5. After 10-15 seconds, pressure has been built so the transfer can now start. Set the gas toggle to the "Off" position, then open the ball valve by rotating the control arm into the open/vertical position.

6. Depending on how much pressure is in the bottle, and the pressure differential between the bottle and the keg, beer may now start flowing. The flow rate can be controlled by releasing pressure from the bottle using the pressure release valve on the UltraFill (by turning it counter clockwise). Release more pressure to speed up the filling process, though slow and steady is generally recommended to minimise foaming.

7. Once the desired fill level is achieved, shut off the beer flow by rotating the ball valve control back to the off/horizontal position.

8. Gently/carefully remove the UltraFill from the bottle. A little bit of spray/foam may come out of the top of the bottle as the pressure is released.

Repeat the above process for each subsequent bottle. 

Having never used a counter pressure bottle filler before, we were pleasantly surprised at the ease of operation. It perhaps sounds a bit more involved than it actually is, and it was surprisingly easy to operate the controls whilst maintaining a little bit of downward pressure on the bottle to ensure a good seal.

We really liked the Keg Connector kit that allowed us to have bottles placed on a hard surface so we didn't have to hold the bottles and maintain pressure on the UltraFill - though there's no reason to think attaching it to a tap and maintaining upward pressure on the bottle would be overly difficult either. The inclusion of push in fittings instead of stepless clamps, or an optional upgrade to include them and a liquid disconnect on the website for an additional fee might be a good idea too.

There was definitely a reduced amount of foaming compared to our previous bottling method from kegs using a beer gun. Whilst beer guns are still good, the requirement to use them at much lower serving pressures to reduce foaming (around 2-3 psi is typically recommended) means there's a bit more mucking around with lowering keg pressures which has it's own implications (quickly reducing pressure in the keg will lead to foaming in the keg) which then leads to increased foaming when bottling unless you leave the keg to settle again after reducing the pressure.

Counter pressure bottle filling does away with all of this, meaning you can bottle quickly using the same pressure that your keg is at, with minimal fuss and less cleanup since there's less foaming. Less foaming means a reduction in lost carbonation too. And filling into a bottle pressurised with CO2 greatly reduces the risk of unwanted oxidation occurring - meaning your beer will stay fresher for longer after being bottled.

The fact the entire UltraFill unit is made of stainless steel means it's robust and sturdy and can be quickly and easily cleaned and sanitised before and after each use. The pressure control valve can also be fully removed for cleaning should some foam happen to make it back up into the unit during bottling by overfilling.

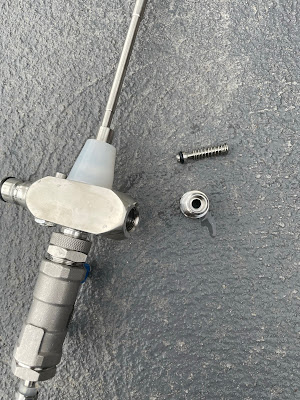
UltraFill with the pressure control disassembled for cleaning

When it comes to bottling beer from a keg, a counter pressure bottle filler is arguably the best option to use, and Keg King's UltraFill has all the features brewers would need. The ability to directly attach to UltraTap's makes it a must have accessory if you're already using them, but even if you're not, the Keg Connector kit gives the flexibility to work with just about any keg.

Some people have concocted their own counter pressure filling devices using carbonation caps and lengths of silicone hose, which may work but are inevitably finicky and difficult to use, especially if you want to fill different size bottles. There's a lot to be said for purpose built applications such as the UltraFill to make processes as easy and efficient as possible.

The UltraFill is available from Keg King's website and is currently retailing for AU$59.95.


Related Articles

Other Homebrewing Equipment Review Articles

Sunday 25 September 2022

BrewZilla Brew Day - Stone & Wood Pacific Ale Clone

Here's a rundown on our latest brew day where we are attempting a clone of Stone & Wood's famous Pacific Ale.

Here is the recipe we're using. Essentially it's a 60/40 split of pale malt and wheat, with US-05 yeast and exclusively galaxy hops.

Starting out we setup our strike water and sparge water in our BrewZilla and Digiboil units, and made the water adjustments as per Brewfather. We used the 'hoppy' water profile in Brewfather which has high sulphate levels to help accentuate the hop flavours. We've noticed when drinking Pacific Ale, particularly on tap the really dry finish which is indicative of high sulphate levels.

We haven't got our own grain mill (yet) so we have our grain milled by our local homebrew store when we purchase it. We added the pale and wheat malt together into the BrewZilla for the mash, then added the flaked wheat onto the top of the grain bed but didn't mix it in entirely. We've heard of others utilising this method to help reduce the stickiness of the mash and help with recirculation. After doughing in we let the grain bed settle for around 10 minutes before taking a small sample for our pH reading. 

This is our first time using a pH meter to test our water acidity levels. We added 2 of the 3mL of 85% phosphoric acid as recommended by Brewfather to get a target pH of around 5.3. Our first test returned a result of 5.65.

We then added another 1mL of phosphoric acid to the mash, waited another 5-10 minutes and took another sample which gave us a reading of 5.45. Close enough for us to 5.3 and well within the acceptable range of 5.2 - 5.6. Mash pH is a bit of a moving target, so hitting an exact number is not a huge deal for us, so long as we're in the correct range.

We set the BrewZilla to recirculate with the lid on and adjusted the temperature to reach 65C at the top of the grain bed which we measure with a separate long probed thermometer.

Recirculation flow was fairly decent considering the amount of wheat. We did add a bunch of rice hulls to aid with water flow through the grain bed as well.

We stirred the grain bed 3 times during the 60 minute mash process before lifting the grain basket and beginning the sparge.

We took a pre-boil gravity reading and was pleased to find it 1 point over our expected pre-boil gravity of 1.046.

We're still developing trust in the accuracy of our digital hydrometer so we measured with our floating hydrometer as well which showed the same reading on both.


We set our BrewZilla to boil and continued sparging until we reached our target volume of approx 25.5L. The sparge started to slow down towards the end but had a fairly constant flow and never got stuck.

Once our wort was boiling we started a 30 minute timer (as the recipe we're using is calculated based off a 30 minute boil). 

We measured out our first galaxy hop addition which is relatively small at only 8g, along with 15g of yeast nutrient.

At the halfway point of the boil (15 minutes elapsed, 15 minutes left), we added this addition of hops and yeast nutrient. We then measured out our second galaxy hop addition (16g) which was added with 5 minutes left in the boil, then our final and largest hop addition (40g) which was added during the whirlpool after the boil had finished.

We overshot the cooling of the wort for our whirlpool so the temperature ended up dropping to around 76C instead of the target 80C - may lead to a little less bitterness being extracted but we don't anticipate it will be a huge problem - guess we'll find out in a couple of weeks.

After the whirlpool we continued cooling the wort using the BrewZilla stainless steel immersion chiller before transferring to our Apollo PET fermenter.

Original gravity reading is 1.051, confirmed again with the digital and floating hydrometers, which was 2 points higher than expected from the recipe. So we'll end up with a tiny bit more alcohol in the end product than expected. Perhaps we'll call it an "Extra Pacific Ale"?

The colour looks really good, and judging by the sample from the hydrometer, probably not far off the colour of the actual Stone & Wood Pacific Ale. After pitching our US-05 yeast, we had fermentation activity underway the next morning.

Fermentation is set to a target temperature of 19C with an expected final gravity of 1.010.

As you can see from the graph below, fermentation completed in a few days reaching the expected FG of 1.010. Once FG was reached, we raised the temperature a couple of degrees to help the yeast along with cleaning up diacetyl and any other unwanted byproducts from fermentation.

We confirmed the FG reading using our trusty floating hydrometer which confirmed 1.010. This gives us an ABV of 5.4%.


After initiating a soft crash to 12C, we added our 80g dry hop charge of galaxy hops which was left in the fermenter for 48  hours before transferring to our keg.


Monday 19 September 2022

Feature Article: Bluestone Yeast Co - Australian Brewing Liquid Yeast


There's an old saying that "brewers create wort, but yeast creates beer", which highlights the significance and importance of yeast in the beer creation process. Debate has long been raging amongst brewers, but particularly with homebrewers, on the topic of dried yeast vs liquid yeast in relation to which one gives better results for making beer. We've used dried yeast in all of the beers we've made, and there are several reasons for this. Firstly, dried yeast is significantly cheaper than the liquid version. It's more resilient, readily available, easier to store, and we've made some seriously good beers using it - some just as good as other craft beers we've had that have been made commercially.

Since we're in Australia - historically our only option for liquid yeast has been varieties imported from overseas, usually from the USA with brands like Whitelabs occasionally popping up in homebrew stores, but often in limited supply and varieties. Using imported liquid yeast from overseas is in our mind somewhat risky though. The sheer distance it needs to travel, and the logistics involved in transit, clearing customs, and making it's way through holding warehouses and distributors before finally landing in homebrew shop fridges means the risk of a reduction in quality is somewhat high. Given the relative volatility of yeast in liquid form, and the premium price tag, we just haven't seen a compelling reason to use it.

There's a new local player in town though, with Bluestone Yeast Co starting up and offering breweries and homebrewers alike, access to locally produced, high quality liquid yeast. Since it's made in Melbourne, Australia, all the risks we previously mentioned from imported liquid yeast don't apply, since it can be shipped to nearly all major cities within Australia overnight. We're all for supporting Australian business, so we're going down the proverbial rabbit hole on liquid yeast to see what we can find. 

First things first. Who are Bluestone Yeast Co? Bluestone was founded by the Lacey brothers - Derek and Damien. Derek has a science background and is an avid homebrewer himself. Damien is a mechanical engineer and together they started Bluestone Yeast Co back in 2018 after identifying a large gap in the local Australia brewing market - that there were no decent local yeast manufacturers. Due to the explosion of the craft beer scene in Australia in recent years, there's finally a large enough local industry, and therefore demand from local breweries to support local yeast production.

In an episode of Between Two Urns, Daniel from Keg King interviewed Derek from Bluestone yeast. They discussed a number of different topics, from Derek's background in medical research, to the founding of Bluestone yeast as well as trends in the industry and some tips on how to get the most out of your homebrew (like oxygenating your wort and having good temperature control). Derek mentions a number of prominent craft breweries in Australia who are already customers of theirs (currently around 80 in total) and are using their yeast products. Such breweries include Mountain Culture Beer Co, Deeds Brewing. Kaiju, and Ocean Reach.

Bluestone cite enhanced esters, higher flocculation, and higher viability after fermentation - ie. better yeast harvesting and re-use when comparing their liquid yeast varieties to dry yeast. They've got a pretty decent range of yeasts too, as you can see from the image below (click the image to enlarge);

Bluestone Yeast Co - Yeast Varieties
Image Copyright of Bluestone Yeast Co

Let's break down some of the yeast varieties to take a look at what they are, and what commercially available yeast strains we believe they are similar to.

Lager Yeasts


Pilsen - BSY-L005


"This strain combines good flocculation characteristics with low sulfur and low diacetyl. Clean fermentations produce amazing bock, helles, pilsner, dunkles, and just about any other lager style you throw its way."

We'd liken this one to Mangrove Jacks M84 Bohemian Lager Yeast or Lallemand's Diamond Lager Yeast, for creating classic, clean, neutral flavoured lager styles.


Stuttgart - BSY-006


"This strain is for fermenting your "Crisp Lager" beer. Stuttgart can produce clean pseudo lagers at ale termperatures but is also willing to work as a traditional lager strain down to the low teens."

This variety sounds like Mangrove Jacks M54 Californian Lager Yeast, or Fermentis W-34/70 given the ability to ferment warmer than traditional lager yeasts typically do without the associated off flavours. Perfect for creating styles like Cold IPA's or India Pale Lagers.


American Ale Strains


San Diego - BSY-A010


"Clean character performs well at standard ale temps but for exceptionally crisp ales you can brew between 14-16C. However for crystal clear beers filtration or fining is required."

Since San Diego is on the West Coast of the USA, we're taking this to be a West Coast style ale yeast. The neutral flavour properties sound similar to Fermentis SafAle US-05, Morgan's American Ale Yeast,  Lallemand's Lalbrew BRY-97 or Mangrove Jack's M44 US West Coast Yeast. Ideal for those clean and balanced pale ales.


New England - BSY-A011


"Juicy. Fruity. New England is an amazing strain for East Coast IPAs. The ester profile of New England brings out the aromas and flavours of the modern hop varieties and creates a beer that is greater than the sum of its parts. This dynamic strain likes to move to the top of the fermentation and will climb out the fermenter if too full."

The description pretty well gave this one away, being an East Coast style ale yeast. It's medium flocculation properties and the New England style suggest it will make for hazy, heavily hopped beer styles which are all the rage at the moment. Similar varieties or substitutes would include Mangrove Jack's M66 Hophead Ale Yeast, Lallemand's New England American East Coast Ale Yeast or even Lallemand's Verdant IPA strain.


Michigan - BSY-A012


"Michigan will shape a strong IPA, producing stone fruit esters that work great when paired with citrus hops. Michigan will give you what you need for an exceptionally balanced IPA."

Perhaps similar to Mangrove Jack's M36 Liberty Bell Yeast, but not entirely sure what other current yeasts may be similar. The packaging colours are also a subtle nod to the Michigan Wolverines football team too.


Detroit - BSY-A013

"This strain is a fast mover and can be used at the low end of the ale fermentation spectrum to keep it clean. Detroit is a great choice for big, high alcohol, malty beers but has no issues motoring through a hoppy double IPA."

The description of this one sounds similar to Mangrove Jack's M42 New World Strong Ale Yeast. Supposing the "Detroit" name to be a reference to the American "Motor City" - perhaps closely related to the above Michigan strain (since Detroit city is in Michigan State).

Boston - BSY-A015

"Very clean, crisp flavour characteristics with low fruitness and mild ester production. A  very versatile yeast for styles that desire dominant malt and hop character. Use this strain to build a wonderful "House" ale. Mild citrus notes develop with cooler 15-19C fermentations. Normally requires filtration for bright beers."

Another neutral sounding yeast style, it's properties sound similar to SafAle US-05, but nothing that seems to set this one apart from some of the other American strains.

Portland - BSY-A037

"A solid all-around ale strain that is perfect for hop-forward beers. It is the go-to yeast for Brut IPAs. It ferments clean with an emphasis on hop flavour and aroma. Well-balanced, this yeast strain can be used to construct a wide range of ales."

The promotion of  hop flavours sounds similar to Fermentis SafeAle S-33.

Belgian Ale Strains


Wallonia - BSY-A002

"Wallonia is named after the French speaking part of Belgium where the saison style first originated. Wallonia is a great yeast for saison, farmhouse ale and Belgian styles giving high ester levels and juicy aromas that complement complex malts."

Obviously a saison yeast strain, similar yeasts include Mangrove Jack's M29 French Saison yeast, or Lallemand Belle Saison, or Fermentis SafAle BE-134.

Ghent - BSY-A004

"Want a Belgian in a hurry? Get on the Ghent yeast train. This yeast produces good phenolic character that matches well with hops and caramel/toffee flavours. Extremely floculent producing clear beer quickly."

A classic Belgian yeast variety, it sounds similar to Mangrove Jack's M41 Belgian Ale Yeast or Fermentis SafAle T-58.

Brussels - BSY-A005

"This is a phenomenal wort attenuator producing a very dry, crisp beer with nice citrus aromas. Requires filtration for bright beers."

Perhaps similar to Lallemand's Lalbrew Abbaye dry yeast or Mangrove Jack's M47 Belgian Abbey Yeast or Fermentis SafAle BE-256.

English Ale Strains


Shoreditch - BSY-A014

"Shoreditch is a rich mineral profile that is bold and crisp with some fruitiness. Often used for higher gravity ales and when a high level of attenuation is desired."

Lallemand's Nottingham yeast is a similar, being a highly attenuating dry yeast variety.

London - BSY-029

"Originating from a traditional London brewery, this yeast has a wonderful malt and hop profile. It is a true top cropping strain with a fruity, very light and softly balanced palate. This strain will finish slightly sweet."

Lallemand's Windsor yeast has similar properties or Fermentis SafAle S-04. Classic british ale strains to provide that nice, soft, rounded balance, with perhaps a little bit of residual sweetness from not attenuating as high as other strains.


German Ale Strains


Munich - BSY-A007

"Munich is the traditional German strain used to build world class weizen beers where big banana aroma is required. Balanced with mild clove, this strain will produce amazing beers. Munich will create a slightly higher level of acidity to give your beer a very crisp finish. Slightly underpitching will help increase the banana character."

Lallemand's Munich Classic to create those classic German styles


Cologne - BSY-A008

"Cologne is a clean, crisp, traditional German Kolsch strain. A very low ester profile makes this strain perfect for Kolsch, and other light coloured delicate beers. Cologne has better flocculation characteristics than most Kolsch strains which allows brewers to produce clean, bright beers in a shorter amount of time."

Other popular Kolsch yeast varieties include Lallemand's Koln or Fermentis SafAle K-97.


Norwegian Ale Strains


Bergen - BSY-A038


"Named after the region in Norway where Lars Marius Garshol isolated a number of  traditional yeast strains. Bergen is traditionally used in the production of Norwegian Farmhouse Ale, this strain is a fast fermenter with good attenuation, a light earthy spiciness, marked tartness and unique ester profile of orange peel. This strain is prone to forming incredibly large flocs unlikely any other yeast we've seen before, yet still remains highly attenuative. Bergen also exhibits the ability to ferment wort over a large temperature range, 21-37C. At the cooler end of the range Bergen is clean; producing little to no esters and phenols. But builds a huge fruit ester profile as the temperature increases."

Well, there's certainly quite alot to unpack with this one, as it's by far the largest and most detailed description for yeast that Bluestone have on their website. It's essentially Bluestone's version of Kveik yeast - similar to Lallemand's Voss Kveik or Mangrove Jack's M12.