Monday 29 August 2022

Stone & Wood - Pacific Ale - All Grain Clone Recipe


Every time we have this beer we're reminded of just how good it is - hence why it made The To Brew List as well. It's super easy drinking and highly refreshing, and with the weather warming up a little here it seems like the perfect time to have a crack at making our own version of it.

We're treading a fairly well worn path with brewing this beer - plenty have attempted this one before us, as can be seen from this rather large thread on the Aussiehomebrewer forum where recipes have been formulated, tested and critiqued - at length, and often with little to no follow up on how they've turned out. So after reading through this thread (several times), along with a few others we've been able to all but confirm a few aspects of the recipe based on people suggesting they've spoken to (perhaps former) brewery staff directly. Note that the thread is quite old - it started back in 2010 so the recipe has more than likely changed since then, but let's see how close we can get.

The malt bill is claimed to be a 60/40 split of ale and wheat respectively. The wheat is apparently a mixture of malted and unmalted wheat with the exact split unknown. Unmalted wheat can be flaked or torrefied depending on what you're able to get. We're opting for flaked.

22 IBU.

Yeast is claimed to be US-05.

Hops are exclusively Galaxy.

The Stone & Wood website doesn't give much further information about this beer, other than that it has 4.4% ABV, and confirms it uses barley, wheat and galaxy hops;

"Inspired by our home on the edge of the Pacific Ocean, we brew our golden hazy Pacific Ale with all Australia barley, wheat and Galaxy hops from Tasmania, which give the beer its big tropical fruit aromas and flavours and refreshment. This is what we've long called 'Byron Bay in a bottle'..."

We'll stick with US-05 for the yeast since we're trying to clone this beer. You could mix it up a little though and use an alternative yeast like Lallemand's Verdant IPA to really help promote some more fruity and juicy flavours, and promote the haze factor - though with 40% wheat, haze should definitely not be an issue to create in this beer.

Galaxy hops are known to be a little temperamental as well - they can be somewhat harsh if overused for bittering, and can lead to grassy notes if left to dry hop for too long. For this reason we'll be going for a shorter 30 minute boil, with a small addition at 15 minutes, and another addition at 5 minutes, followed by a larger hop-steep/whirlpool addition to really extract some of the fruity galaxy flavours without imparting too much extra bitterness. Dry hop will be fairly large as well and only left for 2 days before transferring to keg. Here's the full recipe we're going to run with.

Our expected ABV and IBU are marginally higher than the original. Hop additions are very much an educated guess to limit harsh bitterness and extract more of the desirable fruity and floral properties of Galaxy. Other clone recipes have cited dry hop additions of 50-60g were not high enough so we're opting for 80g as a starting point.

Remember to adjust the recipe accordingly for your system based on batch size, malt types and hop AA %'s to get the correct bitterness and other key values.

Update: November 2023 - we have just published our second attempt at this recipe - you can check it out by following the link below.

Check out our revised version of this recipe


Batch Volume: 22L 
Boil Time: 30 minutes
Brewhouse Efficiency: 75%

Original Gravity: 1.049
Final Gravity: 1.010
IBU (Tinseth): 24
BU/GU: 0.48
Colour: 7.5 EBC
Expected ABV: 5.3%

Mash

Temperature: 65c - 60 minutes
Mash Out: 75c - 10 minutes

Malts

2.8 kg - Gladfield American Ale Malt (60%)
1.4kg - Gladfield Wheat Malt (29%)
0.5kg - Torrefied Wheat (11%)

Hops

15 mins - Galaxy 7g (7.6 IBU)
5 mins - Galaxy 14g (8 IBU)

Hopstand 15 mins @ 80c - Galaxy 35g (7.8 IBU)

Dry Hop - Galaxy 80g - 2 days

Yeast

Fermentis SafAle US-05 (1 packet - dry)

Fermentation

20c for 14 days

Carbonation

2.4 CO2-vol

Water Profile (Brewfather's "Hoppy" Water Profile)

Ca2+ (Calcium): 110
Mg2+ (Magnesium): 18
Na+ (Sodium): 17
Cl- (Chloride): 51
SO42- (Sulfate): 265
HCO3- (Bicarbonate): 48


Check out our BrewZilla Brew Day - Stone & Wood Pacific Ale Clone to see how it went.

You can also view our Tasting Results for this brew/recipe which will show you how this brew turned out as well as some adjustments we'd make if we were to make this beer again.


Related Articles

All Grain Recipe List

Stone & Wood - Pacific Ale - All Grain Clone Recipe (Version 2)

Stone & Wood Pacific Ale Clone - BrewZilla Brew Day

Stone & Wood Pacific Ale Clone - Review & Tasting Results

Wednesday 24 August 2022

How to connect RAPT Pill to RAPT Temperature Controller using Bluetooth

The RAPT Pill can be "bonded" to the RAPT Temperature Controller to allow the temperature controller to act as a bluetooth beacon/gateway to relay the data received from the RAPT Pill to the RAPT cloud via the temperature controllers Wi-Fi internet connection.

This is particularly useful in certain situations where the Pill may not be able to connect to Wi-Fi - for example, if your Pill is in a stainless fermenter in a fermentation fridge, which can severely hamper the Wi-Fi signal quality/strength and prevent the Pill from reliably connecting to Wi-Fi in order to submit it's telemetry data to the cloud. 

There are a few steps involved in getting this working together as outlined below. In order to perform the steps below it is assumed that your RAPT Pill and RAPT Temperature Controller are both registered against your account in the RAPT Portal.

  1. From the temperature controller, bring up the on screen menu then select Bluetooth and press the Select button. You should be prompted with a screen like the one below. Press the Select button again to enable bluetooth.


  2. You will now see a screen showing Bonded devices and Unbonded Devices (with nothing listed underneath them at this point) which is normal.


  3. Next, connect your RAPT Pill to a power source via USB to enable the captive portal mode. From your phone or other Wi-Fi enabled device, connect to the Pill's Wi-Fi network which should load the captive portal automatically once connected.


  4. Select the Diagnostics menu then click the button to Check for new firmware. Depending on when you last updated the firmware on your Pill, you may need an update in order to access the Bluetooth functionality.


  5. Once the firmware has been updated, connect to the captive portal again and access the Settings menu. Change the Telemetry Method option from Wifi to Bluetooth.


  6. You can also adjust the telemetry method for Bluetooth connectivity as well. Note that the Bluetooth mode uses less power than Wi-Fi so you can increase the frequency without a significantly detrimental impact on battery health.

    As a reference, on our Pill we set a Bluetooth telemetry interval of 10 minutes, and after 12 days of fermentation the battery was still at 100% capacity in the RAPT Portal.

  7. Login to the RAPT Portal and access the dashboard. Click the Edit button to edit the settings for your RAPT Pill.


  8. Under the Details section, click the Paired Device drop down menu (should currently say [Unpaired] and select your RAPT Temperature Controller from the list then click the blue Save button at the bottom of the screen.


  9. Go back to your temperature controller and access the Bluetooth menu again (as we did in Step 1 above). You should see your RAPT Pill appear in the Unbonded devices list.


  10. Press the Enter/Select button on the unbonded device. A prompt should now appear confirming you want to bond the device. Press the Enter/Select button on the controller again to confirm you wish to bond this device.


  11. The RAPT Pill should now appear under the bonded devices list


  12. Your Pill is now bonded/connected to your RAPT Temperature Controller. You can now set your Temperature controller to use the Pill for temperature readings instead of the built-in/attached probe. This is done from the menu of the Temperature Controller as well.

    The graphs on the RAPT Portal for the Temperature Controller will now also overlay data (gravity and temperature) from the Pill.

    In the example below, the green line is the Pill temperature, blue line is the Temperature Controller probe temperature, the yellow line is the gravity reading from the Pill, and the red line is the set/target temperature of the RAPT Temperature Controller.


If you haven't done so already, it's well worth investing the time in performing a calibration of your RAPT Temperature Controller. We discovered ours was out by 3°C in it's default calibration out of the box!


Related Articles


Thursday 18 August 2022

Keg King - Apollo Titan - 30L Stainless Conical Pressure Fermenter - Hands on Review

When it comes to brewing equipment - stainless steel is undoubtedly the gold standard. It's hard wearing, robust, and if maintained and looked after it can last a life time. Take a look in any professional brewery and you'll notice the majority of their equipment - but particularly their tanks, are all made of stainless steel.

For the average homebrewer though, the significant cost of stainless steel equipment - in particular fermenters, has made it difficult for brewers to justify upgrading their equipment, especially given the popularity of PET plastic fermenters in recent years, which are cheaper than their stainless counterparts and are capable of achieving excellent results but do still have some limitations and restrictions on their use.

Keg King's Apollo Titan - Front View

Thankfully though, Keg King (from Melbourne, Australia), have designed and released a stainless steel, conical, pressure capable fermenter which ticks all the boxes and is available at a seriously sharp price point - the Keg King Apollo Titan.

We got our order in early and were one of the first to take delivery and couldn't wait to break it out and put it through it's paces. 

The main body and three supporting legs are manufactured with 1mm thick 304 grade stainless steel. There are two stainless handles located on each side of the main body for lifting/maneuvering - rated strong enough for use when the fermenter is full. 

Keg King Apollo Titan Handles

On the rear of the main body, we have some printed markings indicating the volume levels (in gallons and litres), as well as the maximum pressure rating of 30psi.

Keg King Apollo Titan - Rear View

Also attached to the fermenter body are 3 x 1.5" tri clover ports. One at the very base of the cone, another part way down the cone on the front, and another located just above where the conical formation starts, also facing the front of the fermenter.

The 2 tri clover ports on the main fermenter body are an important and key differentiating factor when comparing the Apollo Titan to pressure rated PET plastic fermenters - since these PET based fermenters are not able to have these ports, the nature of the relatively thin plastic they're made of means they just aren't strong enough to do so.

With standardised 1.5" tri clover ports, any number of attachments can be fitted to the Apollo Titan. The very bottom port would typically be fitted with an elbow and dump valve for quick and easy yeast/trub removal, allowing the fermenter to be used as a true unitank. The other ports could be fitted with other accessories like sight glasses, ball valve/sample taps, or carbonation stones.

Keg King Apollo Titan - Front 1.5" tri clover port

Leg extensions are also included to raise the height of the Apollo Titan to allow things like the aforementioned dump valve to be fitted to the most lower 1.5" tri clover opening. Extending the legs will raise the total height (to the top of the gas/liquid posts) from 574mm to 754mm.

Apollo Titan Legs (extensions are included)

The kit comes complete with end caps, clamps and seals for all the tri clover openings so you're fermenter is ready for business straight out of the box - you can purchase and add attachments later on if you please, though you certainly don't have to. This type of modular system is a big benefit as it means brewers can add bits and pieces - like the previously mentioned valves and taps later on in their brewing journey and know that they'll fit and work since tri clover connections come in standard sizes (in this case, all are 1.5").

Apollo Titan - 3 x 1.5" tri clover clamps, end caps & seals

Moving back to the top of the Titan and we have the same plastic based lid and collar that is used on the PET plastic based Apollo snub nose fermenter. An interesting design decision but it does make sense in a number of ways. Firstly, the design and manufacturing of this lid is already established which likely helps keep costs at a minimum by not having to design and manufacture a new one. Making a new one out of stainless steel would be more expensive, and therefore increase the total cost. Considering the lid doesn't typically come or remain in contact with the beer inside, does it really need to be made of stainless steel? We'd argue it doesn't.

Apollo Titan lid with gas/liquid posts and PRV attached

The relatively small opening where this lid fits is key to the design. Having a smaller opening compared to other stainless fermenters that have a full diameter sized lid/opening means it's easier to seal and less likely to leak. Good news for anyone like us who has battled a leaking pressure fermenter in the past. It can also hold more pressure than many other stainless fermenters, rated with a maximum working pressure of 30psi. The size of the opening is good though, with sufficient space for a full size adult male hand and arm to reach in for thorough cleaning.

Speaking of cleaning - and this is one of the other big benefits of stainless steel - it's ability to be cleaned with hot, caustic cleaning solutions. Using these is definitely a big no-no on PET plastic based fermenters, but not with the Apollo Titan. Good news for homebrewers who prefer using hot water and more aggressive cleaning agents in their home brewery. Alternatively, you could clean it with Keg King's Keg Cleaner & Washer Kit by situating the cleaning arm through the lowest tri clover opening and letting the water pressure from the included water pump do all the work for you.

Back to the lid, and this is where the gas and liquid ball lock disconnect posts are located, along with the pressure release valve (PRV) which can be unscrewed and act as a port for dry hopping as well. The lid also houses the thermowell which is a great inclusion, since on other fermenters the thermowell would typically be fitted to one of the tri clover ports on the body of the fermenter. Having the thermowell attached to the lid essentially frees up one of these ports meaning it can be used for something else instead.

Some assembly was required for the lid, with the gas and liquid posts needing to be put together (poppet and spring inserted into the post) and then screwed onto the lid, along with the PRV housing and PRV itself. When dealing with plastic threads like these it's important not to overtighten anything so tools shouldn't be required. It's also a good idea to put some food grade lubricant on the threads to help with sealing and the prevention of gas leaks when working under pressure. The thermowell was already attached to the underside of the lid which uses a standard BSP threaded connection.

Thermowell comes pre-attached to the lid

There is also capacity for a cooling coil to be fitted to the lid for use with glycol chilling systems - though some drilling of the plastic lid is required to accomplish this.

After assembling our Apollo Titan fermenter, we gave it a clean with PBW followed by a good rinse with water. We weren't sure whether or not the interior surface was passivated or not, so we opted for a quick/simple passivation using the citric acid based Bar Keepers friend before adding our first wort to the fermenter. Passivation may or may not have been necessary, but we opted for it anyway just in case.

Passivating our Apollo Titan with Bar Keepers Friend

The last piece of assembly was putting together the floating dip tube, along with ball float and mesh filter. We ended up removing one of the extra rings and attached it as per the picture below. The centre ring can be fed onto the thermowell to keep the float centered in the fermenter. 

Now that everything has been cleaned and assembled, we went ahead and added our wort to the fermenter and decided to fit our 1.5" tri clover sight glass so we can have some visibility of what is happening inside the fermenter. A good example of the type of attachments that can be added to the Apollo Titan.

Keg King Apollo Titan with 1.5" tri clover sight glass fitted

As the Apollo Titan shares the same general profile/body as it's PET plastic counterpart, the Apollo insulating jackets are also compatible which can help with maintaining/stabilising the temperature within the fermenter, particularly if you'll be using it in a cooler climate.

What improvements could be made for a future revision? Firstly, the inclusion of a 1.5" tri clover opening on the top near the lid opening - purely for the purpose of dry hopping would be well received. The PRV housing on the lid can be unscrewed and used as a dry hopping port which would work well for modest amounts of dry hopping, but we expect that trying to get a few hundred grams of hops through the relatively small hole for a heavily hopped IPA might be a bit more challenging and time consuming, though some kind of funnel would probably help with this too. Having an additional tri clover fitting for the purpose of dry hopping could also allow for pressurised dry hopping contraptions to be devised and fitted to allow dry hopping doses to be purged of oxygen, and released into the fermenter without having to release the pressure within the fermenter itself. Such contraptions can essentially eliminate any risk of oxidation occurring from dry hopping.

An option for wheels/castors could also be a good (optional) extra for those who want it. With a 30L capacity, even when full a relatively fit/healthy adult can lift and maneuver the fermenter using the attached handles, however the option for wheels would no doubt help others who are perhaps unable to lift such weight, or simply for those who just want an easier and less strenuous way of moving the fermenter around when full.

Will a larger format Apollo Titan be coming in the future? We expect it's more than likely, since the PET plastic Apollo range come in 30L and 60L versions. A larger version would likely also come in a 60L format, but will also likely depend on demand and relative success of this 30L version.

The Apollo Titan is currently available on the Keg King website for AU$399.95 which represents incredible value for money. There isn't currently another pressure capable stainless steel fermenter on the market anywhere near this price point. It's a no brainer for any homebrewer looking to upgrade their equipment to stainless steel, and with the inclusion of industry standard tri clover fittings, brewers are able to purchase additional add-ons and accessories later on to help reduce the initial financial outlay as the cost of stainless steel accessories can add up quite quickly. The Apollo Titan kit comes with everything you need to get fermenting right out of the box, and the low/short profile when the extendable legs retracted (as we have it) means it should comfortably fit in just about any fermentation fridge or chamber.

Also check out our Guest Review of Keg King's Apollo Titan 30L stainless conical fermenter!


Related Articles


Tuesday 16 August 2022

KegLand - RAPT Temperature Controller - Hands on Review

It's widely agreed among brewers that temperature control during fermentation is a critical factor in making the best beer you possibly can. Lack of temperature control can allow the exothermic process of fermentation to cause the temperature of the fermenting wort to spiral upwards, which is known to cause some undesirable off flavours to be imparted into the beer.

This is where temperature controllers come in. What once were relatively simple devices with a temperature probe and relays that open/close electrical circuits to power devices for heating or cooling, have now evolved into smart, internet connected devices that can do this plus so much more.

RAPT Temperature Controller Box

The concept in itself is pretty simple. Use the temperature probe to check the temperature of your wort. If it reaches a set threshold/difference or hysteresis from your target temperature, then the controller will switch on either a heating or cooling plug/circuit to power on a device like a fridge or heat mat to adjust the temperature accordingly. 

The RAPT Temperature Controller does all this, plus much more, so let's dive in and see what it's about.

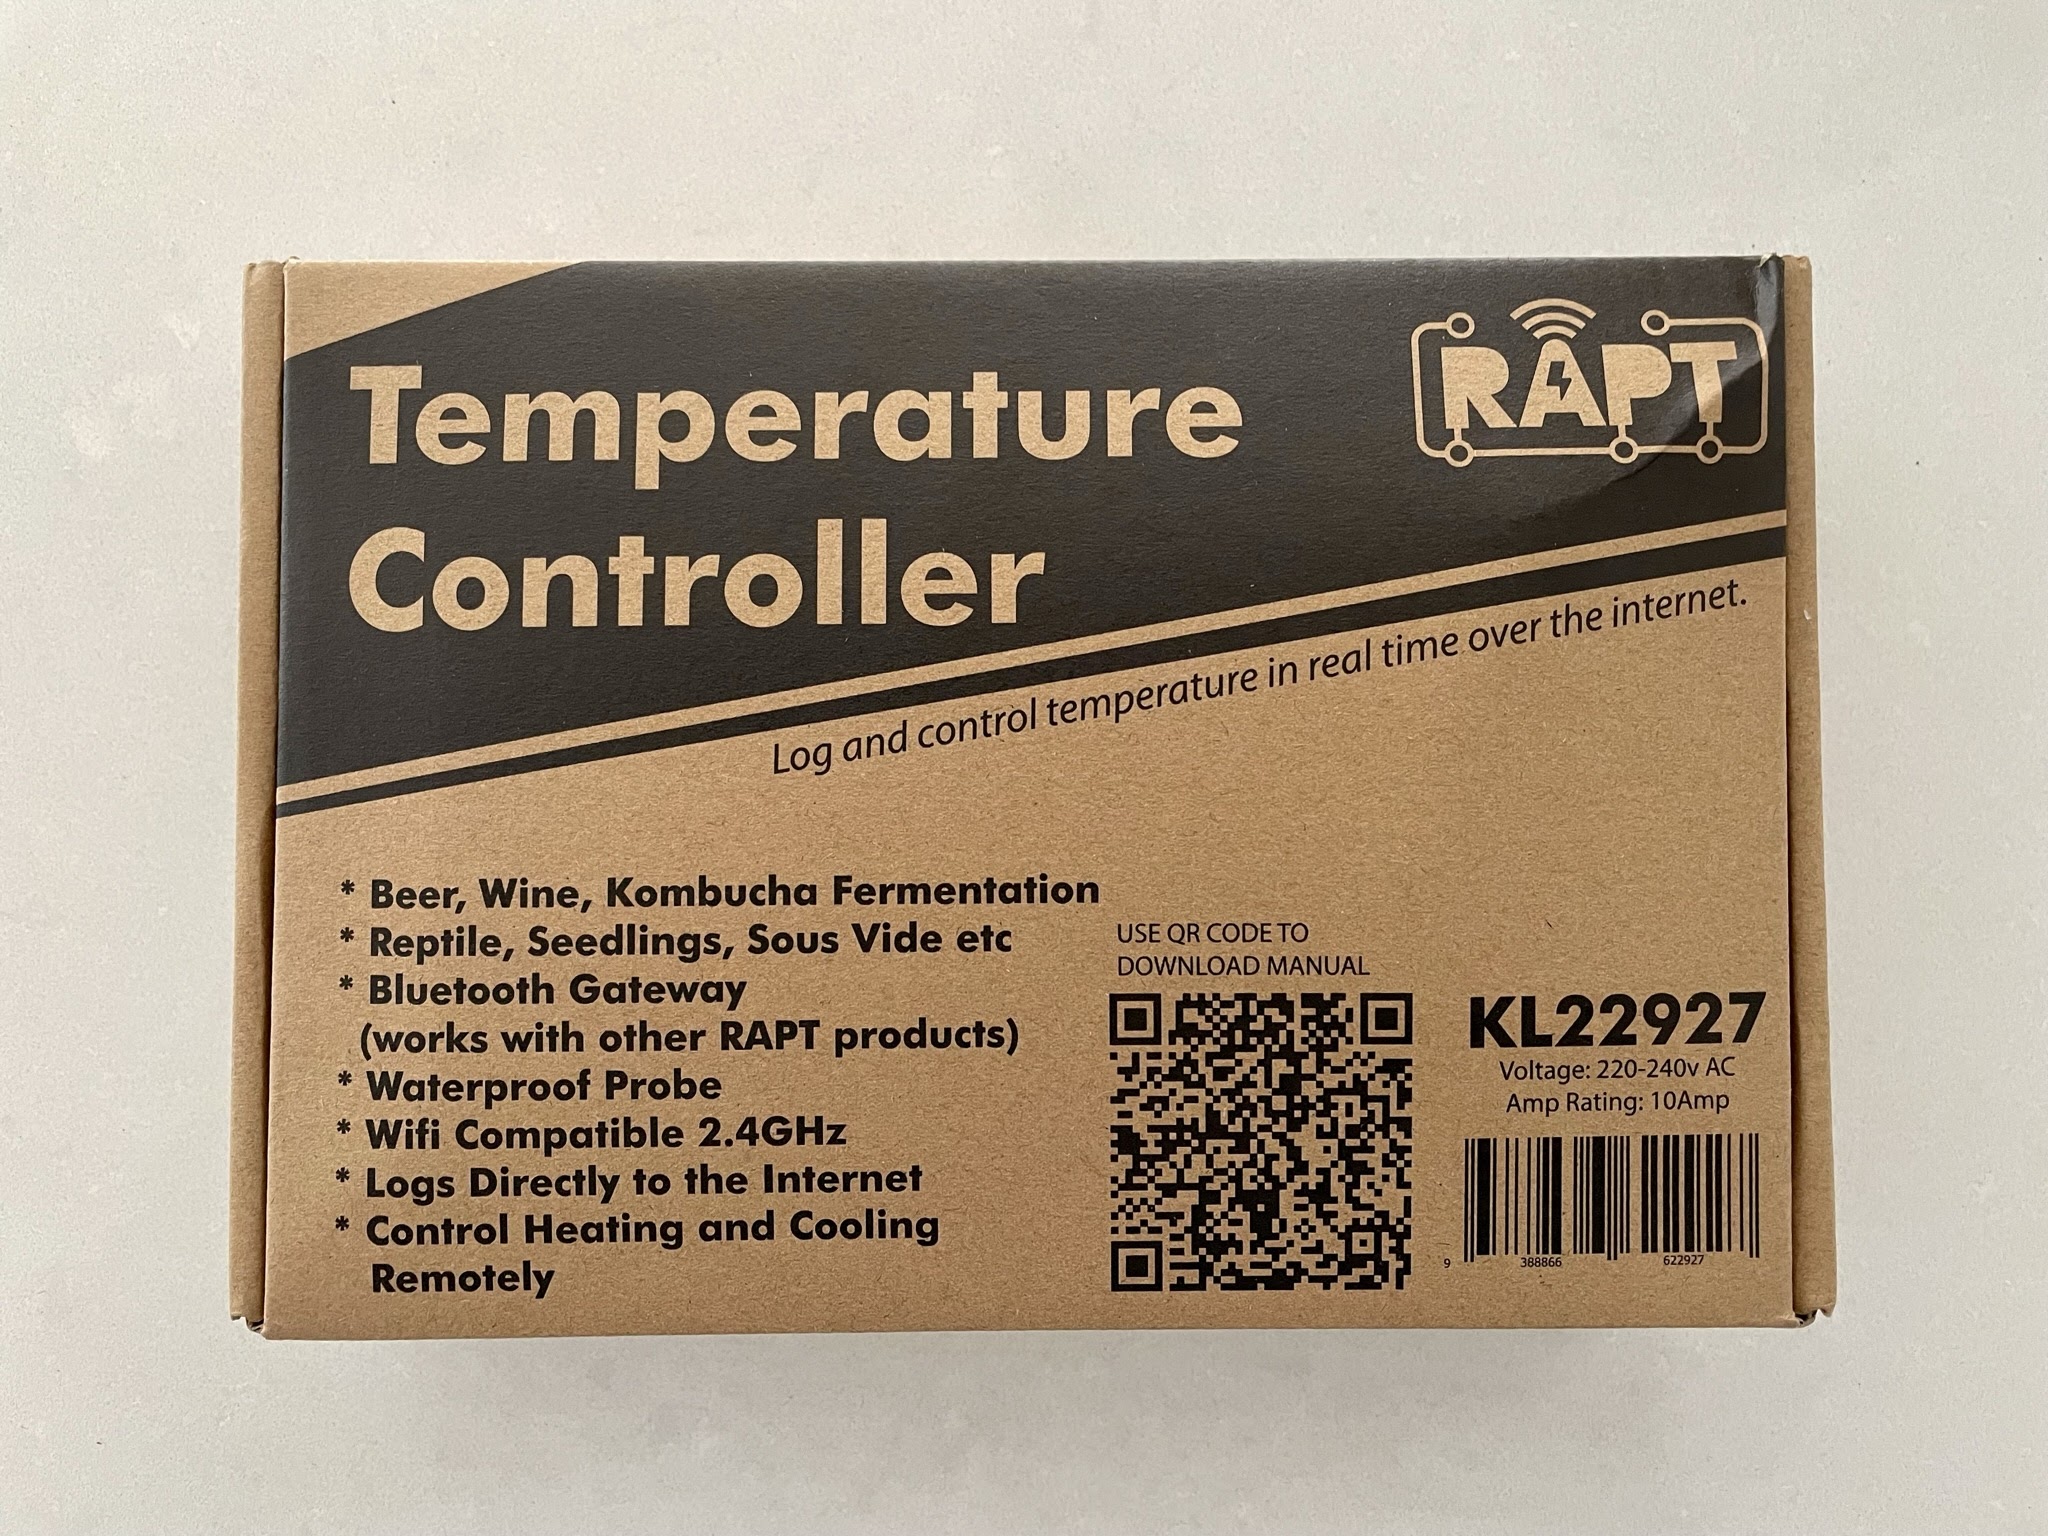
First off, the packaging is simple and minimalistic, coming in a basic cardboard box with a QR code directing to the user manual plastered on the front. Open the box and we've got our controller neatly packed inside.

RAPT Temperature Controller Packed into Box

No doubt the first thing that jumps out is the coloured cables and plugs for heating (red) and cooling (blue). Both rated at 240V output, there is certainly no mistaking which one is which. We've also got a thinner black lead with the temperature probe on the end. With a rated temperature range from -20C to 120C it will certainly cater for all temperature ranges required for brewing and fermenting. Lastly we have the thicker black lead for main AC power connection to the controller.

The control box itself is kind of chunky, but is cleverly designed to allow a number of different mounting options - though some configurations require re-routing how the four separate physical cables protruding out of the control box (main AC power, temperature probe, heating and cooling outlets/plugs). No doubt some will appreciate the flexibility here, but for us the standard configuration is fine and allows the controller to be mounted from a single or double screw heads with the cables hanging straight down. If you're after more details on mounting options, they're covered in detail within the RAPT Temperature Controller Instruction Manual.

For controlling the device we have 4 physical buttons, giving functions for up, down, enter/select, and back/return. The button styles and appearance of the controller is similar to that of the control panel on the BrewZilla Gen 4 units, giving a consistent look and feel to the RAPT products and ecosystem that KegLand are developing.

Powering on the device and we've got a decent sized colour LCD screen. The resolution isn't particularly high by today's standards, but it's adequate for what it's purpose is here, and the fact that it's colour is a welcome inclusion. Interestingly, the screen is always on/lit up and as far as we can tell there aren't any options or modes for it to dim, go into a sleep/standby mode, or utilise some kind of screensaver. This would no doubt effect the longevity of the screen itself, or perhaps risk the issue of "burn in" from the same image being presented on screen for extended periods of weeks, months or even years. Replacement screens are available as a spare/serviceable part for AU$49.95 though.

Upon powering on the controller for the first time, we're immediately presented with a screen advising us to connect to the controllers own Wi-Fi network (SSID) to configure it to connect to our home Wi-Fi network. 

RAPT Temperature Controller - Initial Connectivity Prompt

It's worth mentioning though that this device can be used offline without any Wi-Fi internet connectivity as all the configuration options needed to get it operating as a basic temperature controller are available through the onscreen menus using the built in button controls.

We're self-confessed geeks at heart though, so of course we're going to get this thing online. After connecting to the controllers Wi-Fi network using our phone, we're presented with the same esp32-wifi-manager/portal used by the RAPT Pill that allows us to find and connect the controller to our home Wi-Fi network in a couple of quick and easy steps. The controller is only compatible with the older 2.4GHz wireless band though - which offers better range and penetration through walls and other objects (like fermentation fridges and stainless fermenters) compared to the newer 5GHz band, but means that users will need to make sure their wireless modem/router has 2.4GHz Wi-Fi enabled.

Once connected to Wi-Fi, the controller prompts us to initiate the registration process from the controller menu itself, then complete the registration online through the RAPT Portal by entering the MAC address and Validation Codes as displayed on the screen. If you haven't used or accessed the RAPT Portal before, registration is simple and free, and your sign in/authentication can be integrated with your Google or Facebook accounts for ease of access and so you have one less password to remember.

RAPT Temperature Controller - Registration Prompt

All in all this registration process was quick and painless, and we had the controller registered in the RAPT Portal in a matter of minutes. The on-screen prompts are clear meaning users can follow on without needing to resort to the user manual.

We then initiated an Over The Air (OTA) update to ensure the controller was running the latest available firmware - as is good practice with any internet connected device. The option to initiate the update was easily accessed via the menu, downloaded and installed quickly, rebooted and we were back up and running again.

RAPT Temperature Controller - OTA Update Screen

We did encounter an issue shortly after this where the registration on the Temp Controller itself seemed to have become broken and it was prompting us on the screen to register the device again. After a bit of mucking around we figured out that we had to select the "Clear Registration" menu option to reset it that then allowed us to Register the device again. This was perhaps an issue initiated by the firmware update, and ultimately wasn't a big deal as everything started working again correctly after re-registering the device to the RAPT Portal.

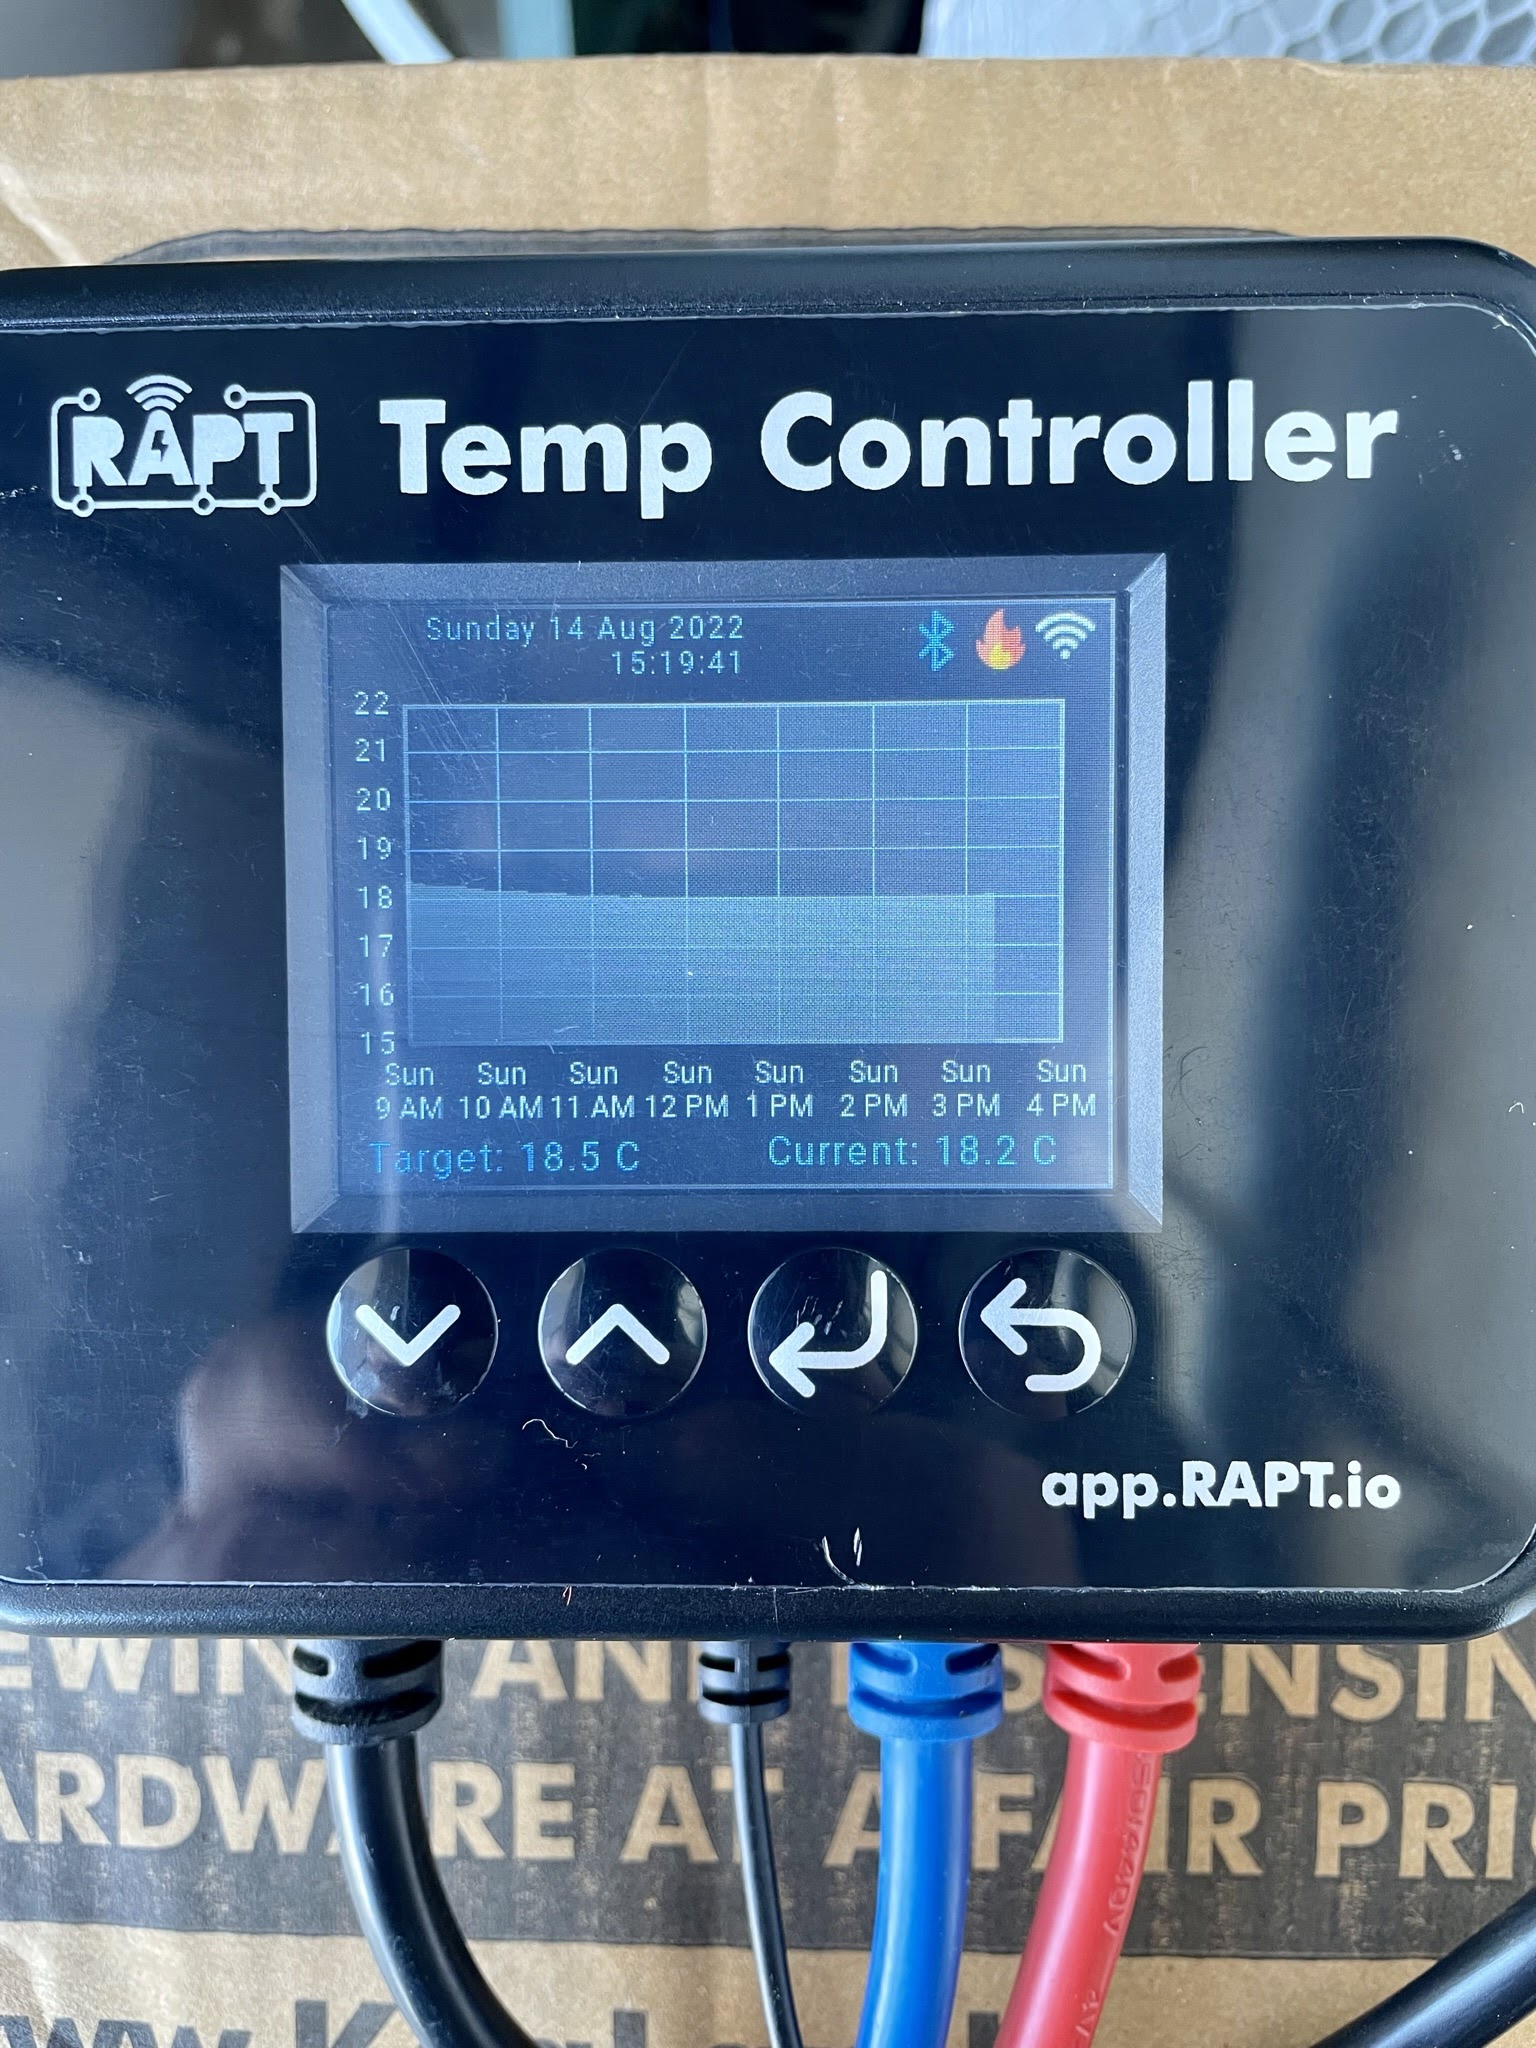
The screen itself is host to a decent amount of information. In it's default format, the screen displays the current temperature probe reading in a large text in the middle of the screen. The date and time are in the top left corner, Wi-Fi signal strength and heating, cooling alarm icons are in the top right corner, and the target temperature is located in the bottom left corner.

RAPT Temperature Controller - Main/Home Screen (Default)

This display can also be adjusted to show a temperature history graph in place of the current temperature reading in the middle of the screen, with options to show temperature history for periods ranging from the past 7 hours to 14 days as shown below.

RAPT Temperature Controller - Graph Display

Diving into the RAPT iPhone App now and after selecting our Temperature Controller, we can access the Settings tab to configure our temperature settings, delay times and telemetry frequency options. As previously mentioned, these settings can also be adjusted directly from the Temp Controller as well using the onboard buttons.

RAPT Temperature Controller Settings in RAPT Portal/App

After making changes through the app, they are pushed back to the controller immediately. We did encounter some frustrations with the RAPT iPhone App as well where the grey, blue and red buttons (pictured above) were cutoff from the bottom of the screen, and the scrolling up/down didn't work correctly to make them more available/accessible. Hopefully this will be addressed in due course, but the full web browser based portal doesn't appear to suffer from this issue.

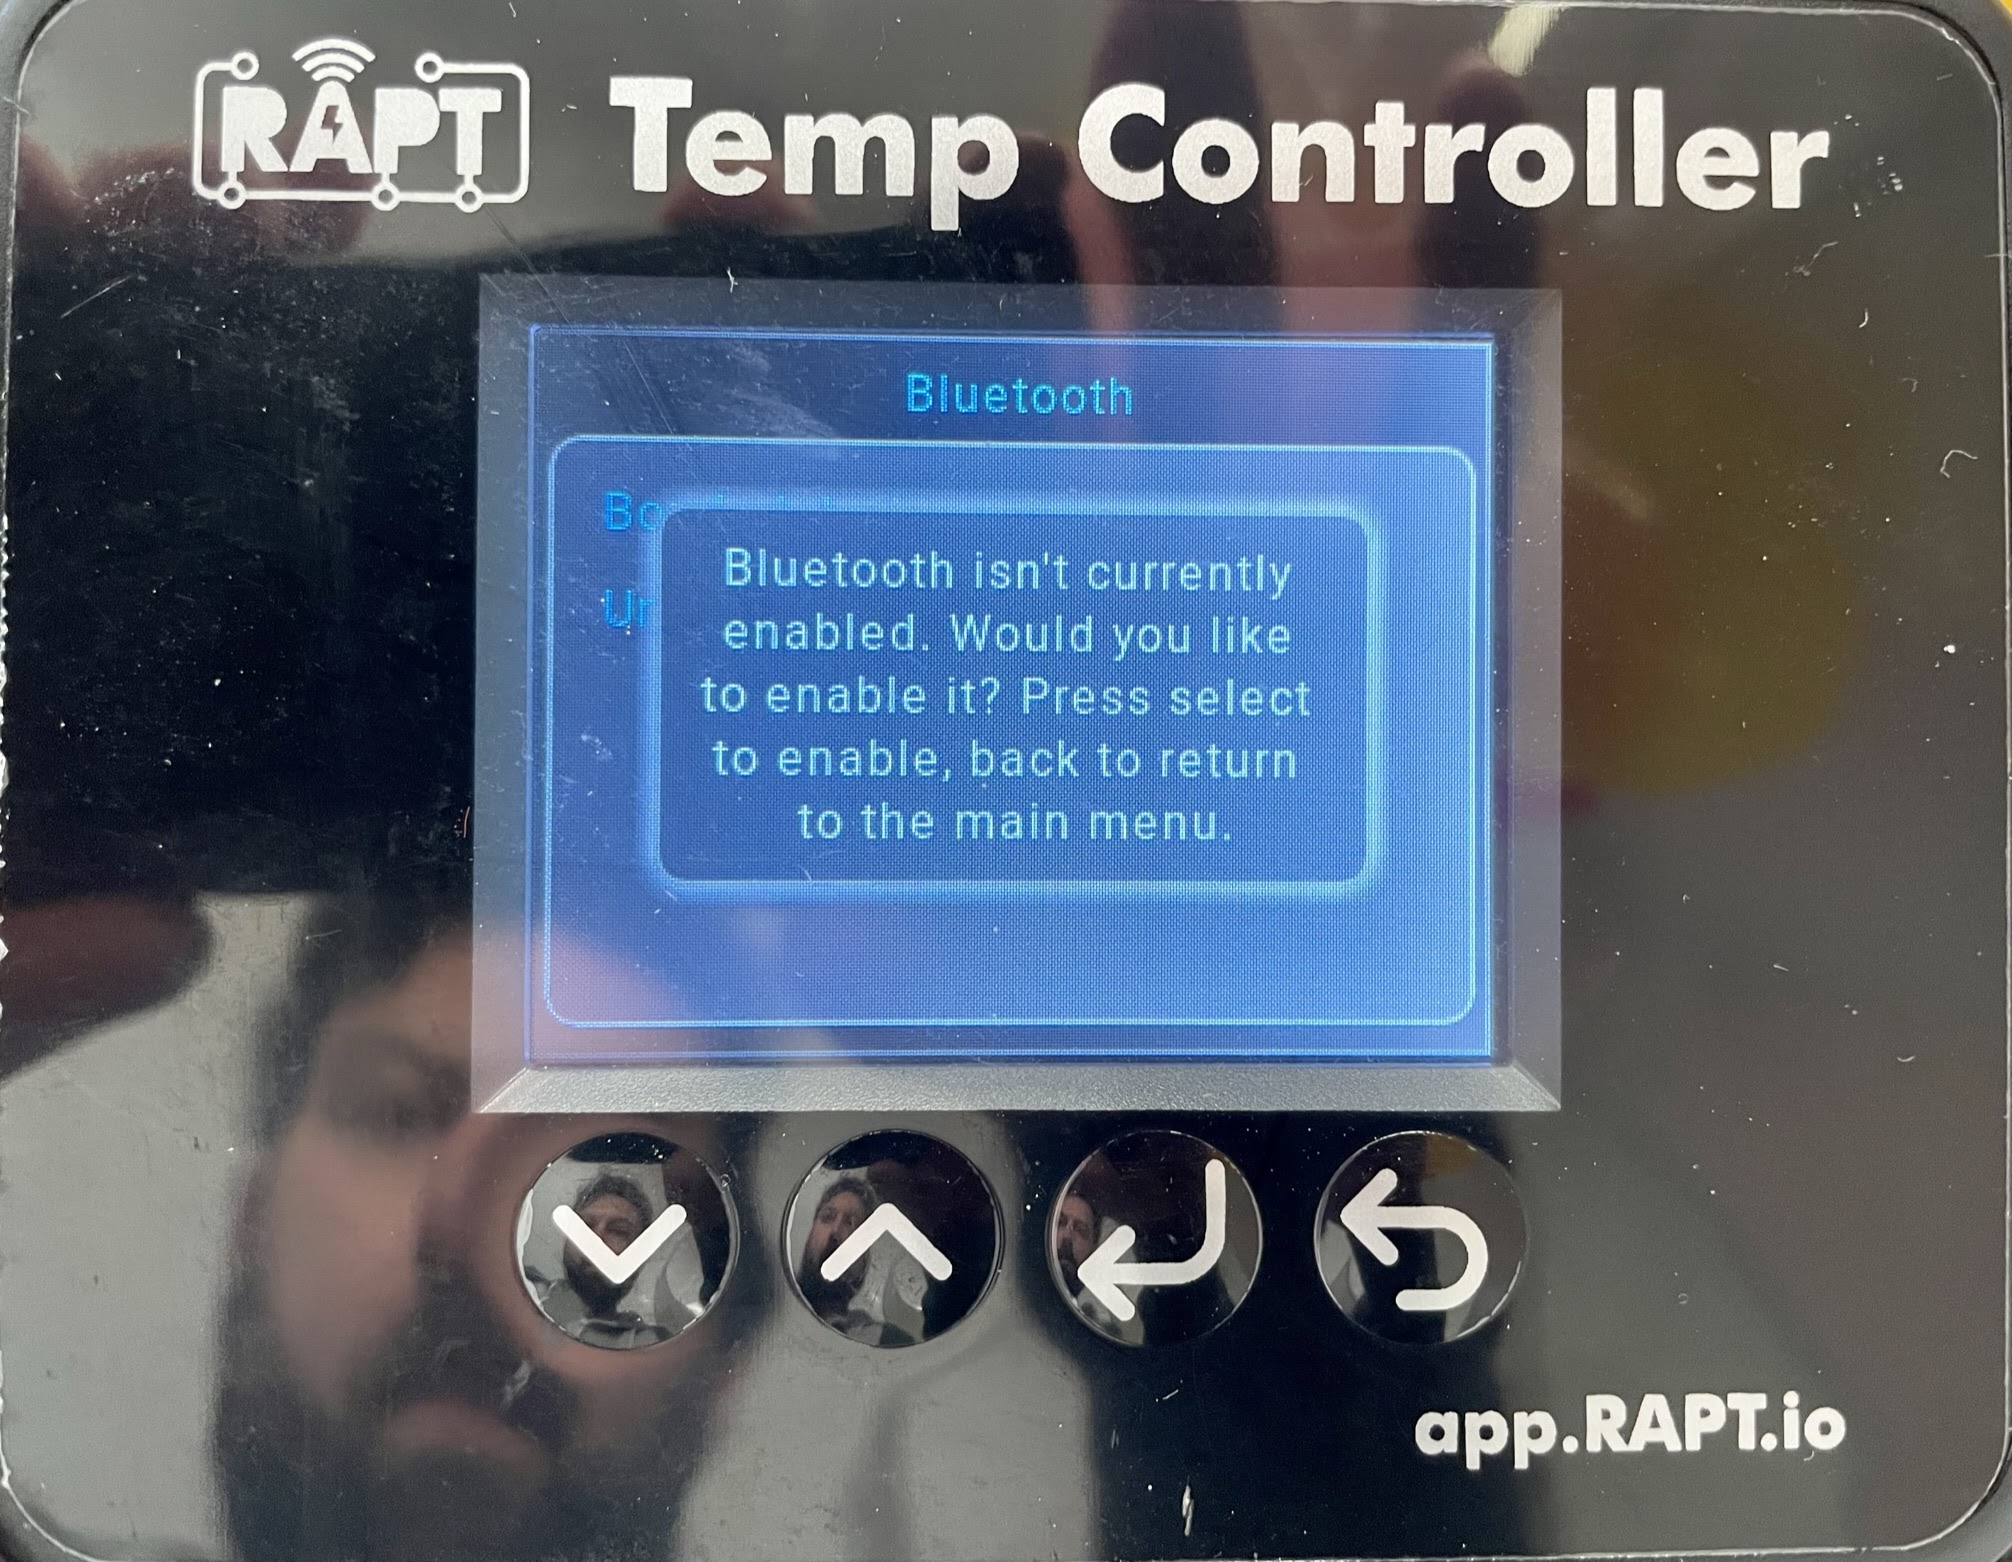
Another really cool feature that is offered by the RAPT Temperature Controller is for it to act as a bluetooth repeater. The most common use case for this at the moment is to address an issue that we encountered ourselves, which was the inability for our RAPT Pill to connect to our Wi-Fi network for submitting telemetry to the cloud when using it in a stainless steel fermenter in our fermenting fridge.

RAPT Temperature Controller - Bluetooth Devices Screen

Using the Pill in this manner essentially has it in a type of faraday cage, with the stainless walls of the fermenter, and thick insulated walls of the fridge blocking the wireless signal from penetrating. The RAPT Temperature Controller gets around this by allowing the RAPT Pill to be "bonded" to it via Bluetooth - which does have a strong enough signal to penetrate through a stainless fermenter and fridge wall (assuming they're located reasonably close together) - and will receive the telemetry from the Pill, then submit it to the RAPT Portal using it's own Wi-Fi connection. A clever solution to a problem that saves people from messing around with Wi-Fi range extenders, or other rudimentary solutions.

The steps involved pairing the Temperature Controller and Pill together are a little more involved. and require the latest available firmware update to be installed on the RAPT Pill, as well as adjusting settings within the Pill, RAPT Portal and Temperature Controller to have them all work together harmoniously. We didn't have any difficulties though and got it all up and running fairly quickly. Check out our  guide on How to connect RAPT Pill to RAPT Temperature Controller for detailed instructions on how to accomplish this.

So, what are the benefits of having an internet connected temperature controller like this, besides being able to adjust and configure settings remotely? Well, as you'd expect, through the RAPT Portal (app or website), the temperature controller will display a neat timeline and graph overlayed with historical data showing the target temperature, actual temperature from the temp probe.

If you integrate it with the Rapt Pill you'll get additional data overlayed on the graph for gravity readings, alcohol content and Pill temperature, in addition to the readings provided by the temperature controller for set temperature and actual temperature according to the temperature probe.

As you can see from the sample above, the red line indicates the set/target temperature, blue line indicates the temperature reading on the probe, and the green line represents the temperature from the RAPT Pill. The yellow line represents the gravity readings and the faint red dots (that intersect the yellow line) represent the alcohol content (ABV%).

That's not all though - there is also a neat feature called "profiles" that allow pre-defined steps to be run on the temperature controller to maintain and adjust the temperature accordingly for set periods of time. Here's a test one we setup as an example;

Step 1 - target temperature 18.5C for 7 days for primary fermentation
Step 2 - target temperature 21C for 3 days for diacetyl reset
Step 3 - target temperature 12C for 2days for soft crashing and dry hopping
Step 4 - target temperature 1C for 3 days for cold crashing/packaging.

This is all done within the RAPT Portal and gives a neat list and graphical view of the profile you have setup - as pictured below (click the image to make it larger and easier to read).

RAPT Portal - Sample Temp Control Profile

At the time of writing this article, steps can only be configured based on time/duration in days, but I'd expect this will be further developed in the future to allow triggers to be set using gravity readings from the Pill. For example, you could set the profile so that Step 2 outlined above is triggered when your expected final gravity (FG) is reached and detected by the Pill.

The possibilities are almost limitless, and essentially allow a "set and forget" methodology for managing your fermentations which would undoubtedly benefit some brewers who aren't able to constantly check and manage their temperature controller manually for whatever reason.

We'd consider KegLand's RAPT Temperature Controller an excellent piece of gear. The bells and whistles of internet connectivity, profiles and bluetooth repeater functionality may not be for everyone, but for those who are entering into the RAPT ecosystem with products like the RAPT Pill, the integrations that are being developed to have these devices work together make it well worth considering. 

At the current price point of AU$99.95, it's certainly more expensive other temperature controllers, including Wi-Fi connected ones like the Inkbird ITC-308, however it differentiates itself fairly significantly from the rest of the pack with features the competition just don't currently have. If you plan on using a device like this to it's full potential, then the price tag is easily justifiable.

The RAPT Temperature Controller is available from the KegLand website.

Update 21/11/2022

Having used our RAPT Temperature Controller for a number of brews, we decided to compare it's accuracy against our Inkbird Temperature Controller, as well as a standalone meat thermometer and  discovered that the RAPT device was reading approx 3°C lower than the actual temperature. We strongly recommend anyone who purchases one of these to perform a temperature probe calibration as part of the setup - we've documented the process which you can view by following the link below;

RAPT Temperature Controller - Temperature Calibration Process


Related Articles


Monday 15 August 2022

Keg King - Corny Keg & Fermenter Cleaning Kit - Hands on Review

Brewers are often thought of as cleaners who occasionally make beer, since such an integral part of making quality beer is having good cleaning and sanitation practices. The best ingredients and brewery equipment in the world won't make a good finished product if the equipment being used isn't clean and sanitary.

Like with many other aspects of brewing, there's more than one way to skin the proverbial cat of keg and fermenter cleaning, but some methods are definitely better and easier than others. So when it comes to the less glamorous side of brewing - cleaning, it makes sense to go with an option that's not only easier, but can arguably give better results as well.

The Keg King Corny Keg and Fermenter Cleaning Kit is a complete solution designed to make the process of cleaning corny kegs and fermenters quickier and easier. We were sick of manually cleaning our kegs and fermenters so decided to get our hands on one to see how it performs.

The full cleaning kit includes;

  • A plastic bucket
  • Submersible pump (rated at 3500L/h)
  • Extendable/telescopic cleaning tube
  • Plastic cleaning tube
  • Gas and liquid ball lock disconnects
  • Silicone tubing
  • Stainless t-piece
  • Stainless keg stand

The plastic bucket it comes in doubles as the reservoir that is used for holding the cleaning solution and pump, as well as a neat way of storing the kit all together in one place when not in use.

Keg King Corny Keg Washer Kit

Assembly of the kit was very straightforward - we followed along with the Keg King YouTube video which does a really good job of breaking down each step. There are no clamps required to hold the silicone tubing onto any of the barbed connections, though it is definitely necessary to soak the edge of the tubing in some boiling water to soften it in order to get it over some of the barbs.

Keg King Corny Keg Cleaning Kit - Assembled

At this point it's probably worth pointing out some of the cool features of the kit design. Firstly, the inclusion of the gas and liquid ball lock disconnects. You can see from the photo above that the water outlet from the top of the pump  has a large stainless T-piece on it. The telescopic (or plastic) cleaning tube attaches to one end of the "T" (pointing directly upwards), and the silicone tubing attaches to the other end of the "T" which is then split again using a smaller stainless T-piece into another two tubes that the gas and liquid disconnects attach to.

What this means is that cleaning solution is pumped through the telescopic arm as well as the gas/liquid disconnects, which in turn means the posts and gas/liquid tubes on the inside of your keg (or the lid of your fermenter) are blasted with cleaning solution and hence thoroughly cleaned when the pump is running.

Without this inclusion, the only way to clean the dip tubes and keg posts was to fill the keg with cleaning solution then apply pressure to force the cleaning solution out through them. Inefficient and not a great use of valuable CO2 gas.

Having water forced through the cleaning arm and disconnects via the pump means that the cleaning solution can be recirculated for as long as you wish to ensure everything is as clean as possible. Since the vessel being cleaned is seated on the stand upside down, the solution drain backs out of the bottom of the vessel (where the cleaning arm is inserted) into the bucket/reservoir where the pump is. Re circulation like this is also not possible to do if you use the aforementioned method of filling the keg with cleaning solution then forcing it out the posts using CO2.

The telescopic arm is another excellent inclusion that allows the height of the cleaning arm that sprays the water/cleaning solution onto the inside of the vessel being cleaned. The fact that the height of this can be adjusted means that for larger/taller vessels, such as corny kegs or 60L fermenters, the height can be increased to help ensure maximum water pressure at the exit point to aid in cutting power when cleaning. The kit also comes with a fixed length plastic cleaning arm that can also be used in place of the stainless telescopic arm.

You can also use hot water in your cleaning solution to help improve the cleaning/cutting power as well, but be sure not to exceed the maximum rated temperature if cleaning PET plastic based fermenters to avoid damaging/warping/melting them. The recommended maximum temperatures are 50C for stainless equipment and 30C for plastic based products.

After everything was assembled we mixed up some PBW in 5L of water in the bucket. 5L seems to be the ideal amount of water to include as it covers most of the submersible pump. The pump also includes some small suction cup feet that secure it to the bottom of the bucket to help ensure it remains submerged and doesn't move around.

Pump in bucket with telescopic arm attached

Next step is to add the stainless keg stand - we found necessary to route the power and silicone tubes underneath the top ring of the stand to keep them out of the way. The stand is designed to hold all different kinds of kegs, like mini kegs, full size cornelius kegs, as well as fermenters like the Apollo and Fermenter King range.

Pump and stand inside the cleaning bucket

We then attached the gas and liquid disconnects to the corresponding posts on our keg, and inverted it onto the stand. It did require a little maneuvering at first to negotiate the tubes and disconnects to stop them from pinching under the keg and on the edge of the bucket, but after a couple of attempts at removing and re-adding and adjusting the height of the telescopic cleaning tube, we got the hang of it pretty quickly.

Corny Keg seated on the stand in the bucket

The pump doesn't have an on/off switch, so as soon as it's connected to a live power source it begins running immediately. The operation is reasonably quiet, though we don't consider noise to be much of a factor since you'll almost always be running this outside. In saying that though there was no splashing of water outside the bucket whilst it was running and was all contained quite nicely.

This kit truly is a must have for kegs - especially since the lid opening of a cornelius keg is generally not large enough for most adults to fit their entire arm in - which is what is required to be able to clean the bottom where the majority of sediment and residue will reside.

We left it running with the cleaning solution for 10-15 minutes, before emptying and refilling the bucket with plain water and repeating the process for rinsing. The same process is repeated once again with a sanitising solution to complete the cleaning and sanitising regime.

You may be wondering exactly what a submersible pump rated at 3500L per hour looks like in action - so check it out in the video below. Certainly a sufficient amount of pressure for most applications we would expect.

Since all the barbs, T-pieces, cleaning arm and stand are made of stainless steel, you can be confident this kit will last a long time. We certainly won't be missing our previous process of manually cleaning kegs and fermenters. Our only wish is that we'd gotten one of these sooner!

The kit can also be upgraded by purchasing a Cleaning In Place (CIP) Kit which comes with a sprayball attachment and matching barb and silicone hosing as an alternative method for cleaning fermenters.

Here's a link to where you can purchase the Keg Washer and Fermenter Cleaning Kit from the Keg King website.


Related Articles