Monday 31 October 2022

Stone & Wood Pacific Ale Clone - Tasting Results

We recently attempted a clone of Stone & Wood's highly regarded Pacific Ale - a galaxy hopped Pale Ale using only barley and wheat using this recipe.

Here's how it turned out.

Our version is pictured on the left with the bottled version on the right in the picture above.

Straight off you can see that our version is noticeably darker which we found surprising as when it's on it's own the appearance is very light. Guessing the colour could be lightened further by increasing the amount of flaked wheat and reducing the amount of malted wheat. We'd be going for a mixture of 60% pale malt, 20% wheat malt, and 20% flaked wheat which still keeps in line with the much reported 60/40 split of ale malt to wheat. We're surprised a beer could be this light without the inclusion of pilsner malt!

Aroma wise and unsurprisingly the beers are very similar - since we know for sure that only Galaxy hops are used. The aromas are perhaps a little stronger from our version - and this isn't surprising considering ours is only a few weeks old, and the bottling date printed on the bottle is from several months ago.

Which brings us to the tasting. As mentioned above, the bottle we have is several months old so we're not considering this an entirely fair or equal comparison as it's definitely well past it's prime. We know for certain that a fresh bottle, or a pint of Pacific Ale on tap at the pub is noticeably better. We'd describe the bottle we have as "muted" - not bad by any stretch but certainly lacking a lot of those intense fruity aromas of passionfruit and citrus that Galaxy hops and Stone & Wood's Pacific Ale are renowned for.

The body and mouthfeel on the bottled version was marginally lighter than ours.

The bottled version had a slightly crispier finish, and was perhaps a little drier. Increasing the flaked wheat in the recipe as mentioned above could help ours replicate this a bit better - since flaked wheat is known to give a crisper mouthfeel to that of wheat malt.

Ours is perhaps a little more bitter, however we think that only having late hop additions is the right way to go for this beer. A 30 or 60 minute addition would likely impart too much up front bitterness, unless it was really small, like 5 IBU's or so.

In saying that, we're very happy with how this has turned out - it's a totally crushable and enjoyable summer ale style of beer.

What would we change if we tried it again? As mentioned above, we'd increase the amount of flaked wheat to help get the colour closer to the original and promote that crisp/dry finish. We also think it would be fun to try with a different yeast, particularly Verdant IPA which would really help accentuate and contribute some more fruity flavours.

Another interesting test would be to flip the water chemistry around a little. We went with the "hoppy" profile in Brewfather which has increased sulphate levels and reduced chloride which helps to accentuate the hop flavour and provide a dry finish. A common technique used in aggressively hoppy styles like New England IPA's or Hazy IPA's is to have a high chloride to sulphate ratio to help balance the aggressive hop load which has elevated chloride levels and reduced sulphate levels. This could be worth a shot and then increase the dry hop to over 100g.

It's certainly fun trying to replicate commercial beers - we're not worlds away with this first attempt and we've definitely gained some insight into exactly what goes into making the Stone & Wood Pacific Ale.


Related Articles

Wednesday 19 October 2022

How to do a Whirlpool/Hop Stand in a BrewZilla

Many of today's hop forward recipes call for what is commonly known as a "whirlpool" or "hop stand" hop addition. The idea behind these additions is that they are done after the wort is slightly cooled from boiling temperature at the end of the recipe's recommended boil period. By adding hops at a lower than boiling temperature, more of the fruity and floral properties of hops can be extracted without as much bitterness being imparted into the wort.

Whirlpool additions are typically added at around the 75°C - 85°C and are left to 'steep' in the wort for a period of 10-20 minutes. During this period, the wort is circulated, either manually or using a pump to aid in hop utilisation which causes a whirlpool like effect (hence the name). Your recipe should stipulate at what temperature and for how long the whirlpool hops should be added.

An example whirlpool in a BrewZilla (using water)

Homebrewing applications like Brewfather have a dedicated feature for whirlpool hop additions to help calculate how much bitterness (measured in International Bittering Units (IBUs) will be imparted from the whirlpool hop addition - based on the whirlpool temperature, duration and the Alpha Acid properties and quantity of hops being added.

If you're using a BrewZilla, you may be wondering how you go about performing a whirlpool. The process is really straightforward, but there are a couple of neat tricks to help make it easier and more efficient which we'll outline below.

BrewZilla Whirlpool Arm Attachment

Before we begin, it's worth mentioning that a whirlpool arm attachment for your BrewZilla is a worthwhile addition (but not mandatory) for performing a whirlpool. The whirlpool arm attachment connects to the pump outlet of your BrewZilla in place of the recirculation arm that is typically used during the mash. You don't have to use a whirlpool arm, but if you don't you will need to manually stir your wort during the whirlpool using a large spoon or mash paddle etc.

We also recommend a separate thermometer, preferably with a long probe that you can insert into the top of your boiling wort to measure the temperature of the wort from the top. The built-in temperature probe for the BrewZilla is located at the bottom of the unit, right near the heating elements so is not a reliable gauge for the actual temperature of the wort itself.

Our long probe thermometer for measuring whirlpool temperature

Here's a step by step guide on how to perform a whirlpool/hop-stand with your BrewZilla;

  1. Perform your mash, boil and hop additions as per your recipe. Typical boil times are 30 or 60 minutes.

  2. 5 minutes before the end of your recipes boil time (eg. after 25 minutes have elapsed for a 30 minute boil or 55 minutes have elapsed for a 60 minute boil), disconnect your re-circulation arm attachment and fit the whirlpool arm attachment (if you're using one). We add it whilst the wort is still boiling to allow the boiling wort to sanitize it.
    We also like to ensure that the whirlpool arm outlet faces the opposite direction to how the water will be flowing through the immersion chiller to maximise cooling efficiency.

  3. Also put your immersion chiller into the BrewZilla - and if you're using a paddle/spoon to stir and create a whirlpool manually, dip it into the boiling wort as well for sanitizing.

    BrewZilla with whirlpool arm and immersion chiller

  4. Connect the hose attachments to the chiller (but don't begin flowing water through it yet.)

  5. This is where things get busy. At the end of your boil, turn on the flow of water through the immersion chiller.

  6. If you're using the whirlpool arm attachment, turn on the pump on the BrewZilla and ensure the ball lock valve adjustment is fully open to allow maximum flow of wort through the whirlpool arm attachment. If you're not using a whirlpool arm attachment, start stirring to create a whirlpool effect.

  7. Adjust the temperature of the BrewZilla from "HH" (maximum/boiling) to around 5-7°C above the recommended whirlpool temperature. eg. If your whirlpool temperature is 80°C, set the BrewZilla target temperature to 85-87°C. Ensure both heating elements are On.

  8. Monitor the temperature of your wort using the thermometer probe inserted from the top of the BrewZilla into the wort.

  9. Once the temperature of your wort (according to the separate thermometer you're using) has reached around 5-7°C above your desired whirlpool temperature - stop the flow of water through the immersion chiller. You can turn it off at the tap, or simply kink the hose. You'll notice that even after stopping water flowing through the chiller, the temperature will continue to drop a few more degrees which is why we stop the water flow before reaching our target whirlpool temperature.
    Note that the time for the temperature to drop from boiling to around 85°C is quick - usually around a minute - but there are lots of variables that can influence this like the water flow rate and chilling water temperature.
    Don't take the chiller out of your wort either, leave it in place.

  10. Add your whirlpool hops - we use a hop spider but this is a personal preference - otherwise just throw them straight into the wort. If you're using a hop spider, we like to move/jiggle it around a little to help aid utilisation during the whirlpool period.

  11. Start the timer for your whirlpool hop addition.

  12. Leave the pump running through the whirlpool arm attachment for the duration of the whirlpool/hop stand. Once the time has elapsed, continue flowing water through the immersion chiller and turn off the heating elements. Also remove the insulating jacket if you're using one to help aid with cooling.

  13. Continue to chill your wort then transfer to fermenter as per normal by refitting the recirculation arm attachment.


Monday 17 October 2022

Keg King - King Keg - PET Corny Ball Lock Keg - Hands on Review

There is a well worn path that many homebrewers have been down when it comes to packaging their precious brews. It typically involves starting out with bottling, and fairly quickly realising that washing dozens of bottles for every batch that is brewed is tedious and time consuming - so much so that it probably leads some to give the hobby away all together.

The next step after bottling for those that persevere is typically packaging into kegs - with the 19L ball lock cornelius "corny" style kegs being the most popular option. Kegging is great - it means you generally only have one vessel to clean and sanitise for each batch, and you can serve from a simple picnic tap or go the whole hog and attach beer taps or faucets to your beer fridge or purpose built kegerator for the true draught beer experience at home.

The undisputed problem with diving down the kegging rabbit hole is the setup cost though. Nothing on it's own is particularly expensive, but when you add up the cost of all the components you need to get going it can become out of reach fairly quickly.

Cheap second hand fridges and freezers for kegerator or keezer conversions can be found fairly easily on used marketplaces, but when you add in the additional components like a CO2 gas tank, gas regulator, taps, shanks, beer line, gas line, disconnects, fittings/clamps and of course, kegs, you can see how quickly the costs can accumulate.

Corny kegs when brand new typically retail for around AU$100 - which doesn't seem too bad, but if you want 3 or 4 of them for your new kegerator setup, you can see how once again cost can be come an issue.

There's a fresh new option available now that is challenging the age old adage that stainless steel is the only way to go for homebrewing equipment like kegs and that kegging is too expensive.

The King Keg from Keg King - a name that will undoubtedly cause mass confusion amongst the internet's search engines, is a PET plastic based keg that provides brewers with a much more budget friendly alternative to the traditional stainless steel corny kegs.

King Keg - 20L PET Ball Lock Keg

Our friends at Keg King sent us one to put through it's paces, so that's exactly what we're going to do. In this article we'll be looking at the 20L ball lock version, but there are other models available in different sizes and connection types - more on that later.

Opening the box and we've got our parts package sitting on top of the keg which includes a stick on thermometer, volume markings sticker, lid, screw on collar, gas/liquid ball lock posts, pressure release valve (PRV) and a rigid plastic dip tube.

Included parts with the ball lock version of the King Keg

Taking the keg out of the box, and as you'd expect it's super light - it is made of plastic after all, so can be maneuvered and carried around very easily with just one hand since it only weighs 1kg. It looks an awful lot like Keg King’s Fermenter King Junior too, but with grey/silver plastic instead of the clear/transparent plastic on the Fermenter King Junior.

The gas and ball lock posts need to be assembled which involves inserting the spring and poppet into the post and then screwing it onto one of the threads on the lid. This process would be familiar for anyone who has purchased/put together one of Keg King's fermenters like the Apollo in the past - it's a piece of cake and only takes a couple of minutes with no tools required.

Ball lock post assembly - spring, poppet and post

Likewise, the red PRV also screws into the threaded hole on the lid as a safety net to ensure the maximum rated working pressure of 35PSI is not exceeded within the keg.

The rigid plastic dip tube is then attached to the under side of the liquid ball lock post (the post without the small notches on it). Pro tip - submerge the dip tube in some hot/boiling water to soften it and make it more malleable before trying to slide it onto ball lock post. Failure to do may result in the dip tube cracking/splitting when being stretched.

If you do manage to split the dip tube, it can easily be replaced with a piece of regular beer line, or even a length of silicone tube. You could also use your floating dip tube from your fermenter instead (if you have one) and harvest beer from the top instead of the bottom.

King Keg lid assembly

Once everything is attached, the lid fits into the keg body nice and snug, with the thick red O-ring providing a nice tight seal. Some food grade lubricant is always a good idea on O-rings like this to help prolong their life and stop leaks from occurring as well.

Lastly, the screw collar then screws into place to hold the lid down and we've got a keg ready to go.

King Keg with ball lock lid and collar fitted

The King Keg features moulded/integrated handles at the top around the lid opening that feel plenty strong enough to lug the keg around when full - the relatively thin edges don't have a particularly ergonomic feel, but to move around the garage or in/out of the fridge poses no problem at all.

Side profile view of the King Keg integrated handles

The opening where the lid attaches is quite small - there's no chance an adult arm would be able to reach in for cleaning/scrubbing purposes, so a keg/corny cleaner kit is a good idea, or otherwise just throw some powdered brewery wash (PBW) and water in and give it a good shake. The maximum recommended temperature of any fluid inside the keg is 35°C so warm water is ok to use as long as this temperature is not exceeded.

Compared to a standard cornelius keg, the King Keg is 2.6cm wider in diameter with a total width of 237mm and a total height of 575mm making it a little shorter. It holds an extra litre too with a total capacity of 20L.

King Keg side by side with a corny keg

The main body of the King Keg is a generic grey/silver colour, with a printed stamp stating the maximum working pressure of 45psi and when it's due for it's next pressure testing - ours is good until 2025, meaning it has an expected working life of 3 years from it's manufacture date.

King Keg printed max working pressure and test date

A small black moulded plastic piece forms the base/stand that the King Keg is permanently affixed to - since the bottom of the keg itself is rounded and wouldn't sit level on the ground without it.

Back to the lid and the tolerances here are quite tight - with two ball lock disconnects attached (in our case the Spundy and a gas disconnect), you can see there is only a couple of millimetres of clearance, but it's enough to get them on and off easily without any problems.

King Keg - clearance between the posts with disconnects fitted

Functionality wise, you've essentially got all the same features and uses as a standard cornelius keg. You can purge the keg of oxygen using CO2 (from a gas bottle or from active fermentation) prior to filling, and perform pressure transfers to further eliminate the risk of oxygen being introduced into your beer. You even get the good old condensation forming on the outside during transfers so you can see the fill level - since you're not actually able to see the fluid level inside the keg as they've made it as impermeable to light as possible.

Condensation reveals the fill level when transferring

So, what's the catch then? Keg King state that beverages will last up to 18 months in the King Keg, due to it's unique oxygen scavenger technology in the plastic design that greatly reduces oxygen ingress through the plastic. We've certainly never had a keg last anywhere near 18 months so for us this really isn't an issue, but it's worth considering and being aware of, especially if you like to age some of your darker beers for extended periods of time. The damaging effects of ultra violet (UV) light are also eliminated by the protective coating on the plastic.

Being made of plastic, the King Keg inevitably has a limited life, with a hydrostatic test recommended after 2-3 years of service. When it is time for replacement though, the keg body itself can be replaced (without the lid components) for only AU$15 meaning for less than the cost of a 6-pack of craft beer you can have another 2-3 years of service (or longer) from a brand new keg, and just re-use the lid and collar components from your original King Keg. The keg itself can be recycled as well, helping to reduce landfill waste.

It makes a lot of sense, and even if you replaced the keg body every 2 years, you'd get 8 years of keg service (2 years from your original King Keg purchase + 3 replacement kegs at AU$15 each) before coming close to the cost of a stainless corny keg - and that doesn't include the cost of maintaining and replacing seals on a regular stainless corny keg over this period too.

We previously mentioned there are a couple of varieties available for the King Keg. There's currently a 10L and 20L version available, with options for A-Type and D-Type spears as well as ball lock configurations, meaning whatever setup you're running for connections can be accommodated.

Pricing on the Keg King website is AU$49.95 for the 20L ball lock configuration, with the A-Type and D-Type 20L versions coming in a little cheaper at AU$45.95.

Finally, and perhaps most importantly, King Keg's are designed and manufactured here in Australia which is great to see. Keg King even have a YouTube video giving an insight into the manufacturing setup especially to make these kegs. Pretty cool and insightful stuff and well worth a look.

Keg King's YouTube video on the King Keg is well worth a watch

Advancements in manufacturing and technology are certainly helping to bridge the gap in functionality between plastic and stainless steel. With such a vast difference in price (a new ball lock 20L King Keg can be had for less than 50% of the cost of a new stainless cornelius keg), and no real downsides or disadvantages besides the limited lifespan, they're definitely a good alternative, especially if you're just getting your kegging setup underway and need to purchase multiple to get going.

Some care needs to be taken not to split the included dip tube (like we did), but even so, a floating dip tube is worthwhile considering fitting - and if you've got a Keg King fermenter, you probably already have one of these anyway.

The 20L version like the one reviewed here is great for home Kegerator setups. The 10L option looks good as well, and we're hoping a smaller 4-5L option is developed in the future for a "party keg" option to take the equivalent of a couple of 6 packs on the go with you.

Check out Keg King's website for the full range of King Keg's and more.


Related Articles


Wednesday 12 October 2022

Keg King - Apollo Snub Nose Fermenter - Hands on Review

For beginner and experienced homebrewers alike, we believe there is always a place in their brewing equipment inventory for at least one plastic fermenter. They're simple, cheap, reliable and can produce excellent results. But not all plastic fermenters are created equally, with advancements in manufacturing technologies allowing new products to constantly push the boundaries of what is possible. The evolution of plastic fermenters has come a long way in recent years, and are completely different to the old plastic bucket style fermenters with a spigot/tap at the bottom from days of old.

Don't be fooled into thinking that plastic fermenters are inferior to those made with stainless steel either. Although stainless does have some advantages, there are certainly some advantages that PET plastic has over stainless such as it's relative light weight, transparency and cost.

Keg King have developed a range of PET plastic based fermenters, dubbed Apollo, that boast a long list of great features to suit homebrewers of all experience levels. They're also designed and manufactured right here in Australia by Keg King.

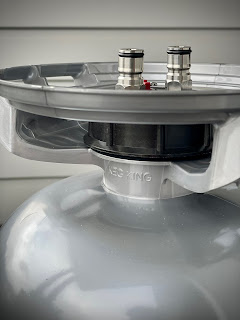
In this review we'll be looking at the 30L Apollo Snub Nose fermenter - a closed bottom, conical style, pressure capable, PET plastic based fermenter.

Keg King's Apollo Snub Nose 30L Fermenter

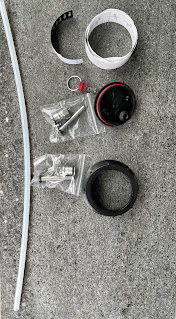
Opening the box and we've got the fermenter body seated on the metal stand, and a bag with all the parts and components required for assembly. The stand is made of stainless steel and is custom designed for the Apollo with a larger top ring supporting the main body and a smaller ring situated lower down to support the snub nose. The two points of contact between the stand and the fermenter body give a rock solid foundation with no movement or risk of it tipping over.

There isn't a way for the fermenter to attach or tether to the stand though, so if you're needing to relocate the fermenter whilst full, you either need to pick it up and carry it by holding the stand itself, or have a second person move the stand to the new location on your behalf whilst you handle the fermenter, since the snub nose shape at the bottom means you can't set the fermenter down on the ground without it tipping over onto its side.

On the Apollo body there are two moulded plastic handles just underneath the lid opening that provide a really solid feel when lifting, and even with the fermenter full there was no noticeable flexing. 

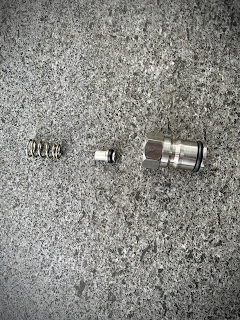
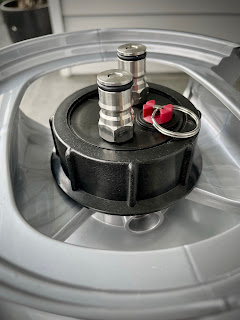
Some assembly is required but is very straightforward, with all the included parts only needing to be attached to the main lid. A poppet and spring need to be installed into the gas and liquid ball lock posts which are then screwed onto the appropriate threads on the lid. The pressure release valve (PRV) housing is then screwed onto the lid (which can be removed and then acts as a dry hopping port), with the PRV then screwing into the housing.

Spring & poppet need to be installed into the ball lock posts

The Apollo comes with two PRV's that are colour coded according to their effective pressures - purple (15psi) and blue (10psi) to ensure a safe working pressure is maintained within the Apollo at all times.

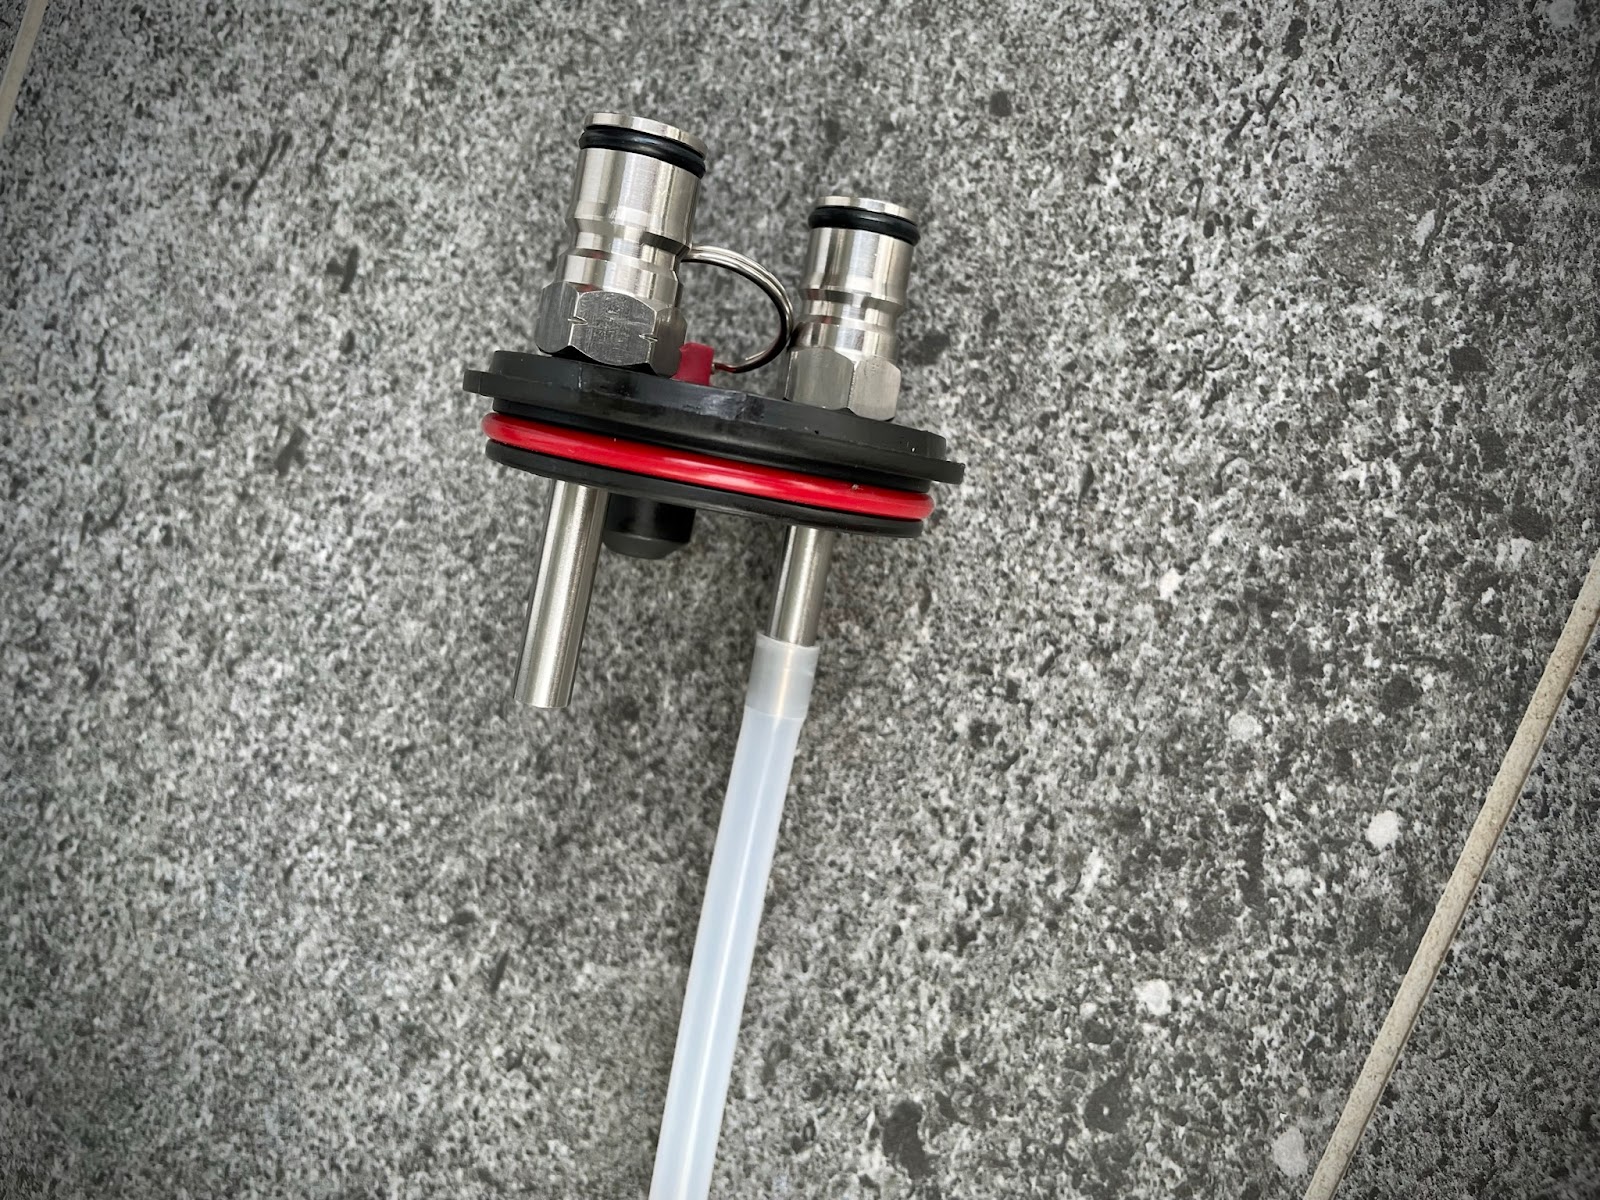
A stainless thermowell is also included that utilises a BSP thread and screws onto the under side of the lid. Once fitted it protrudes into the middle of the wort and allows a temperature probe to be inserted through the top for precise temperature measurement and control during active fermentation.

Lastly, the floating dip tube is assembled by attaching the filter and ball float together, with the filter then attaching to the silicone dip tube. The other end of the dip tube is then attached to the under side of the liquid ball lock post (the post without the small notches in it). The rings used to attach the filter and ball float together can be looped over the thermowell to ensure the floating dip tube remains centered within the fermenter as well.

The Apollo's filter and ball float attached to the silicone dip tube

A couple of tips worth noting is to use some food grade lubricant on the large lid O-ring, as well as the small seal on the PRV to help provide a leak-free seal. Also remember not to over-tighten any of the attachments. No tools should be required for assembly, and when screwing things into place, do them up firmly but not as tight as humanly possible - over-tightening can be just as problematic as under-tightening things.

All up, the lid assembly takes no more than 5 minutes to put together. Keg King have an excellent YouTube video outlining the assembly process as well which is definitely worth a look if you're putting this together for the first time.

A strip sticker with volume markings is also included along with a stick-on thermometer to help determine the temperature of what is inside the fermenter. There's a neat seam down the side of the fermenter that can be used to help align the volume markings sticker so you can get it as straight as possible when affixing.

Keg King's Apollo Snub Nose 30L Fermenter

Now that assembly is done, a quick clean is probably a good idea just in case there are any oils or other substances left over from manufacturing. We always use cold water when cleaning our plastic fermenters, though warm water can be used (up to 50°C) if you wish. We used some powdered brewery wash (PBW) and cold tap water - thrown into the fermenter then shaken vigorously to mix and coat all surfaces before giving a gentle wipe over with a soft dish cloth followed by a rinse with cold water.

A similar process is repeated for sanitising, with 1L of water added along with a small amount of phosphoric acid based no rinse sanitiser to obtain the right dilution before shaking to distribute the sanitising solution on all internal surfaces before emptying again and filling with wort.

The 115mm lid opening provides adequate space when filling, and is big enough for an adult arm to be able to reach in for cleaning all the way to the bottom. We find plastic much easier to clean than stainless since you can more easily see where any build up has occurred so you know where you need to be scrubbing - but we also love the fact that we can see the wort in the fermenter too. We still find it fascinating watching the vigorous action of fermentation once it's underway which to us is probably one of the greatest benefits of clear plastic fermenters like the Apollo.

Speaking of fermentation, did we mention that the Apollo is pressure capable?  Each Apollo fermenter is individually pressure tested as part of the manufacturing process, and is rated for use up to 35psi - more than enough pressure for even the most aggressive of pressure fermentations. 

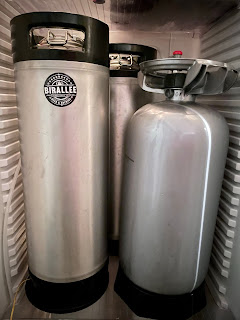
Pressure fermentations are great and offer brewers the ability to carbonate their beer using the CO2 created by fermentation. It also enables fermentations to be performed faster by allowing higher fermentation temperatures and suppressing the off flavours that are often associated with those higher temperatures. Finally, there is the benefit of oxygen free pressure transfers to all but eliminate the risk of oxidation of your fresh beer as part of the transfer/packaging process - combined with the transparent plastic fermenter body allowing you to watch the progress of your transfer and stop it before any unwanted trub is picked up and transferred from the bottom. These are all benefits that brewers are able to leverage with their Apollo fermenter.

Pressure transfers are a good way of eliminating oxygen ingress during packaging

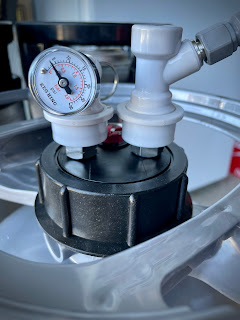
You can also fit a Spundy Spunding Valve to your Apollo to help regulate the pressure within it during pressure fermentations by attaching it directly to the gas post on the lid.

The snub nose is a key feature of the Apollo, allowing the trub and yeast cake to settle into the bottom of the fermenter. The cone-like shape means it collects nicely and takes up less surface area, allowing more of the fresh beer to be harvested from the top using the floating dip tube. There is a noticeable reduction in the left over trub in our Apollo compared to our experience using other plastic fermenters without the cone/snub nose shape.

The trub and yeast collects nicely in the bottom of the snub nose

An insulating jacket is available as an optional extra to help maintain and stabilise the temperature within the Apollo, and can also shield your precious beer once it's fermented from damaging Ultra-Violet (UV) light. There's also a stainless cooling coil available if you wish to control the temperature of your fermenting wort using a glycol chiller setup.

We previously mentioned the PRV housing can be easily unscrewed and removed to be used as a dry hopping port. A funnel may help to get hops through the relatively small opening, but we expect clogging might be a little problematic. We prefer to dry hop by simply unscrewing the collar and opening the main lid which allows large amounts of hops to quickly be added into the fermenter with minimal fuss and mess. 

Since the only way to get your beer out of the fermenter is through the floating dip tube, a CO2 gas source (ie. pressurised bottle) is required to achieve this. You can capture and leverage some of the CO2 created by fermentation to do this, but it wouldn't be sufficient to move a full 20-25L of beer out of the fermenter.

What could be improved for future revisions of the Apollo? We'd like to see the lid redesigned to feature a 1.5" tri clover port to allow for other attachments to be fitted - things like dry hopping contraptions that can be purged for oxygen-free pressure dry hopping, or a carbonation stone that could be attached to a separate ball lock post then quickly/easily removed. 

A way to tether the fermenter to the stand (or have handles incorporated into the stand) would also be a welcome addition to improve the ergonomics of moving it - particularly when full.

The Apollo Snub Nose comes in 30L and 60L varities, but there is another version - the Apollo Unitank which also comes in 30L and 60L sizes and features an additional collection container at the bottom. This allows for yeast and trub to be removed so you can serve directly from the fermenter for extended periods making it a true uni-tank fermenter.

We think the Apollo Snub Nose is an excellent piece of gear that will more than meet the needs of most homebrewers. The simple design makes it incredibly easy to use, and we love being able to watch how our fermentation is tracking through the transparent plastic. The snub nose feature helps to minimise wastage by reducing the amount of beer that is in contact with the trub once it settles into the cone at the bottom. All this combined with pressure fermenting capabilities means that creating high quality beer or other fermented beverages is well within reach for brewers of nearly all budgets and skill levels. Lastly, being designed and manufactured locally in Australia is a great bonus meaning using one is helping to support local business and industry.

The Apollo Snub Nose 30L model we reviewed here currently retails from Keg King for AU$85, but there is also a bundle available that includes the Spundy which is well worth considering for an extra AU$10.


Related Articles