Monday 27 February 2023

Cream Ale - BrewZilla Brew Day

Here's a rundown on our latest BrewZilla Brew Day - where we brought our Cream Ale Recipe to life.

A number of firsts for us again with this brew. Since the Cream Ale style calls for a clear finish, we thought we'd try including a (half) whirlfloc tablet to help with clarifying. We're also using an lager yeast for the first time, opting for SafAle W-34/70.

Shoutout to 41 Pints of Beer for the ingredients - we've always had excellent results and great efficiency with their grain.

As always, we started with filling our 35L BrewZilla with our strike water and adjusting the minerals and pH as per our Brewfather recipe. 

We doughed in and gave the grain bed a thorough stir before leaving it to rest for 10 minutes - a relatively small grain bill meant there was plenty of space left at the top of the malt pipe which was a welcome change from the past few brews where it's been full to the brim.

After the initial 10 minute rest, we took a pH reading. We didn't add the full amount of phosphoric acid recommended by Brewfather (for fear of overshooting - you can always add more in but can't take it back out) so we got an initial reading of 5.53, within the recommended range of 5.2 - 5.6, but we wanted it a little lower so added a tiny bit more acid which got us down to 5.44

We switched on the pump of our BrewZilla and began our recirculation. We anticipated a thicker mash than we had and the flaked maize didn't gum it up or slow it down too much like we thought it might which was nice. Recirculation flow was pretty decent the entire time making for a stress free mash.

After the 60 minute mash the wort had cleared up nicely from recirculating. We raised the temperature from our 65°C mash temperature to 75°C for our mash out and kept it there for 10 minutes.

Next it was time to lift the grain basket and sparge the grain bed. Water flow through the grain bed was good so we hit our pre-boil volume of 28L in about 10 minutes or so.

Once sparging was complete, we set the BrewZilla to "HH" for maximum (boiling) temperature and waited for it to come up to a rolling boil.

Whilst waiting we measured out our 60 minute hop addition of Hallertauer Mittelfrueh as per the recipe.

We also used the time to take a pre-boil gravity reading on our AliExpress Digital Refractometer. It gave us a reading of 1.040 - a few points higher than our expected 1.037.

We had a rolling boil before long, so we added our 60 minute hop addition. Plenty of space left at the top of the BrewZilla so didn't have to worry too much about a boilover.

No other hop additions until 5 minutes left in the 60 minute boil, so we used the time to weigh out our dextrose addition, yeast nutrient and whirlfloc tablet. We cut back the dextrose by 50g since we were already ahead with our efficiency from our pre-boil gravity reading.

Side note - we finally remembered to bring a fold up table so we could set everything up in the garage instead of having to run back in/out of the house to do things in the kitchen - this was a great idea and made things feel so much easier and faster - why didn't we do this sooner!?

With 10 minutes left in the boil, we added our dextrose, yeast nutrient and whirlfloc tablet. Probably added it all a little too quick as it stopped the rolling boil, but the temp only dropped to about 99°C, so not anticipating it will have made much of a difference. Will try to remember to add it in more slowly next time.

With 5 minutes left in the boil we added our final hop addition of Hallertauer Mittelfrueh

At the end of the boil we began chilling with our immersion chiller. No need to worry about messing around with whirlpool hop additions for this one, just get it as cold as possible as soon as possible.

Whilst waiting for the chiller to do it's thing we took a small sample to measure our Original Gravity which was 1.051

Getting more efficiency than expected is often a good thing, but we're worried this one may come out a little too strong. Our recipe predicted an OG of 1.044 so we're well above that, and will give us a fair amount of ABV if it attenuates as low as expected - potentially around 5.6% which is right at the upper limit of what is acceptable for the Cream Ale style. We're worried there may not be enough hop character to support this - guess we'll soon find out.

Once our wort had chilled sufficiently, we transferred it to our Keg King Apollo Snubnose Fermenter.

A quick note on whirlfloc - having not used it before we weren't exactly sure what to expect, but this certainly surprised us. These photos were taken approximately 20 minutes apart - the first immediately after transferring from the BrewZilla. The difference is striking.

We've never seen settlement like that happen so quickly and turn so clear before - we'll definitely be including whirlfloc in all future brews unless they're designed to be hazy. Very surprised at how effective the whirlfloc was.

As a sanity check we also took a floating hydrometer reading which confirmed an original gravity of around 1.050.

We chilled our wort a little further in the fermenting fridge to get to our pitching/fermentation temperature before pitching our 2 packets of SafAle W-34/70 yeast.

Pleasingly we had signs of fermentation within approximately 8 hours of pitching the yeast.

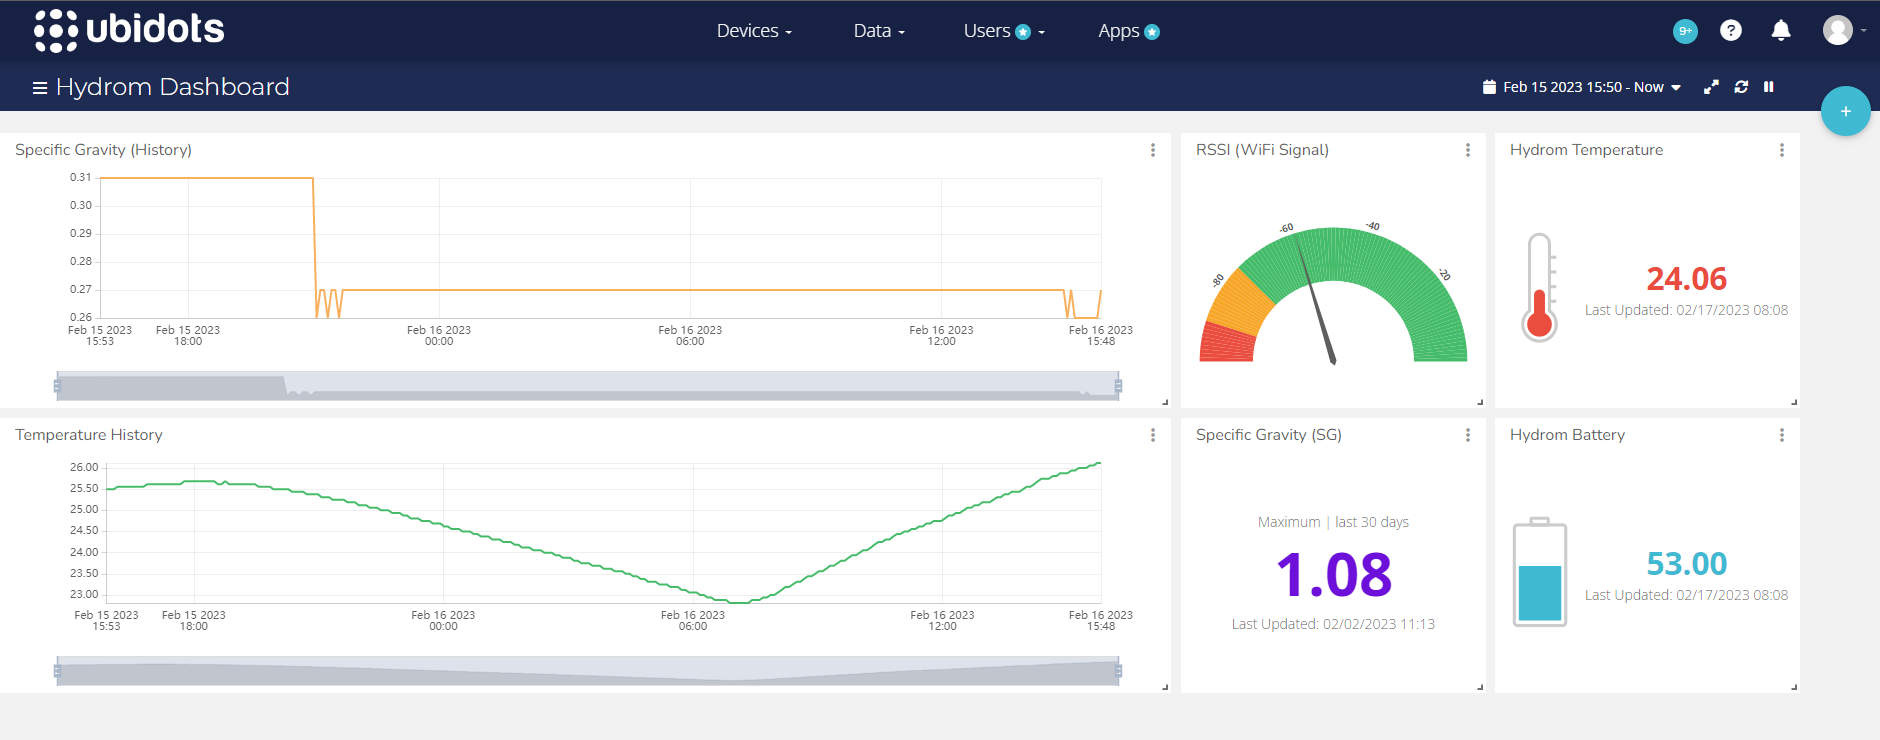
After less than 48 hours from pitching yeast, fermentation had reached its final gravity of around 1.006. This is the value from our Hydrom floating hydrometer and is yet to be confirmed with a traditional floating hydrometer, but we've never had a beer ferment out this fast.

W-34/70 at around 20°C truly is a beast - we kept the fermenter under approx 10psi of pressure throughout the fermentation so we're hopeful this has suppressed any off flavours from developing by fermenting fairly warm for a lager yeast.

Final Gravity reading is around 1.006 - pretty much as expected and giving us a total ABV of 5.78% - certainly a bit more than we were aiming for.

Will give it another couple of days on the yeast to help it mature and clean up a little before cold crashing and kegging.


Related Articles


Sunday 26 February 2023

Cream Ale Recipe (All Grain)

 Following on from our recently published Cream Ale Recipe Creation Guide - here's our Cream Ale recipe.

Notes

A really simple recipe here, and a bit of a change of pace from the typically hop forward style beers we've been brewing lately. Time for something, clean, crisp and refreshing.

The gist of this recipe was taken from the Brewing Classic Styles book by John Palmer and Jamil Zainasheff. We've got a mix of American 2 row ale malt and pilsner malt for the majority of the grist, with a little under 7% making up the corn based adjunct (flaked maize) and a little bit of corn sugar (dextrose) to promote a higher attenuation and dry finish.

We haven't used noble hops in a while so we opted for Hallertauer Mittelfrüh - a popular and relatively low alpha acid option which should give some nice floral and slightly spicy notes.

For yeast, we're going with SafLager W-34/70 - our first time using this yeast but looking forward to seeing how it performs. Yes, this is an ale style, and yes, this is a lager yeast, so technically it isn't really an ale, but the idea is to ferment the lager yeast warmer to promote some slight fruity esters and character. This style allows a lot of flexibility (as we outlined in the Recipe Creation Guide) - so feel free to swap out for any other high attenuating, clean yeast variety.

We've also gone back to a 60 minute boil to try and extract a decent bitterness from the low AA hops.

Vitals

Batch Volume: 23L 
Boil Time: 60 minutes
Brewhouse Efficiency: 75%

Original Gravity: 1.044
Final Gravity: 1.006
IBU (Tinseth): 17
BU/GU: 0.37
Colour: 6.7 EBC
Expected ABV: 5.0%

Mash

Temperature: 65c - 60 minutes
Mash Out: 75c - 10 minutes

Malts

2.0kg - Gladfield American Ale Malt (44.4%)
2.0kg - Gladfield Pilsner Malt (44.4%)
0.3kg - Gladfield Malted Maize (6.7%)
0.2kg - Corn Sugar - Dextrose (4.5%)

Hops

60 Minutes - Hallertauer Mittelfrueh (14.5 IBU)
5 Minutes - Hallertauer Mittelfrueh (2 IBU)

Yeast

Fermentis Saflager W34/70 (2 packets - dry)

Fermentation

20°C - 14 days

Carbonation

2.4-2.9 CO2-vol

Water Profile

Brewfather "Balanced" Water Profile

Ca2+ (Calcium): 48
Mg2+ (Magnesium): 10
Na+ (Sodium): 12
Cl- (Chloride): 69
SO42- (Sulfate): 71
HCO3- (Bicarbonate): 37


Want to see how it turned out? Follow the link to our BrewZilla Brew Day run down for our Cream Ale below.

Related Articles


Cream Ale - BrewZilla Brew Day

Cream Ale - Recipe Creation Guide

Friday 24 February 2023

Cream Ale - Recipe Creation Guide

First things first - a Cream Ale does not contain cream or any kind of dairy or dairy products, or vanilla flavouring, or anything of the sort. In fact, we'd argue the name is probably one of the worst beer style names to exist, simply because the initial impression it gives to just about anyone who has never had one is that it would contain something of the sort - like a Milkshake IPA for example which contains lactose.

Which is incredibly disappointing, as the Cream Ale style is fantastic, easy drinking and would undoubtedly appeal to a broad drinking audience.

Unfortunately there is no straight answer on where the name came from, and there's little chance of it ever changing, so let's just move on.

So what is a Cream Ale then? It's essentially an ale version of an American lager - produced by Ale brewers to compete with their lager brewing counterparts. A clean, crisp, refreshing ale, usually made with corn or rice based adjuncts. Could be considered a lawn mower beer.

Appearance

Pale straw to moderate gold in colour, although will usually be more on the pale side of this range. Low to medium head with medium to high visible carbonation, although head retention may suffer due to the use of adjuncts in the grist. It should appear brilliant, sparkling clear.

Aroma

Malt notes should be restrained with some sweet corn like aromas typically present from the inclusion of corn based adjuncts. Low hop aroma with any variety of hops permitted - so new world and noble hop varieties give a plethora of options. Low levels of DMS are commonly found, along with some faint yeast esters but are not required. Hops and malt should generally be balanced with neither dominating. Diacetyl should not be present and is considered a flaw.

Flavour

Low to medium-low hop bitterness. Low to moderate maltiness and sweetness that can vary along with gravity and attenuation rates. Should be well attenuated and have a dry finish - with neither hops nor malt dominating the palate, as with the nose. A low to moderate corny flavour is commonly found as is small amounts of DMS. Faint fruity esters are optional. Diacetyl should not be present and is considered a flaw.

Mouthfeel

Light, crisp and clean is what is called for here although the body can reach medium in bigger versions. Mouthfeel should be smooth with medium to high attenuation - higher attenuation is probably preferred and can give that thirst quenching finish. Carbonation should be high, and high alcohol versions may give a slightly alcoholic warmth.

Vital Statistics

ABV: 4.2% - 5.6%
IBU: 15 - 20
SRM: 2.5 - 5
OG: 1.042 - 1.055
FG: 1.006 - 1.012

Malts/Grains

American two row or six row malt - 60 - 90%
Adjuncts (typically corn or rice based) - 5 - 20%
Simple sugars (typically glucose or dextrose) - 1 - 20%

The majority of the grain bill should be two row, six row, or pilsner malt, or any combination of these. Sticking to one or two varieties is probably best as this isn't a malt forward beer so a complex flavour profile isn't required here.

Anywhere from 5% up to 20% of the grist can be made of corn or rice based adjuncts like corn based maize which is a common adjunct in American styles like this.

Up to 20% of the grist can be simple sugars like glucose or dextrose - we'd probably recommend keeping closer to 10% or less to avoid any fusel alcohol flavours, though some form of simple sugar being included is a good idea to help promote a lower finishing gravity and dry finish.

Hops

Brewers have the flexibility here of opting for noble or new world hop varieties - but we'd recommend choosing one or the other. 

Whirlpool Hop Additions

Whirlpool hop additions are not required for this style - sufficient bittering and hop flavour can be gained from typical boil hop additions.

Dry Hopping

Dry hopping is not necessary for the Cream Ale style, though there is a Classic American (pre-prohibition) Cream Ale style that is stronger, hoppier and has more bitterness that can allow for this.

Mash (Temperature & Time)

Mash @ 65°C (to create a highly fermentable wort to leave promote a high attenuation and dry finish)
Mashout @ 75°C for 10 minutes

Yeast

The style dictates a clean, dry finish, so any clean and highly attenuating yeast variety will do here. You can go with the good old SafAle US-05, or for some slight fruity esters you can look at using a Kolsch yeast. This is considered an Ale but brewers have been known to use lager strains like W-34/70 fermented warmer to promote some fruity esters. Hubrid strains like the new NovaLager will work well too.

Water Profile

A balanced water profile with generally low levels of key minerals is suitable, and with sulfate and chloride levels kept in balance.

Fermentation Temperature

If using a lager yeast strain, ferment it at the higher range of the recommended temperature. If using an ale yeast strain, ferment it at the lower end of the recommended temperature range to help promote a clean finish.

Pressure Fermentation

Pressure fermentation can be beneficial for this style of beer as fermenting under pressure will help to suppress any off flavours from being created - especially when fermenting at the upper range of a yeasts recommended temperature. Shoot for around 10-15 psi in order to not place too much stress on the yeast.

Cold Crashing

Cold crashing can be beneficial to this style of beer as it can help the hop debris settle to the bottom of the fermenter with the rest of the trub which in turn helps improve the clarity of the beer (which is a requirement of the style as per "Appearance").

Sample Recipe

Cream Ale Recipe (All Grain)


Related Articles

All Recipe Creation Guides

All-Grain Recipe List

Thursday 16 February 2023

Hydrom - Ubidots Stem Integration - Step by Step Guide

If you've purchased a Hydrom digital hydrometer, one of the recommended and easiest platforms to integrate with is Ubitdots Stem. It's free and allows you to easily create awesome looking graphs to display your fermentation data.

Here's a step by step guide on how to get your Hydrom configured and integrated with Ubidots Strem.

  1. Setup a free account at https://ubidots.com/stem/

  2. Once ypu've created your account and signed in, select Devices > Devices from the top menu

  3. Click the blue "+" button in the upper right corner then select the "+" button again to Add new device

  4. Select the option for Blank Device

  5. Enter the Device Name and Device Label into the respective fields. These fields determine how the Hydrom will appear in the device list within Ubidots. We went with "Hydrom001" but you can use whatever device name you like.

    Click the green tick in the lower right corner to proceed.

  6. You will now be returned to the Devices page. Click on the name of the device you just added to open the device properties page

  7. From the device properties page, click the button indicated below to copy the unique Token field to the clipboard

  8. Next, we simply need to paste this Token value into the Ubidots service within the Hydrom configuration.

  9. Unscrew the lid of your Hydrom. Ensure the On/Off switch is set to the On position, then press the Reset button to initiate the web portal interface. 

  10. If you're connecting directly then connect to the Hydrom SSID, then open a web browser and navigate to http://192.168.2.1
    If you have configured the Hydrom to connect to your home WiFi network, then you'll need to determine what IP address the Hydrom has and connect to the web interface using that address.

  11. Once you've accessed the Hydrom web interface, click the menu icon in the top left corner then select Services

  12. From the list of Services, locate the option for Ubidots and toggle the slider to enabled position

  13. Paste the Token value you copied from Step 7 into the field that appears

  14. Also toggle the Test Message slider to On, then click the Save button at the bottom of the screen. This will force a test message to Ubidots straight away so we can check/confirm the integration has worked correctly.

  15. Go back to Ubidots and open the Device Properties page again. You should see data populated similar to the screenshot below

  16. This screen will show all the fields that the Hydrom is reporting, the last reported values, and when the last values were reported. Next, we'll create a dashboard with some widgets to display our data.

  17. Select Data > Dashboards from the top menu


  18. Select the option to Add new Dashboard

  19. Give your dashboard a name, then click Save

  20. Click in the box to Add new widget

  21. We'll create a simple line graph first to show our gravity reading history. Select the option for Line chart from the list of available widgets

  22. Click the button to Add Variables

  23. Select your Hydrom device then select the option that appears for specific-gravity. Click the green tick in the bottom right corner to save

  24. Click the green tick button again to save and create your chart

  25. Your chart will now display on the dashboard. You can resize the chart by clicking the bottom right corner and dragging to resize.
    You can also change the colour, and scale of the graph by using the menu icon in the upper right icon of the widget then selecting Edit.

  26. You can then repeat the process of creating additional widgets by clicking the blue "+" button in the right corner, then repeating from Step 21 above for whatever widget type and data metrics you wish to use

  27. Here are some example widgets we created to give you some ideas


As you can see, the Ubidots platform is incredibly powerful, and you're able to create some cool looking graphs and other widgets to display your Hydrom data in a useful manner.

You do need to tweak some of the graph settings like their scales and colour sometimes as the default options don't always look as good as they could, but the interface is clear and intuitive to use.

Related Articles