The Kegland FermZilla is a great bit of kit that can be used for pressure fermenting. When fermenting under pressure though, it's important that the vessel does not have any leaks. Thankfully, the All Rounder model is quite simple in it's design, so there's really only a few places that leaks can come from, so troubleshooting it really isn't all that hard. Is your FermZilla leaking or not holding pressure?
In this guide we'll go through our three recommended sections to check on your FermZilla if you're trying to track down a troublesome leak.
1. Carbonation Caps
Are you using plastic or stainless carbonation caps? The type you are using will determine what you should do to address any potential leaks.
 |
| Fermzilla with plastic carbonation caps attached |
Plastic Carbonation Caps
If you are using plastic carbonation caps, it is important that you do these up tight. The KegLand plastic carbonation caps don't have any seals, so they should be done up tight to ensure they seal correctly. Some food grade lubricant on the thread can also help prevent any leaks from occurring. There is a hex head on the top of the cap that you can fit a spanner too to help put that extra bit of torque into tightening them.
Also, if you've been removing the lid by prying it open using a spanner on the underside of one of the carbonation caps like our guide suggests, it's worth pressing down hard on the carbonation cap to ensure it is sealed correctly. We've noticed ours leak occasionally after using this method to open the lid.
Stainless Carbonation Caps
The stainless carbonation caps from KegLand are different to the plastic ones as they have a rubber seal within them. Be careful not to overtighten them as this can cause the seal to warp and lead to leaks occurring. Some food grade lubricant on the thread can also help prevent any leaks.
Final Tip
Spray some soap solution around the carbonation cap area and watch for small air bubbles forming/popping to help identify any leaking gas from the carbonation caps.
2. Pressure Release Valve (PRV)
Check and ensure the pressure release valve is seated correctly. Spray some soap solution on and around it and watch for small air bubbles forming and popping to easily identify if there are leaks coming from the PRV.
If you've previously had an aggressive fermentation with lots of krausen - check that no krausen or hop particles have become stuck in the PRV (you will need to take the lid off and look at the under-side of the PRV to check this, though).
 |
| FermZilla lid showing pressure release valve (PRV) location |
3. Main Lid Assembly
This is the only other area that gas could be leaking from in the FermZilla. As previously mentioned, one of the great things about the design of the All Rounder is it's simplicity, meaning there's a very small number of places that can cause air leaks.
Stainless Handles
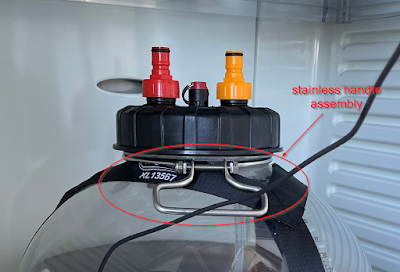
First of all, make sure your stainless handles are not done up too tight. If they are too tight this can cause the opening of the FermZilla to become warped, so the lid doesn't sit in and seal tightly and air will leak out the sides.
 |
| Fermzilla lid showing stainless steel handle assembly |
Lid Assembly Leak Troubleshooting
Before doing any further troubleshooting with the lid assembly, be sure to release any pressure within the FermZilla by pulling the pressure release valve - if you remove the lid collar whilst there's still pressure inside the lid assembly will likely fly off with great force which could cause injury.
After releasing pressure, unscrew the lid collar then remove the lid. Check the following things on the lid;
- Make sure the surfaces around the outside edge of the lid are free from any debris, or burrs which are small bits of plastic some times left over from the manufacturing/moulding process. They can be removed with a stanley knife and/or fine grit sandpaper.
- Ensure the rubber gasket is seated in the groove.
- Ensure the gasket is free from dirt/debris or anything else that could prevent it from sealing on the lid opening of the FermZilla
- Put plenty of food grade lubricant around the lid and over the gasket.
- Re-attach the lid - press it down firmly and ensure all edges of the lid are sitting inside the lid opening of the FermZilla.
- Re-attach the lid collar - do it up by hand but don't over tighten it.
Once you've done this, you can let the pressure build up naturally (if fermentation is still going) or you can attach a gas line from your CO2 bottle and pressurise that way.
A common question I found I was asking myself when looking for leaks is "is it a leak, or is the gas being absorbed into the beer?".
The answer to this is pretty simple - if you're seeing a slight reduction in pressure over a long period - eg. 24-48 hours then this would likely be absorption or variations in ambient temperature affecting the pressure. If you're seeing the pressure drop to 0 then you have a leak.
The first and only leak I've experienced with my FermZilla was by not having one of the plastic carbonation caps done up tightly enough.


No comments:
Post a Comment