
.png)
When starting out, most homebrewers opt to package their finished beers into bottles. It's almost inevitable that at some point down the track, most will start looking into options for kegging their beer - to save time and the hassle of endlessly cleaning bottles.
Why Convert a Fridge into a Kegerator?
A kegerator is a refrigerator that has been converted to serve beer from kegs. You can purchase ready-made kegerators (like the KegLand Series X), but it can be much more cost-effective to buy a used or second-hand fridge (or use one you already have) and convert it to a kegerator yourself. This is something we've done ourself so we've put together this guide to walk you through the process and share some tips we've learned from our experience.
 |
| Our custom made Kegerator |
What You Need
Here's what you'll need to begin your kegging journey:
- A fridge (obviously). There are often plenty of used fridges available on used marketplaces for cheap.
- Beer keg(s) - the 19L Cornelius "corny" kegs are the most popular, but you can also use commercial kegs. For the purpose of this post we'll be focusing on corny kegs.
- A carbon dioxide (CO2) gas bottle.
- A CO2 gas regulator.
- Tap/Pluto Gun - the most common option is to fit a tap to the door of the fridge, but you can also use a handheld pluto/beer gun if you don't want to drill holes in the fridge.
- Gas Line/tubing to connect your gas regulator to your keg(s).
- Beer Line/tubing to connect your keg to your tap(s) and/or pluto/beer gun(s).
- Gas and liquid disconnects that are used to attach the beer and gas lines to your keg on the keg posts).
- Stepless clamps or push in fittings that are used to secure the hose connection to your gas/liquid disconnects and/or CO2 regulator.
Detailed Parts List
1. Choosing the Right Fridge
Make sure the fridge you select will fit into it's designated area, and if opting for a smaller fridge, make sure the internal dimensions are large enough to accommodate the type and size kegs you plan on using.
Another consideration is whether you get a fridge only, or a fridge/freezer combination. A fridge with incorporated freezer can be good for storing things like hops. The fridge only option offers a little more space inside for storing more kegs or other things like bottles/cans (or literally anything else that requires refrigeration).
2. CO2 Gas Bottle and Regulator
The CO2 gas in your system is used for two primary purposes: carbonating the beer in your keg(s) and providing pressure to dispense the beer out of the keg. The pressure inside a CO2 bottle is incredibly high, so a regulator is used to set or control (regulate) the pressure coming out.
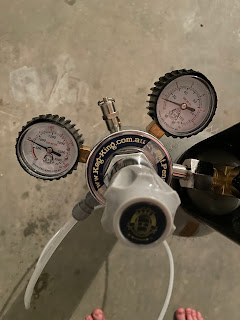 |
| A CO2 gas regulator attached to a 6kg CO2 bottle |
3. Cornelius "Corny" Keg
Probably the most common type of keg used in homebrewing and kegerator setups. They typically hold 19L (but other sizes are available) and have two posts on the top. The post labelled "In" is for connecting the gas line into, and the other, labelled "Out" is where the beer is drawn from via a long metal tube that reaches to the bottom of the keg.
 |
| The Cornelius "Corny" keg is the most popular keg type used in homebrewing |
PET plastic alternatives like the Oxebar from KegLand or the King Keg from Keg King are becoming increasingly popular, and are significantly cheaper than their stainless steel counterparts.
4. Quick Disconnects and Lines/Tubing
Disconnects are used to clip onto the posts of your corny keg. They are colour coded with grey being for gas, and black being for liquid. The disconnect attaches to the corny keg post, and then the beer/gas line attaches to the disconnect.
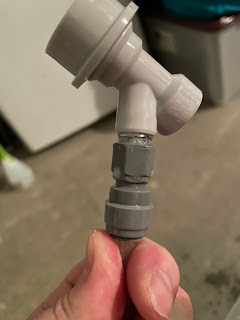 |
| A grey (gas) disconnect with dutotight push in fitting |
The internal diameter (ID) of the gas lines is not important, but the internal diameter of the beer/liquid lines are. The smaller the diameter line, the shorter length you will need to balance your system to avoid constantly pouring super foamy beer. We'll cover this in more detail later.
5. Push In Fittings or Stepless Clamps?
Push in fittings are a great solution to make connecting beer and gas lines to disconnects quick and easy. Some people do find them problematic with leaks but they have not caused any problems in our experience with them.
We particularly like the KegLand Duotight integrated disconnects and use them exclusively in our kegerator setup. No tools are required to connect/disconnect the lines from them making them convenient and easy to use.
 |
| KegLand's Duotight integrated ball lock disconnects |
Stepless clamps work well, but can't be re-used, and require a special tool to clamp shut or remove. It can also be troublesome getting beer/gas line slid onto the barb of the disconnect prior to putting the clamp on.
6. Taps and Shanks
Most people know what beer taps are, but you will also need a shank to attach the tap to. The shank is a long piece of metal that will go through the fridge door that the beer passes through. The tap attaches to one end, and the beer line attaches to the other.
 |
| An example of a beer tap shank |
Note: Make sure you get a shank that is long enough to protrude through the fridge door.
7. Pluto/Beer Gun(s)
These are an alternative to beer taps and allow you to dispense beer from a handheld device or gun style apparatus. This avoids the need for drilling holes into the fridge door if you can't or don't want to. We initially went with this option but got tired of having to open the fridge door to access the gun - we'd recommend going straight for taps - it's just better, but you do have this as an alternative option.
 |
| A Beer/Pluto gun is a good alternative if you don't want to mount taps |
Drilling Holes in Your Fridge
This is always an area of concern for people. The last thing you want to do is put a drill bit through a coolant/gas line in your fridge, but with some careful consideration and research you can minimise the risk of this happening. There are plenty of videos on YouTube with details on how to look for pipe outlines when defrosting the fridge, or drilling small pilot holes to check.
Drilling holes in/through the door is generally safe to do - as long as you have a standard/basic fridge without any electrical features on the inside of the door (like lights or water dispensers). Never drill a hole in the rear of the fridge as this is where all the wiring and plumbing for your fridge will be.
If you will be drilling holes, make sure you use a drill bit designed for metal. We found that drill bits designed for wood did not work well for cutting through the thin metal outer skin of the fridge door.
 |
| Inside door of fridge with beer lines connected to shanks |
The size hole you need will be determined by the size of the shank you use. We used the Kegland 100mm shank which requires a 22mm hole.
We also drilled a hole in the side of our fridge for the gas line to feed through - we initially had the gas line running through the door but got sick of the door not closing and sealing properly.
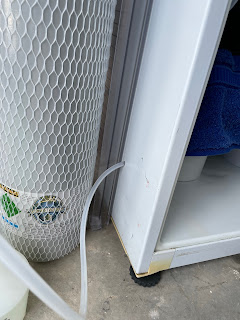 |
| 8mm hole drilled in side of fridge to feed 8mm gas line into fridge |
Step-by-Step Guide
So you've got all your parts, drilled the hole(s) you need in your fridge so now it's time to put it all together.
1. Attach the CO2 Regulator to the CO2 Bottle
- Attach the regulator to the gas bottle, and tighten well with a spanner. Check out our other post on how to set and adjust the pressure on your regulator.
2. Attach your Gas Line to your CO2 Regulator
- Cut a length of gas line that is long enough to reach from the CO2 regulator, into the keg(s) inside the fridge.
- Connect one end of the gas tube/line onto the gas outlet of the CO2 regulator.
 |
| Gas line attached to CO2 regulator via Duotight push in fitting |
- Feed the length of the gas line into the fridge.
- You can use T-pieces if necessary to split the line so you can have multiple disconnects to be able to connect gas to multiple kegs.
3. Attach Gas Disconnect(s) to the Gas Line(s)
- Attach your gas disconnect(s) onto the other end of the gas line(s) and then connect them to the "In" post of the keg(s).
- If you have trouble getting the disconnect onto the keg post, put a small amount of food grade lubricant on the small black O-ring of the keg post.
4. Insert the Tap Shank
- If you're using taps, fit the tap shank through the hole(s) you've drilled in the fridge door.
 |
| Beer line attached to rear of tap shank via Duotight push in fitting |
- Fit the tap to the outside end of the shank, and attach your beer line to the other end of the shank.
4. Attach Liquid Disconnect(s)
- Attach your liquid disconnect(s) to the other end of the beer line(s)
 |
| Liquid line attached to disconnect and connected to corny keg Out post |
- Connect the liquid disconnect to the "Out" post on the keg(s)
- If you have trouble getting the disconnect onto the keg post, put a small amount of food grade lubricant on the small black O-ring of the keg post.
5. Turn On the Gas & Check for Leaks
- Now for the fun part - turn on your gas at the gas bottle and check for any leaks.
- Big leaks will be easy to identify via an audible hissing sound.
- Smaller leaks may be more difficult to diagnose. A good way to tackle leaks is to spray connections and fittings with a soapy water solution and looking for bubbles forming/popping.
6. Balancing Your Kegerator System
A common term you may hear when talking about kegerator and draught beer systems is "balancing" them. This refers to getting the right amount of resistance in the beer flow to prevent excessive foaming when pouring. Too little resistance and you'll get loads of foam. Too much resistance and your beer will lose fizz/carbonation and take too long to pour.
There are loads of calculators online to help work this out - but the easiest method is to increase the length of your beer lines, and decrease the internal diameter of the line itself. We've found around 2 - 2.5m of 4mm internal diameter beer line works well for us - serving at 2-3c and 10-12psi of pressure.
Cost Breakdown
- Used Fridge: $50 - $200
- Cornelius Keg: $30 - $100
- CO2 Bottle: $70 - $120
- CO2 Regulator: $40 - $80
- Beer Tap and Shank: $40 - $60
- Lines & Tubing: $10 - $30
- Disconnects & Fittings: $20 - $50
- Total Estimated Cost: $260 - $640
Conclusion
Converting a fridge into a kegerator is a rewarding project for any homebrewer looking to streamline their beer dispensing process. By following this step-by-step guide, you can save money and customize your setup to fit your needs. Remember to choose the right fridge, gather all necessary components, and follow safety precautions when drilling holes. Regular maintenance and balancing of your system will ensure you enjoy perfectly poured beer every time.
Whether you're a seasoned brewer or just starting out, transforming a fridge into a kegerator is a great way to enhance your homebrewing experience.
Related Articles


No comments:
Post a Comment